East Course at Bermuda Run Country Club
Designer: Ellis & Dan Maples
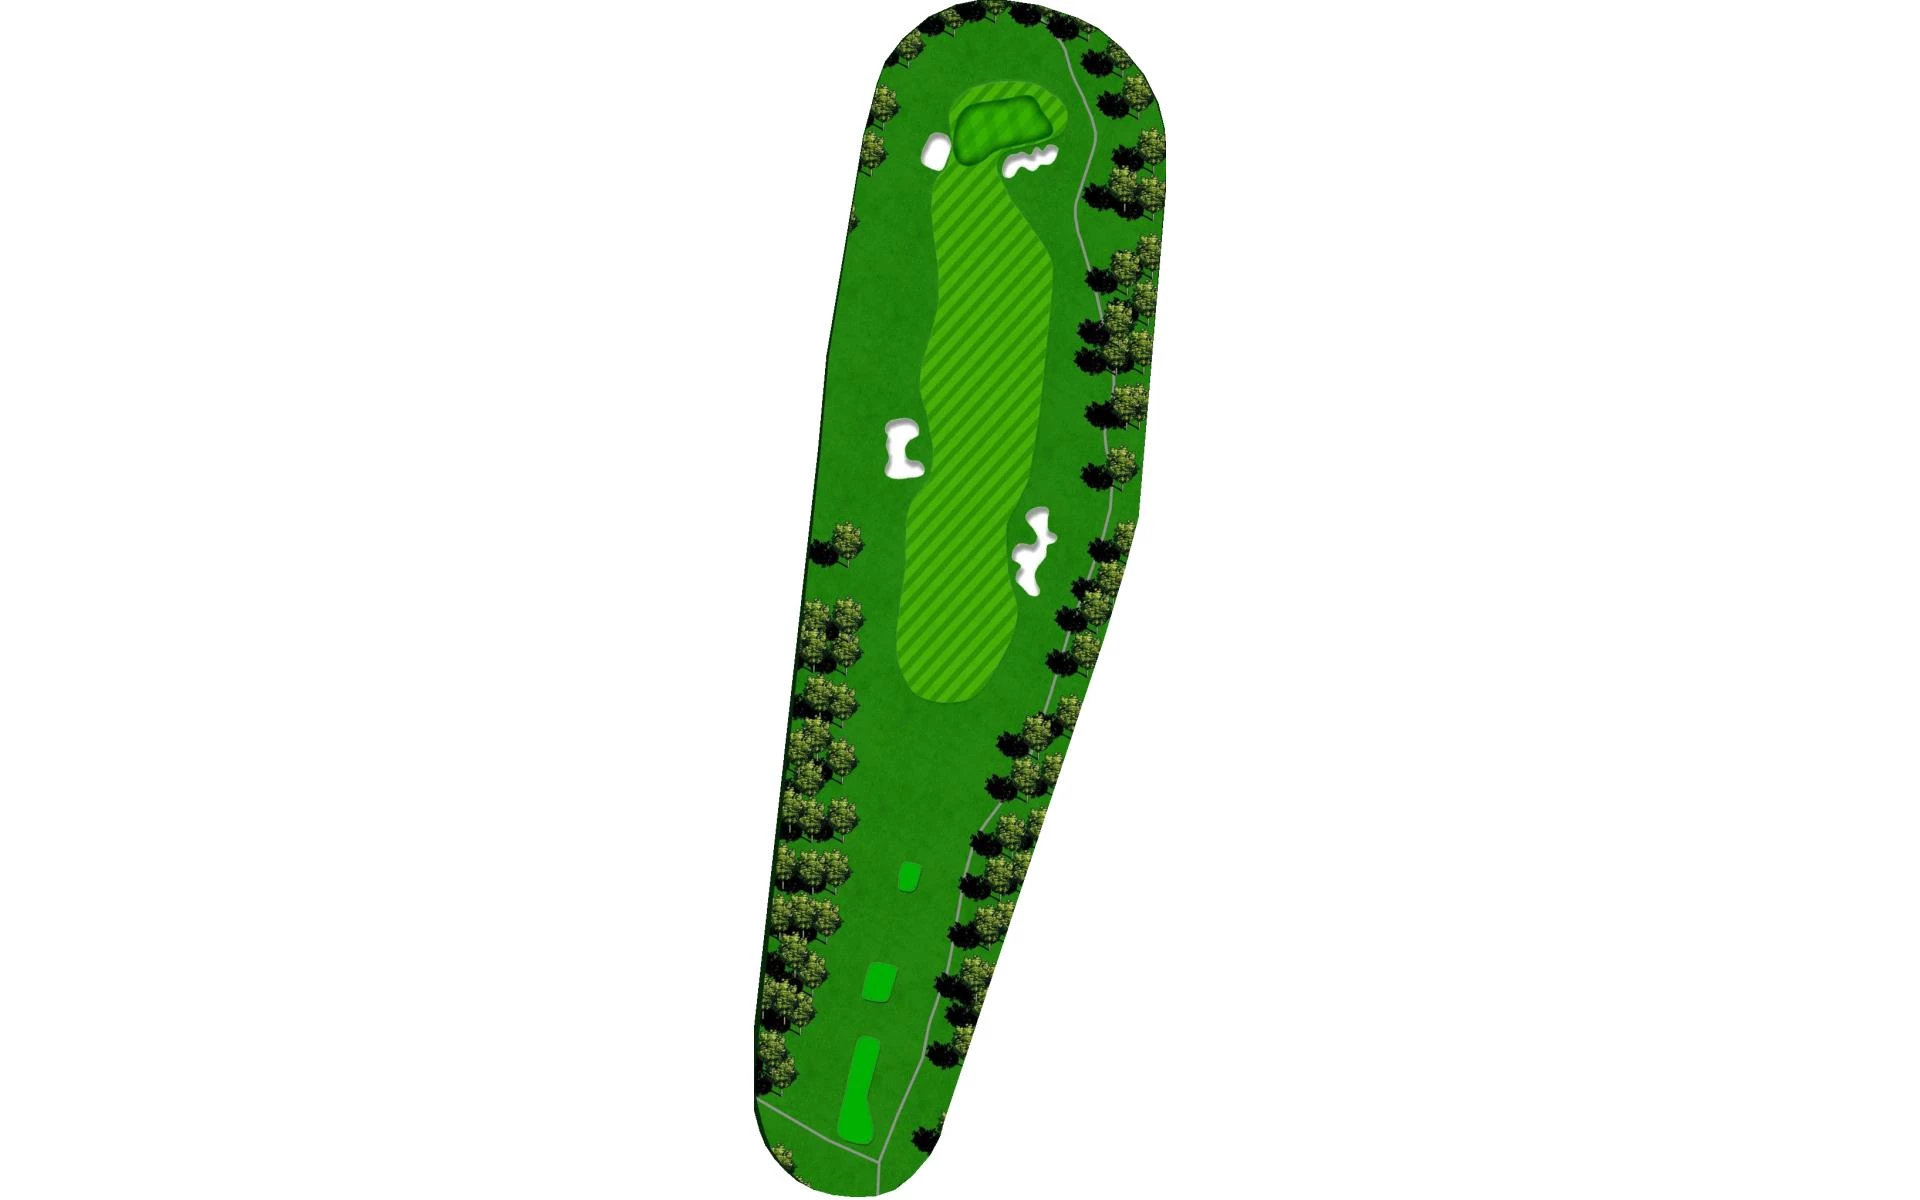
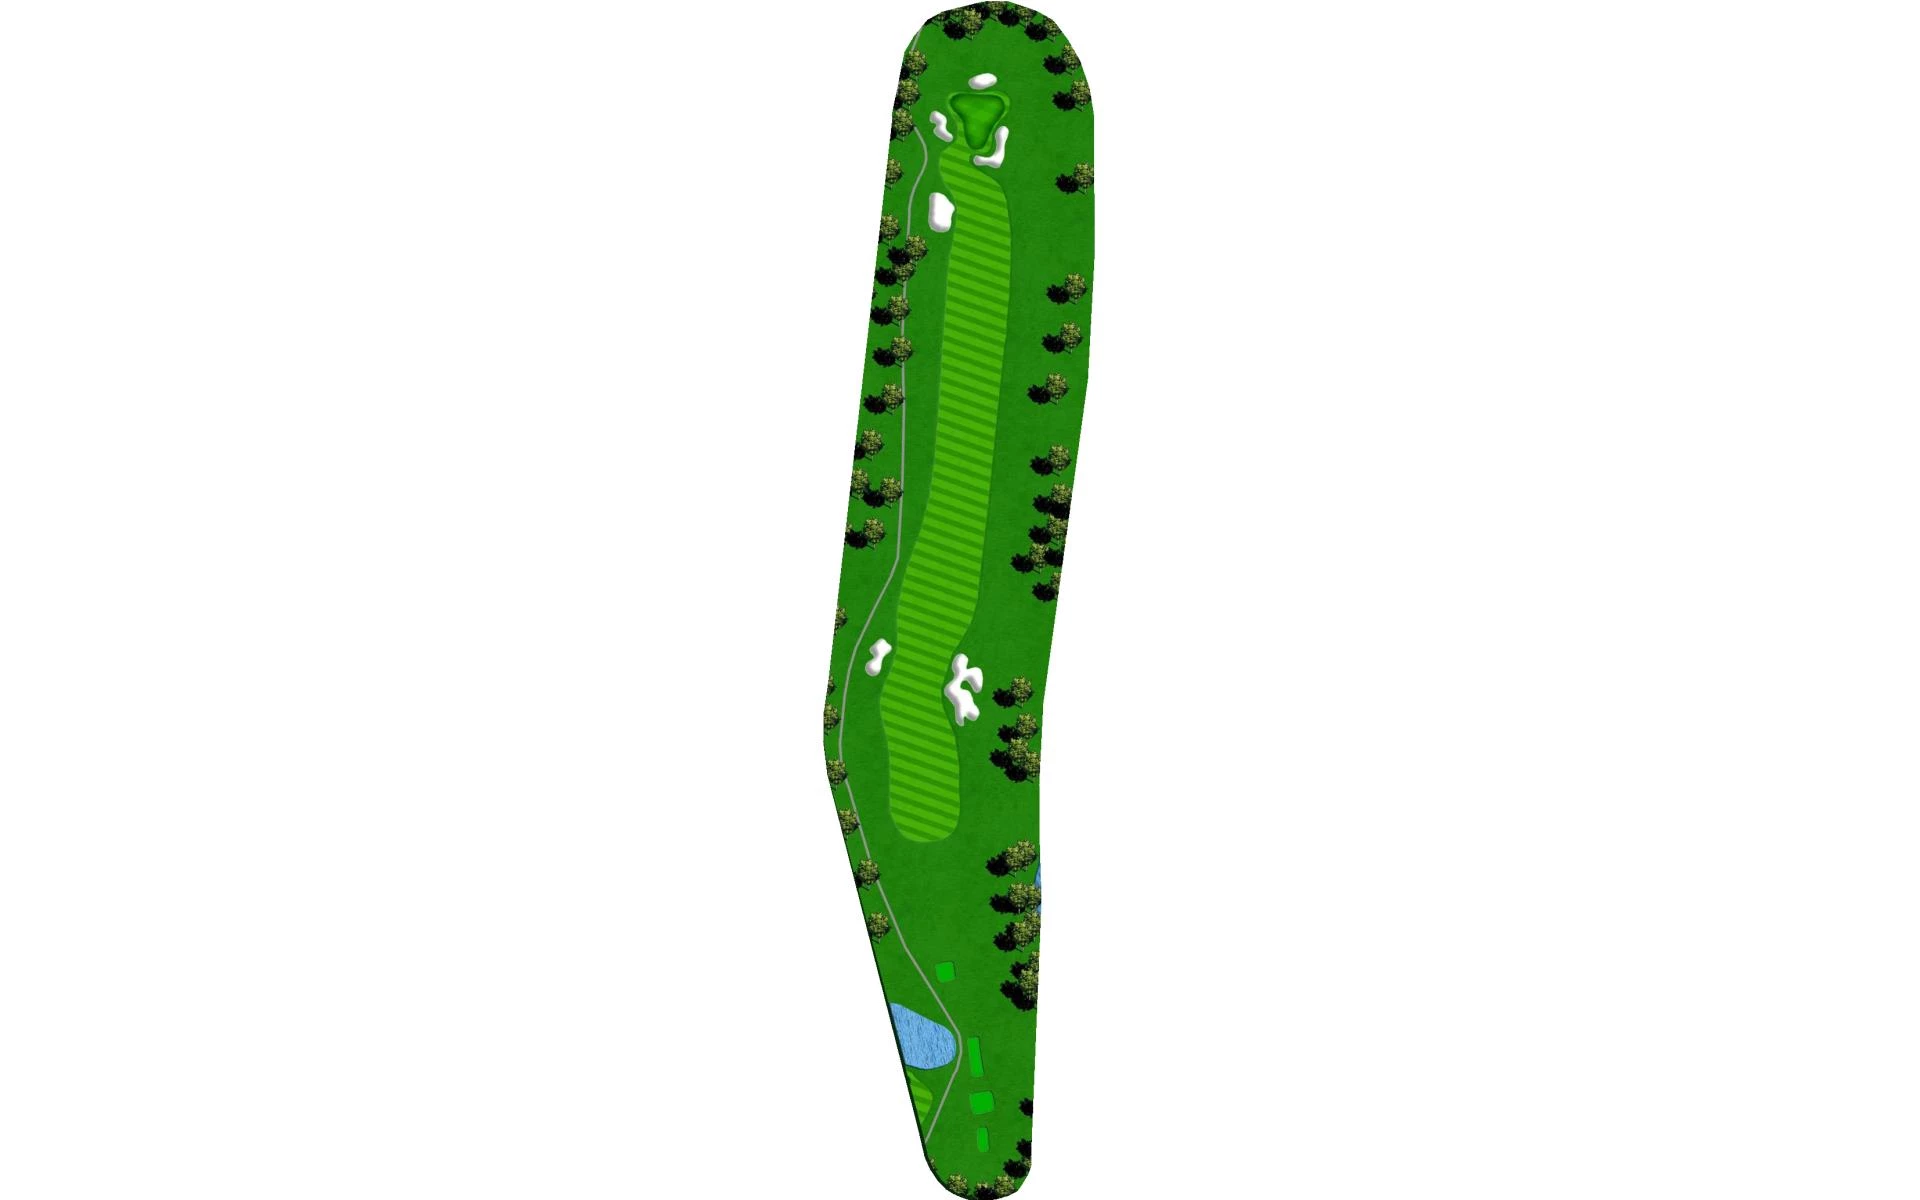
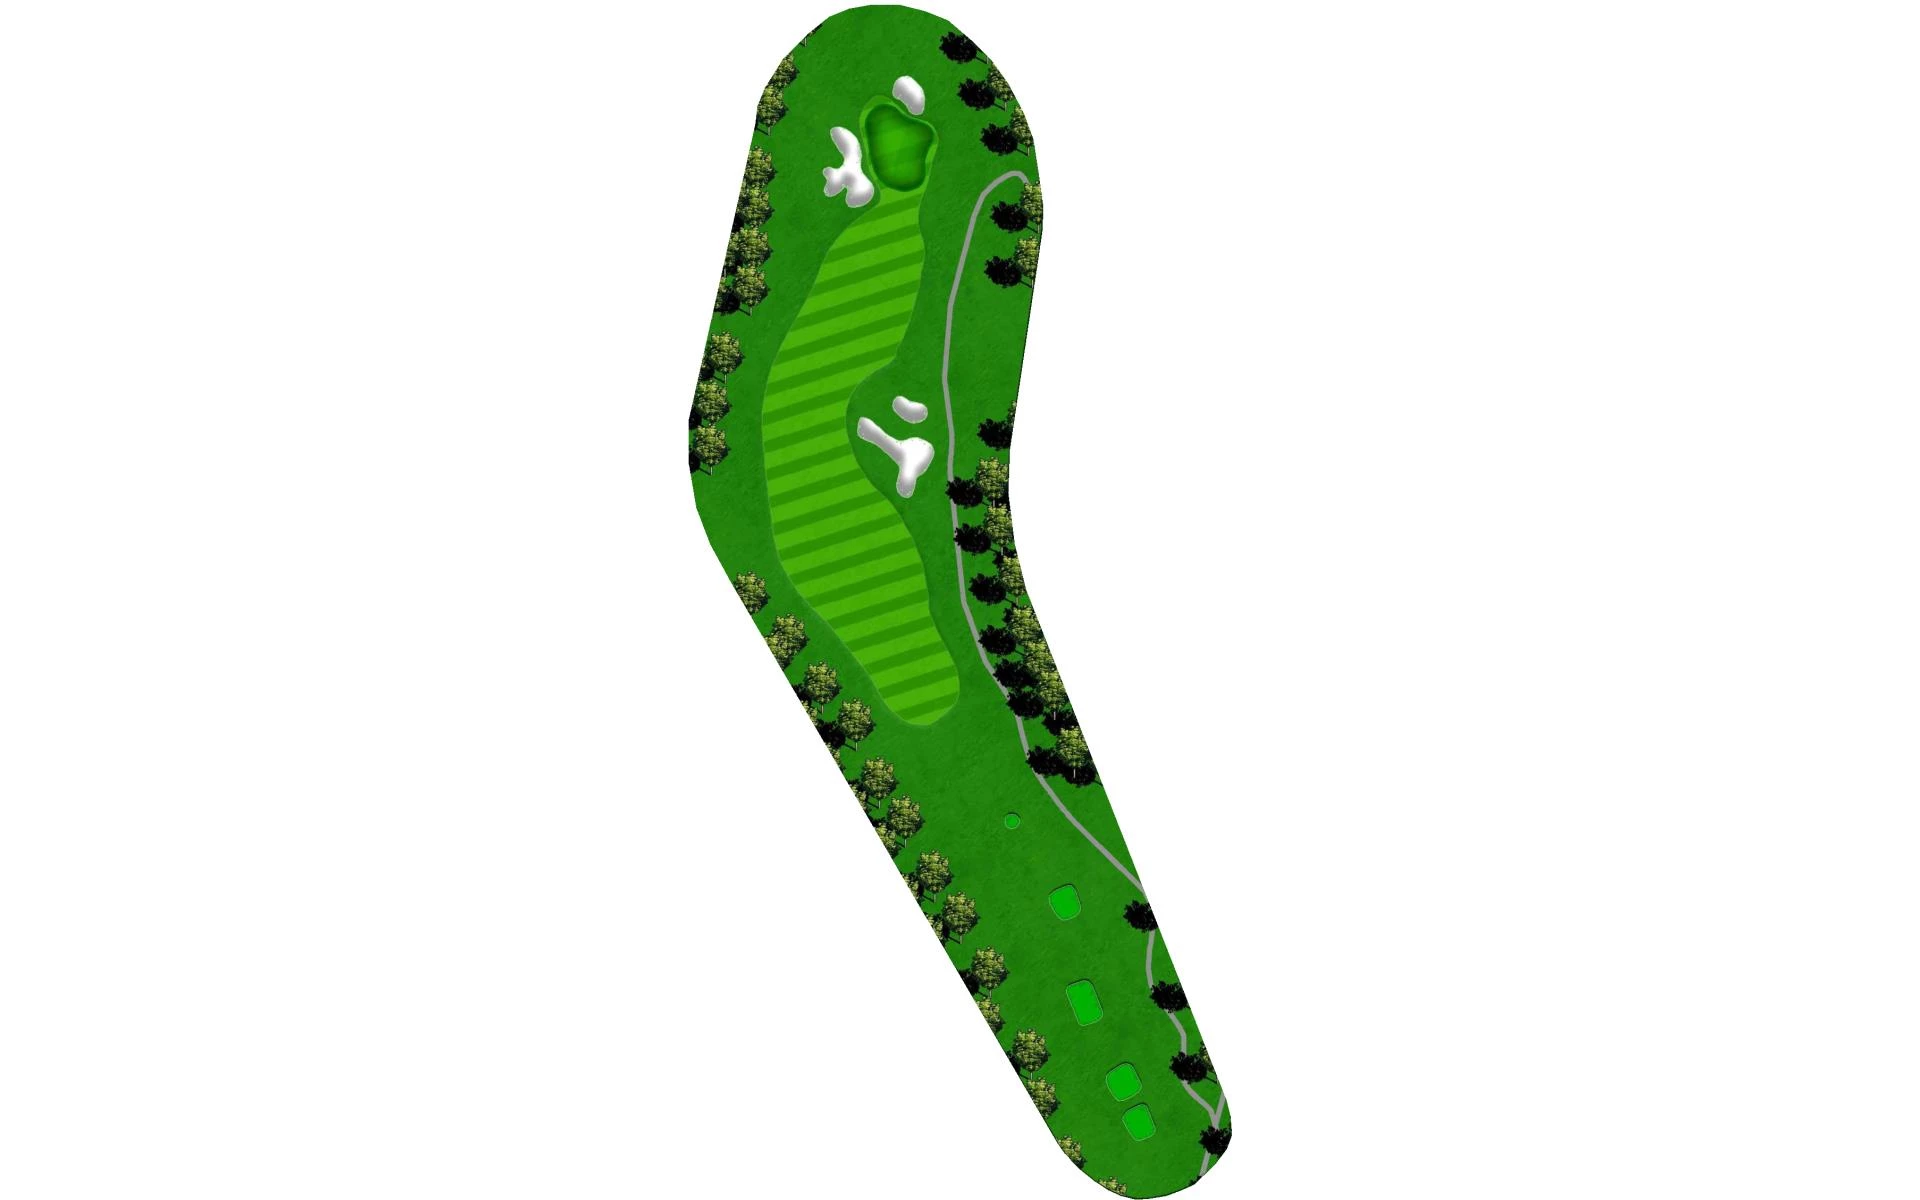
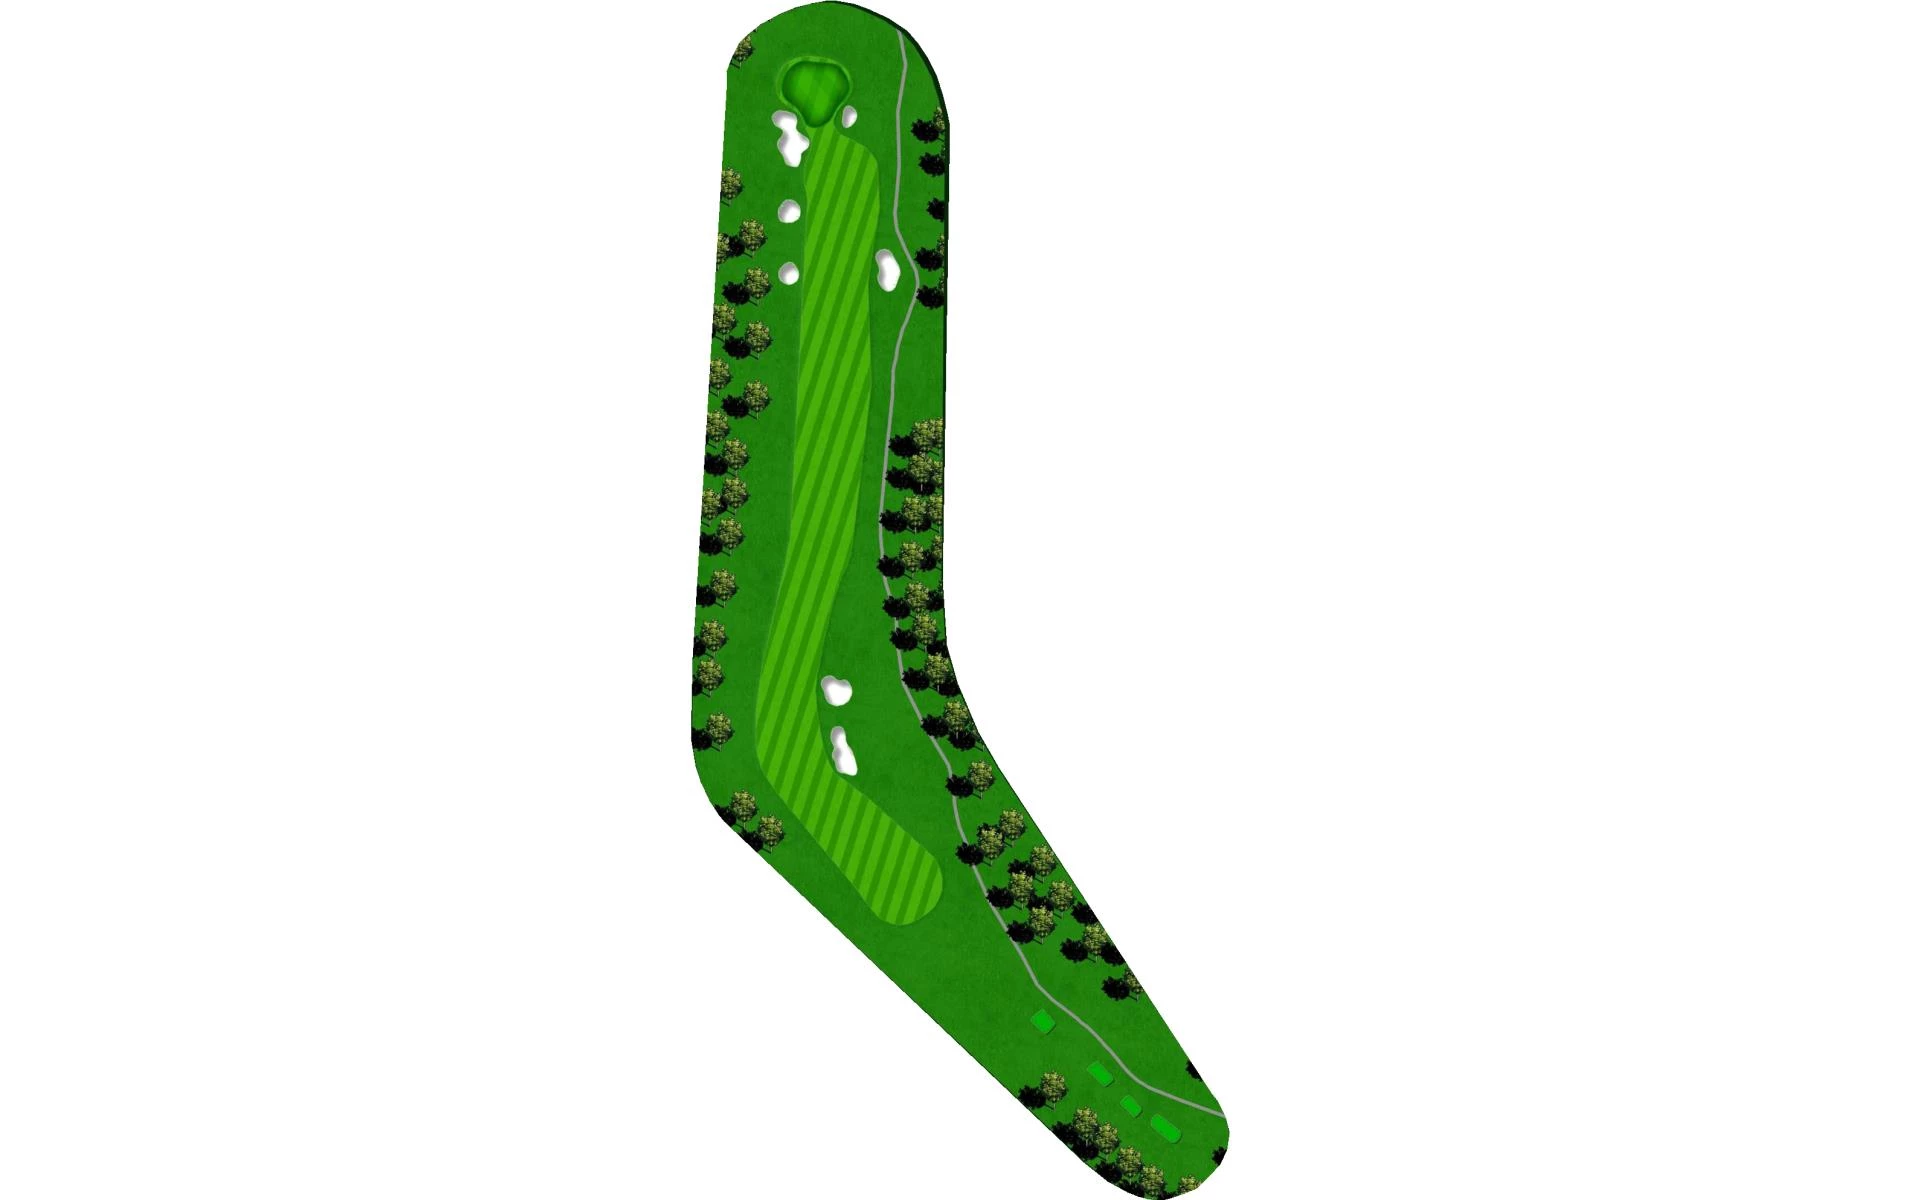
# 1 /
Par: 4
Yardage by Tee:
BLACK 393
BLUE 378
ORANGE 348
GOLD 302
WHITE 302
GREEN 219
Pro Tips
A generous landing area for the opening tee shot of the day allows for a full driver swing off the first hole. The approach shot is key here with bunkers both front and left of the green complex. Stay under the pin on your approach as going long will require a great deal of touch to a green that slopes back to front and from left to right. Play center to use the slope to help get you to a right hole location.
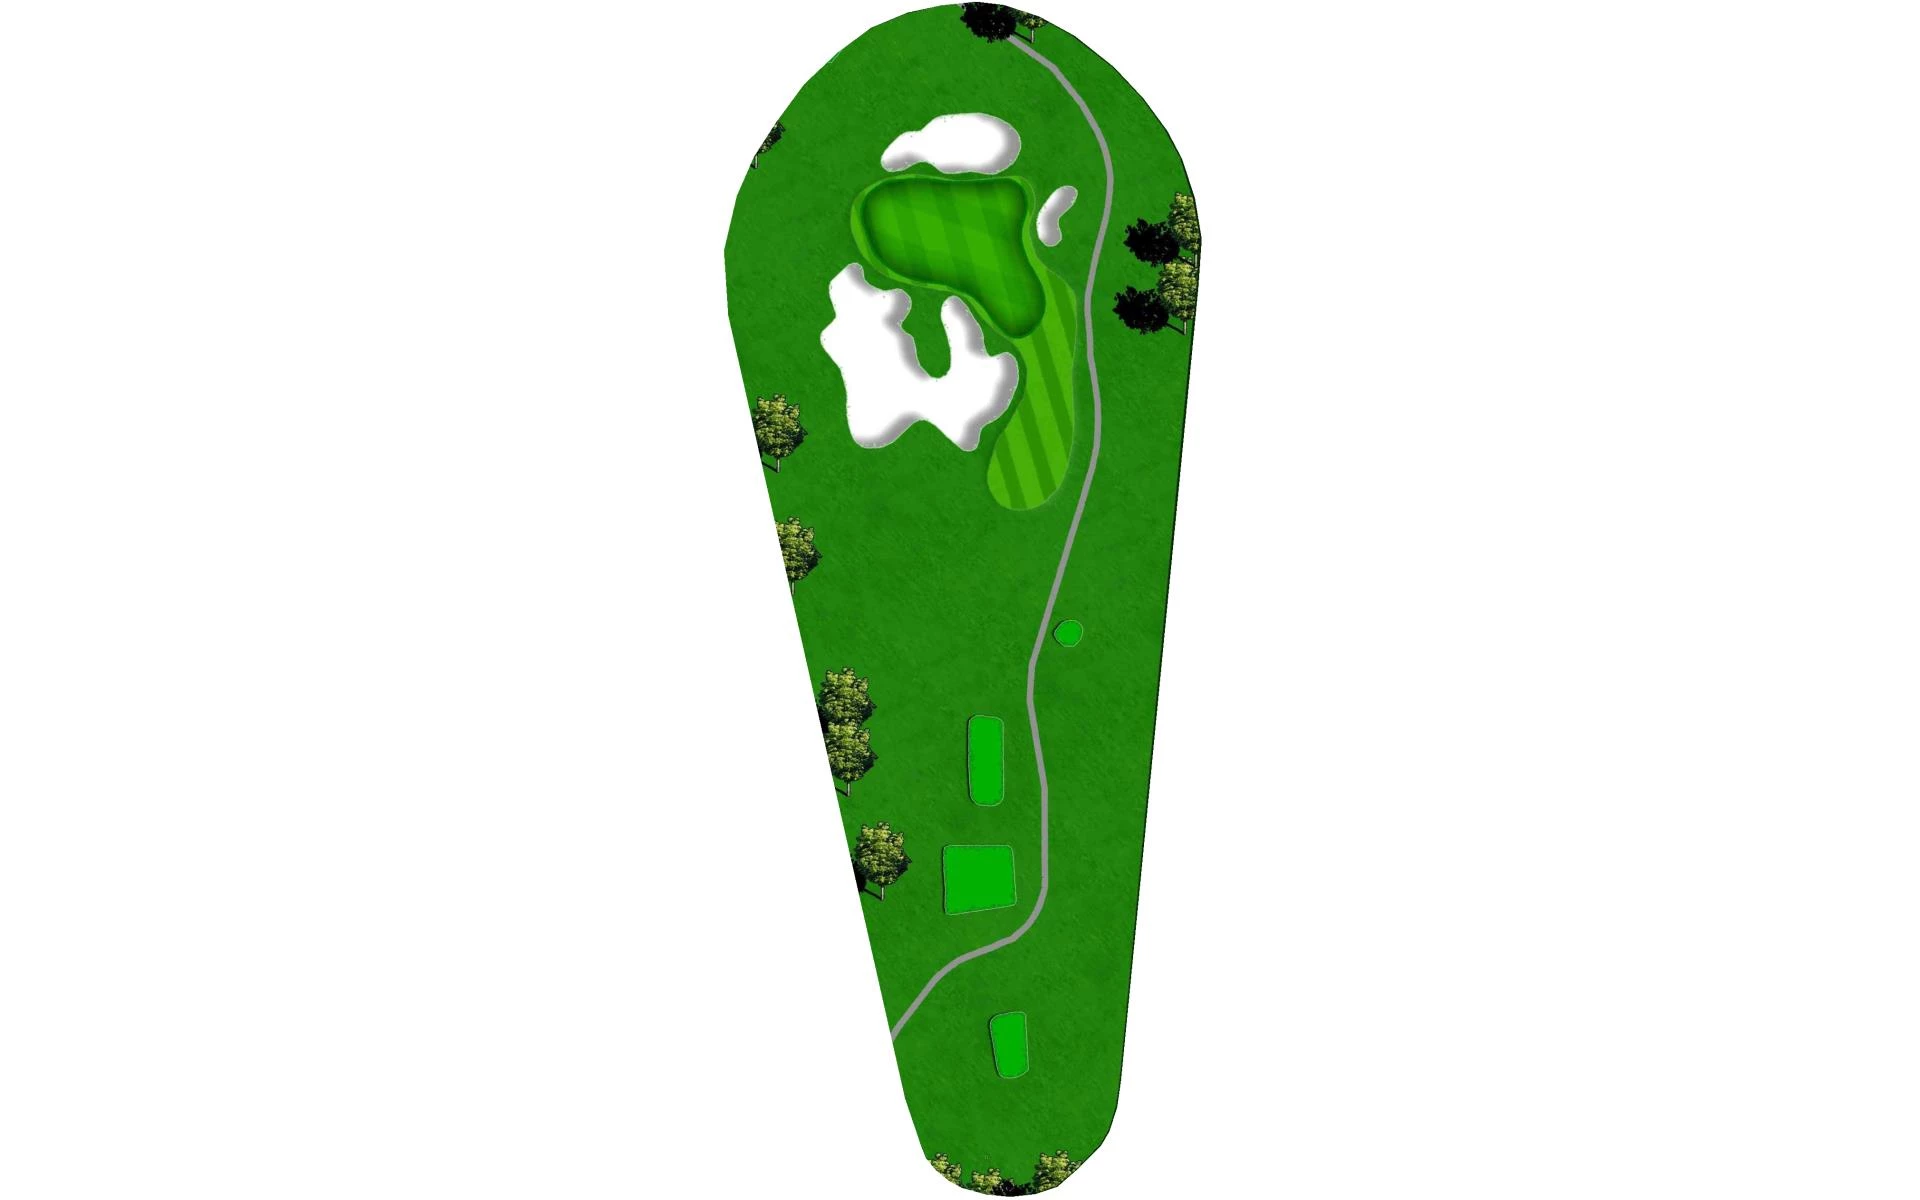
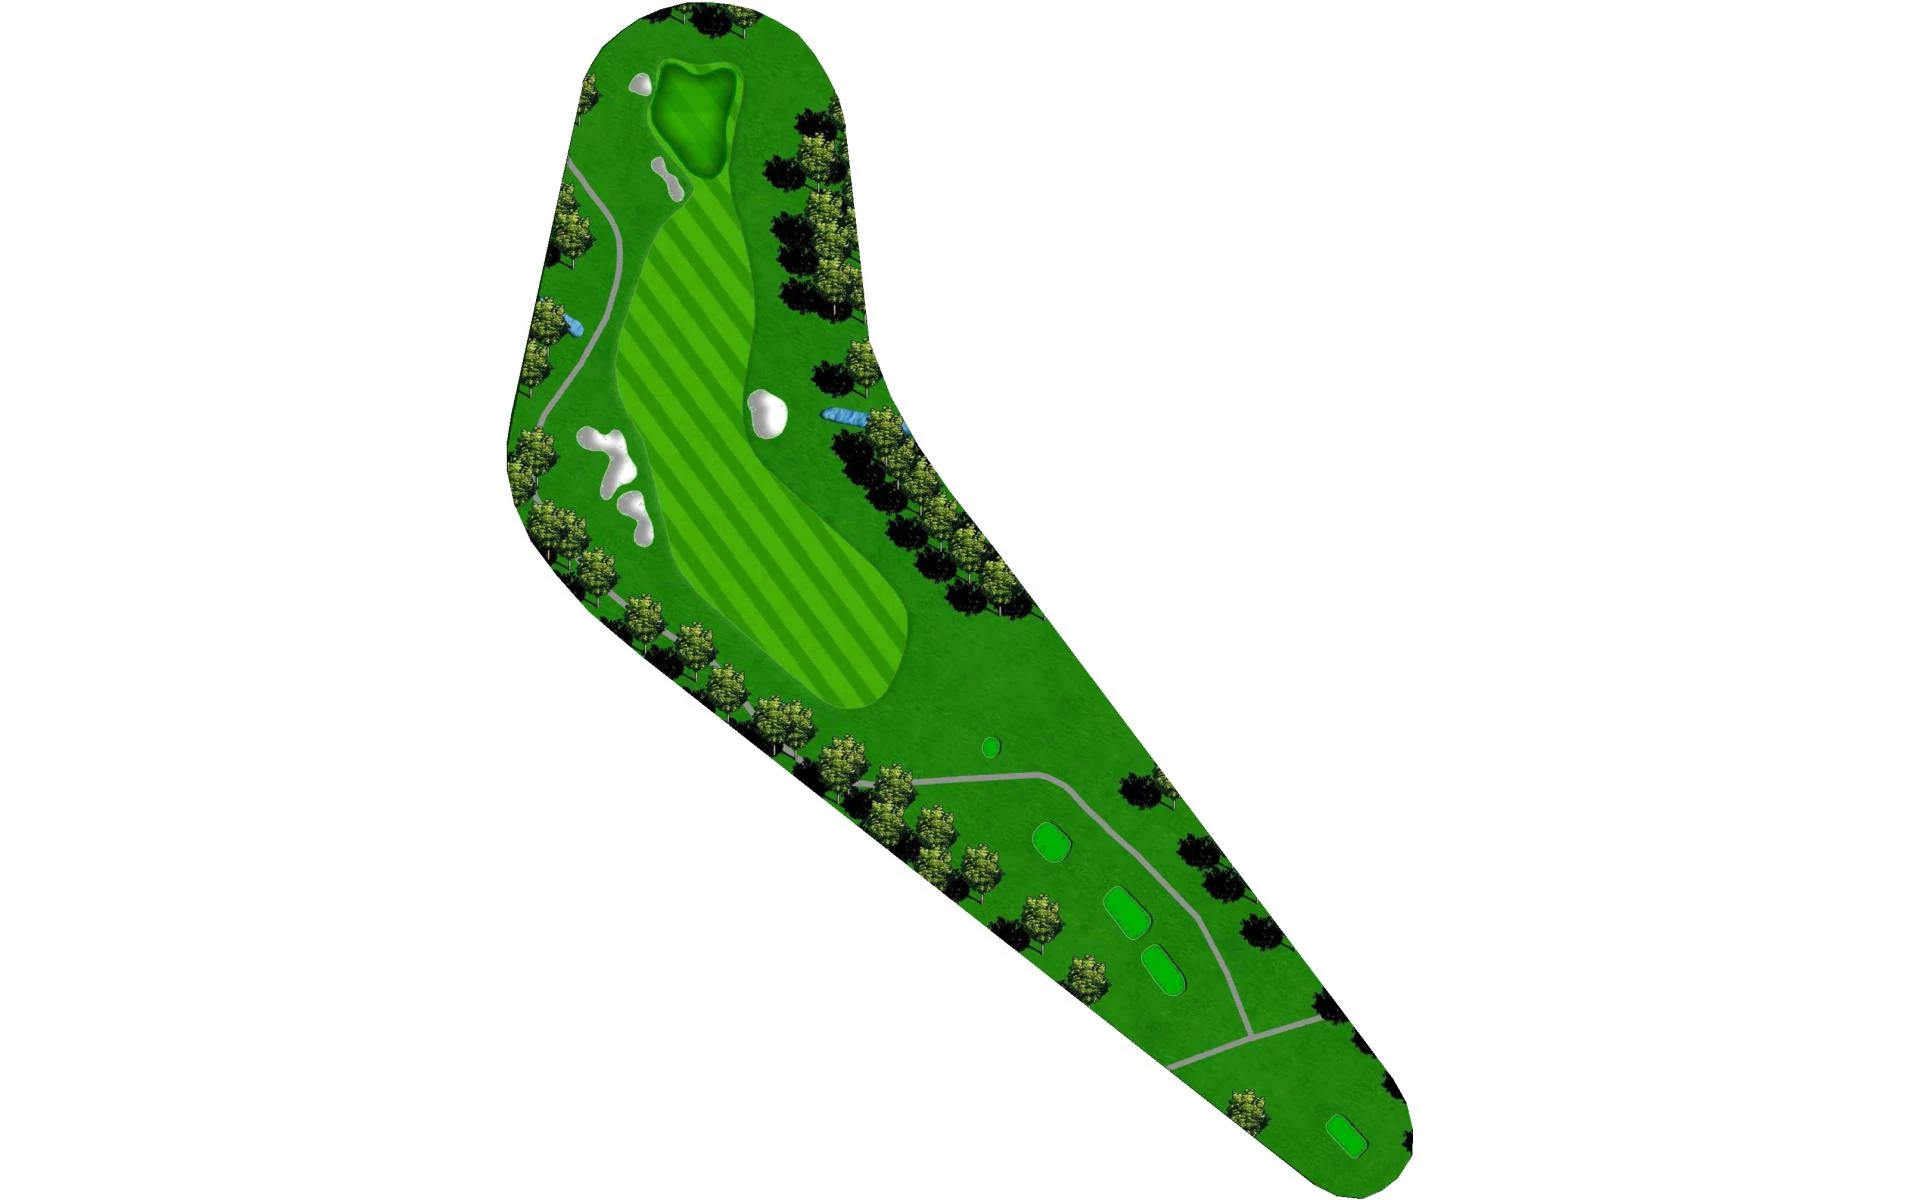
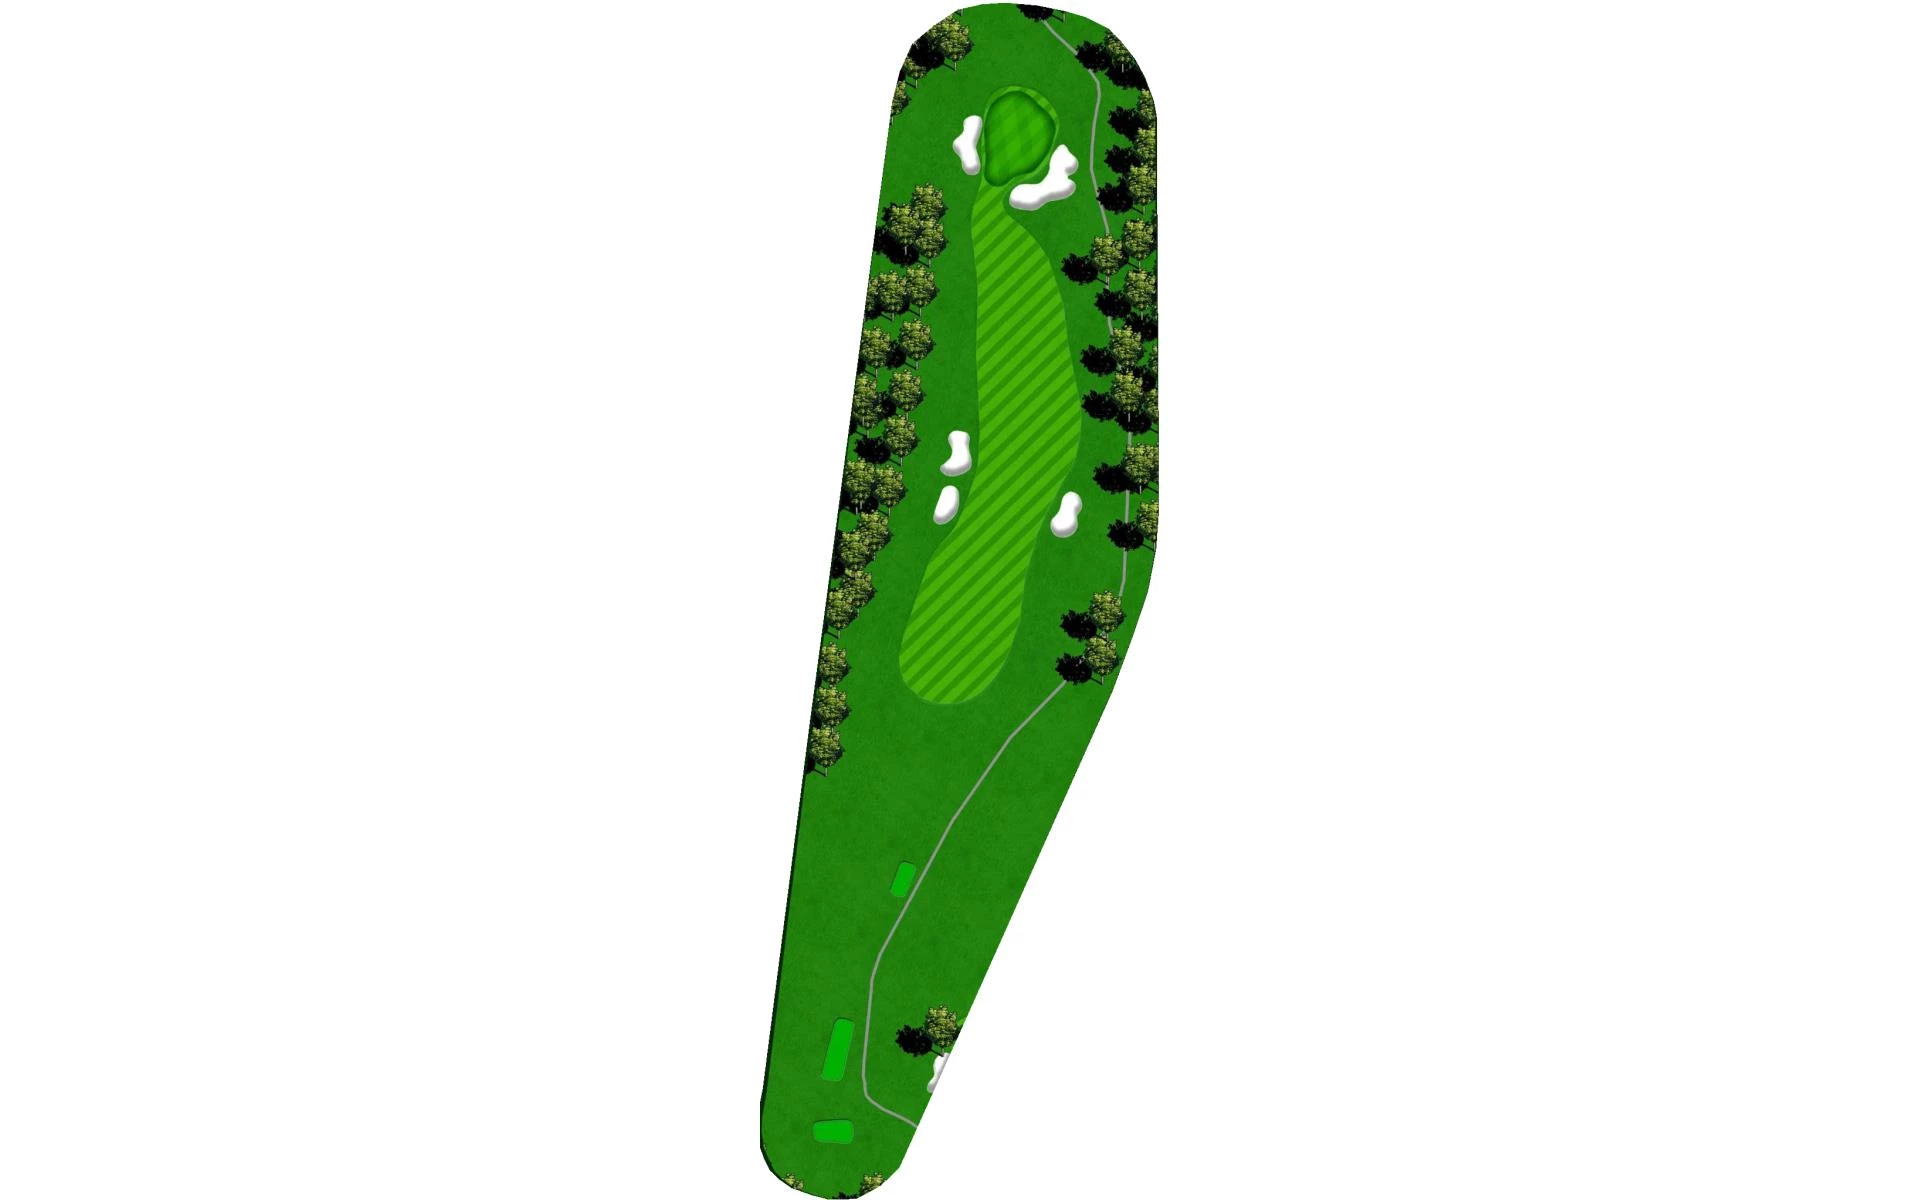
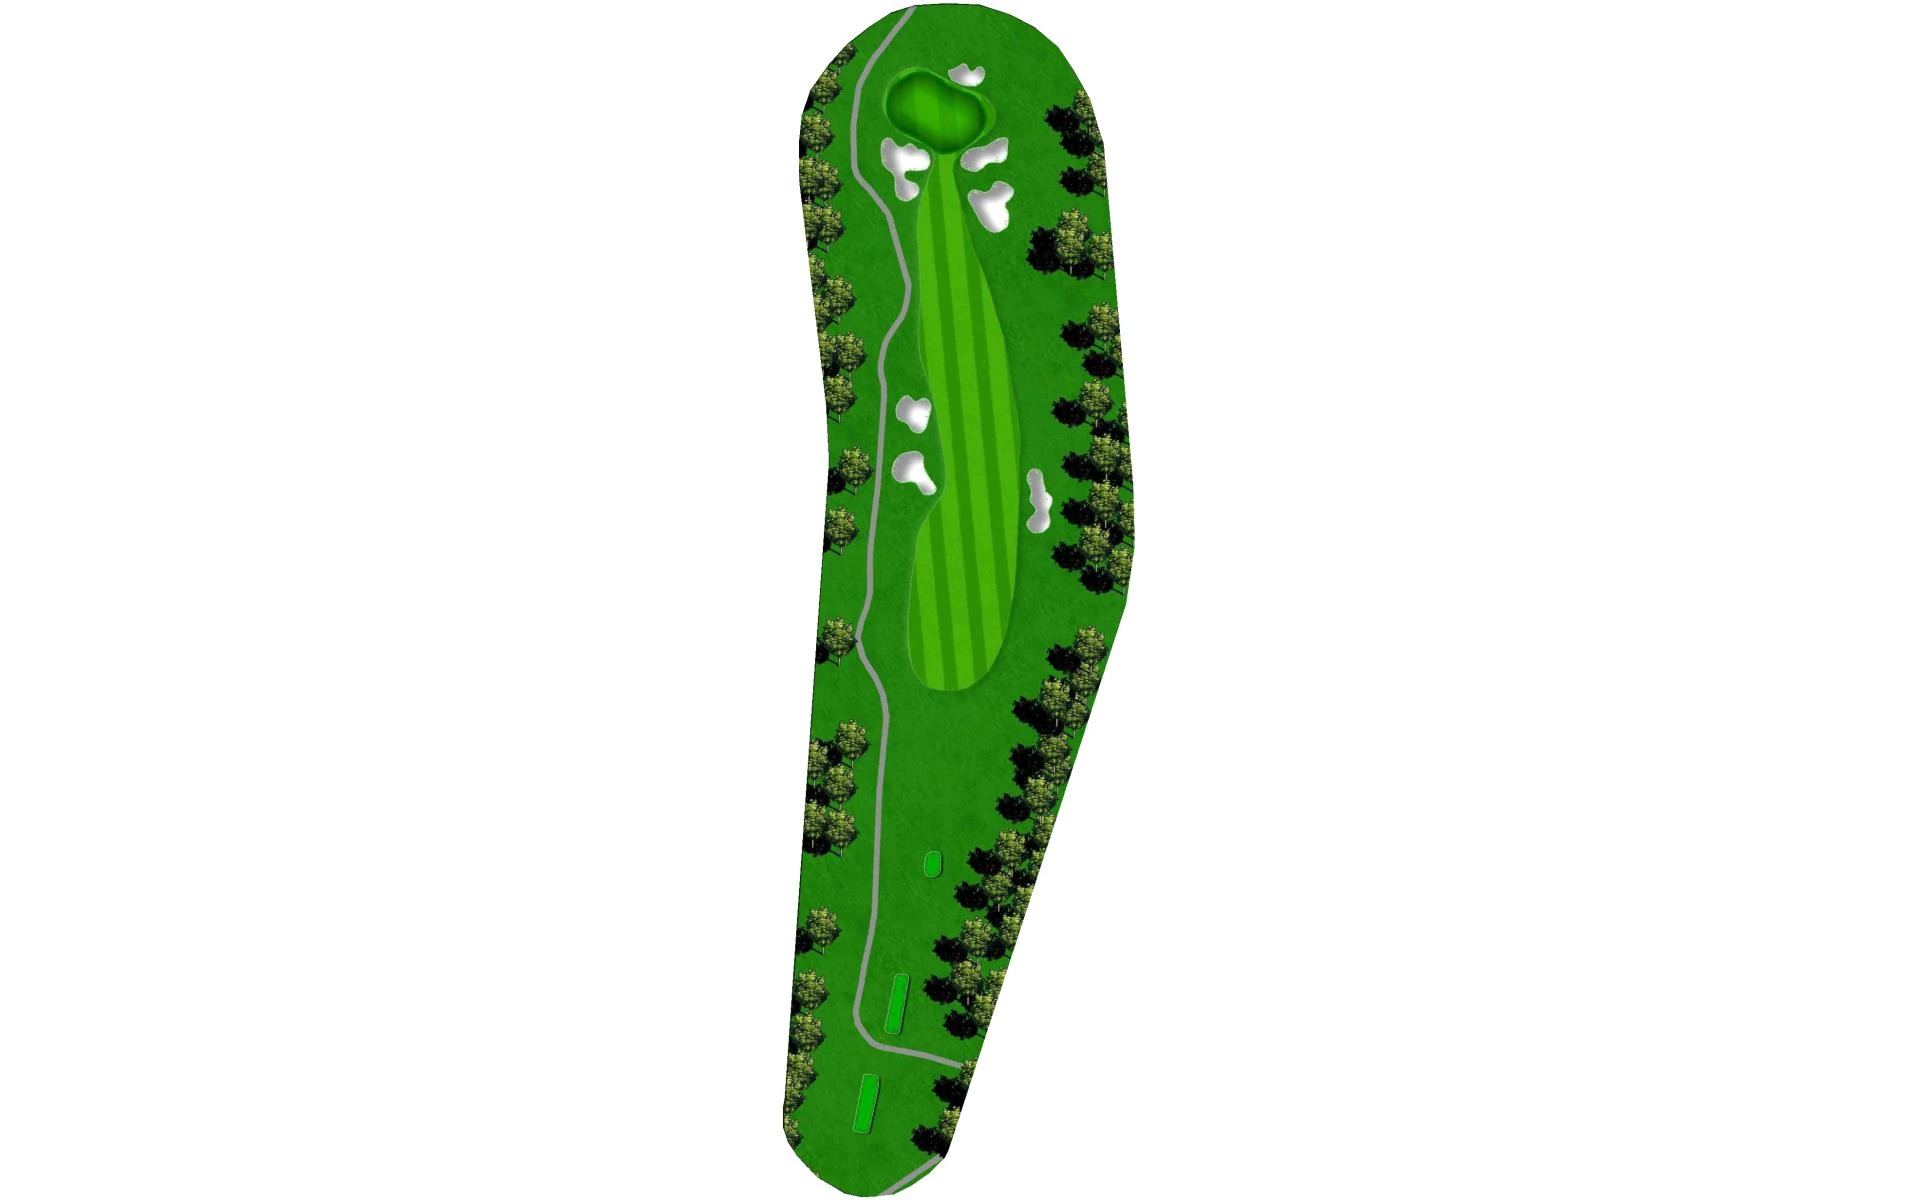
# 2 /
Par: 4
Yardage by Tee:
BLACK 432
BLUE 397
ORANGE 380
GOLD 310
WHITE 310
GREEN 285
Pro Tips
An uphill par 4 that plays a great deal longer than the indicated yardage on the scorecard. Favor the left center of the fairway for the tee shot as going up the right side will block access to an already elevated green.
# 3 /
Par: 3
Yardage by Tee:
BLACK 190
BLUE 149
ORANGE 128
GOLD 128
WHITE 117
GREEN 94
Pro Tips
Pay attention to the wind direction on the first par 3 of the day as being short of the green will end up in one of the bunkers guarding the putting surface. Depending on the pin location, be mindful of a ridge in the middle of the green that will feed the ball right or left.
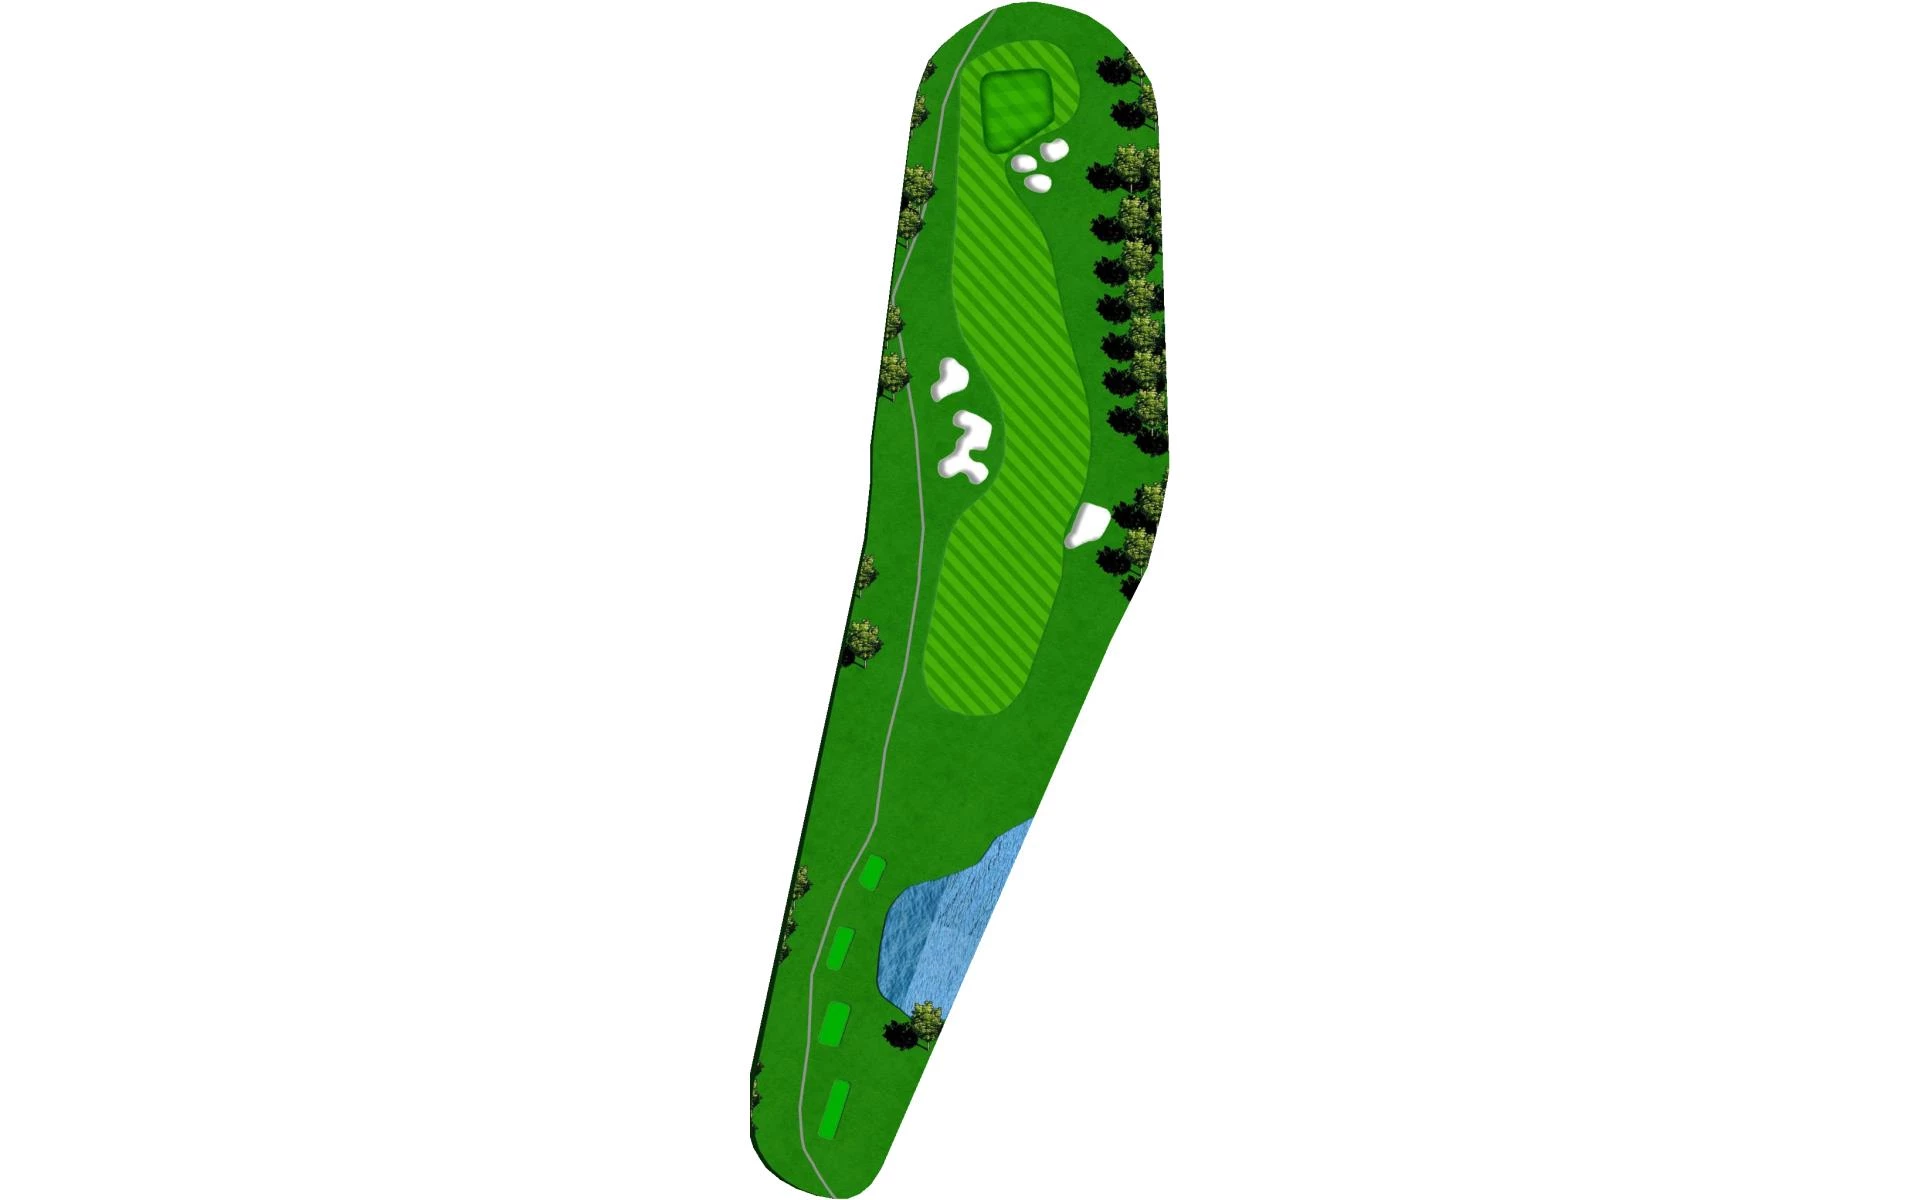
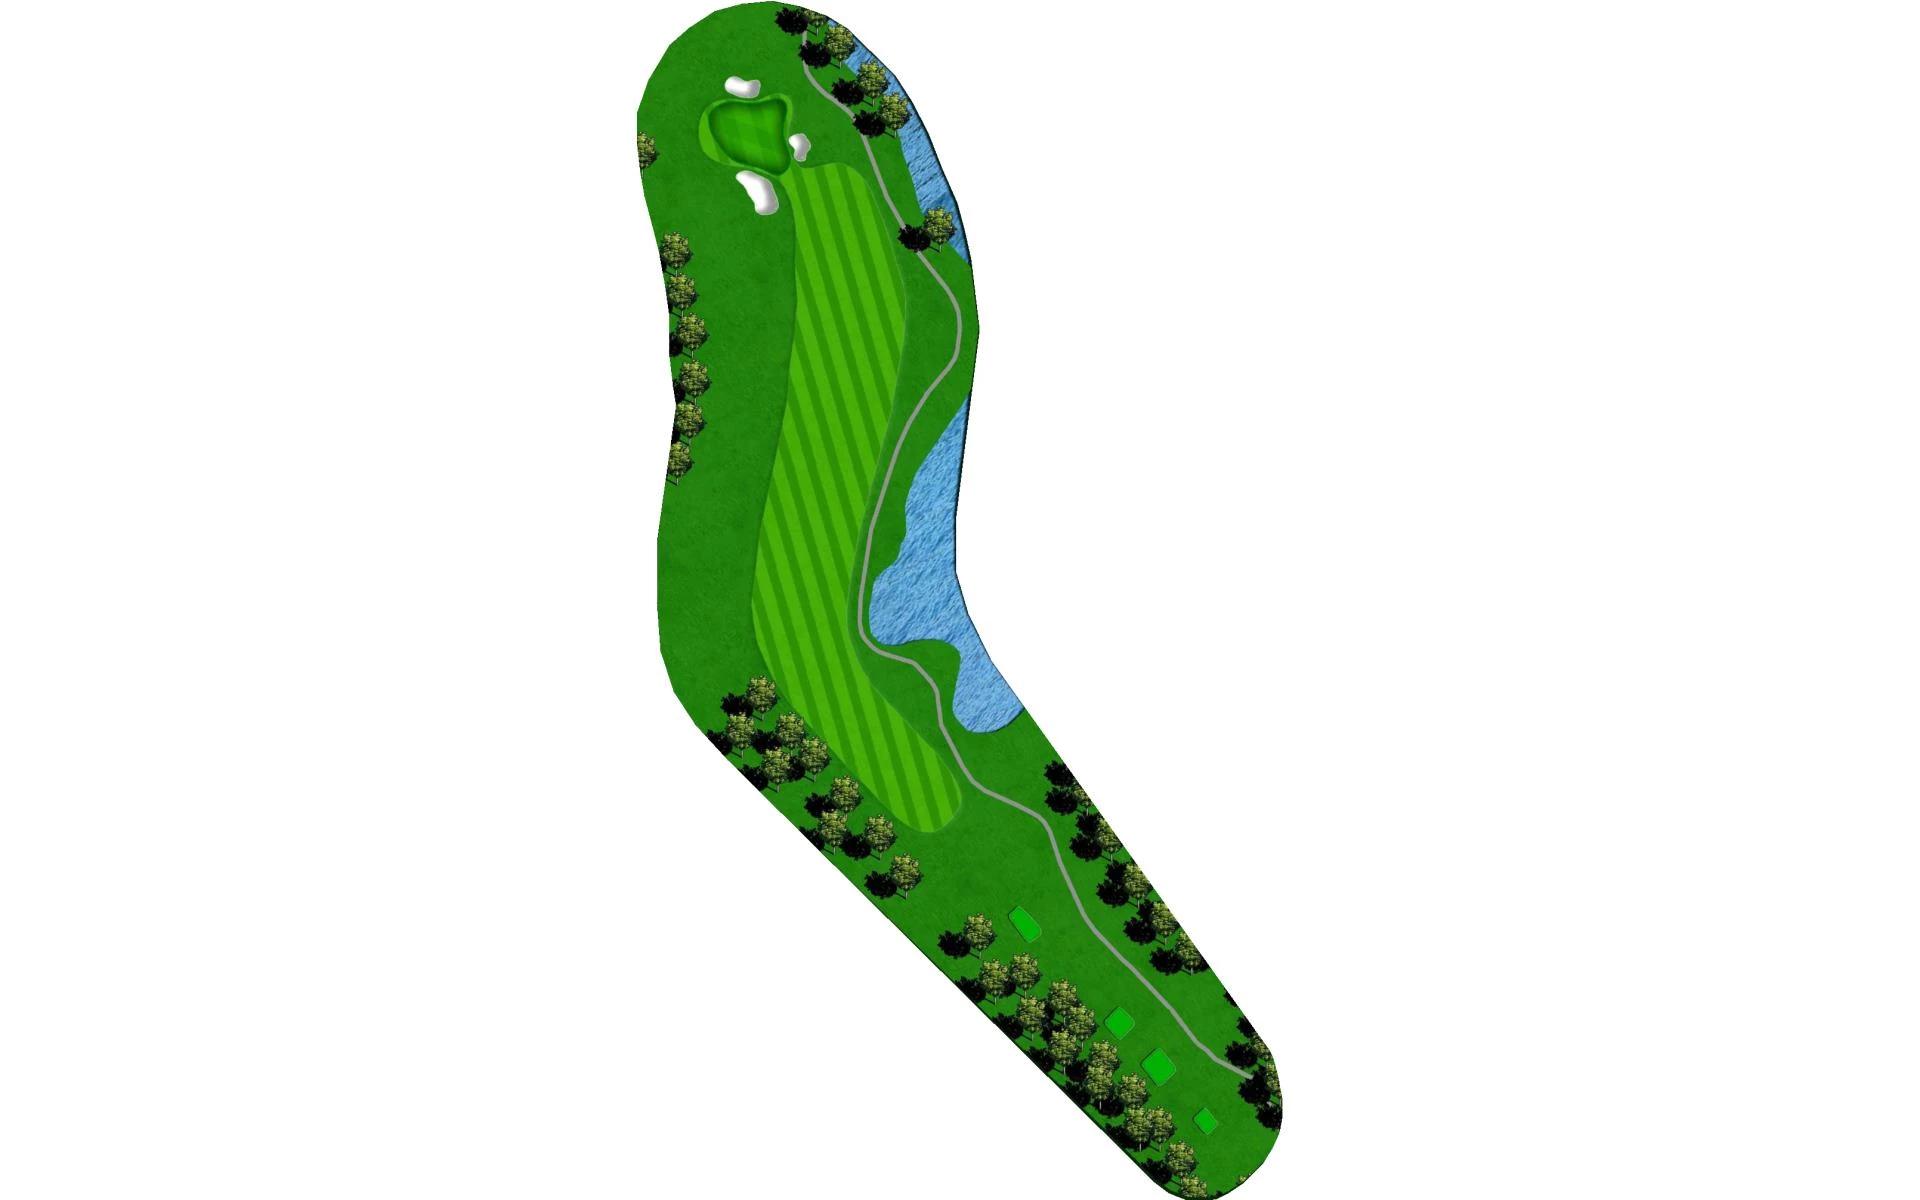
# 4 /
Par: 5
Yardage by Tee:
BLACK 509
BLUE 492
ORANGE 444
GOLD 403
WHITE 403
GREEN 315
Pro Tips
The first par 5 of the day requires an accurate tee ball with OB up the right side and fairway bunkers up the left. For longer hitters going for the green in two, an elevated putting surface may require an extra club. For those laying up be mindful of the lake going up the right side of the fairway as an accurate second shot is required to be in good position for the approach.
Be aware of a ridge in the middle of the green that will feed balls left and right.

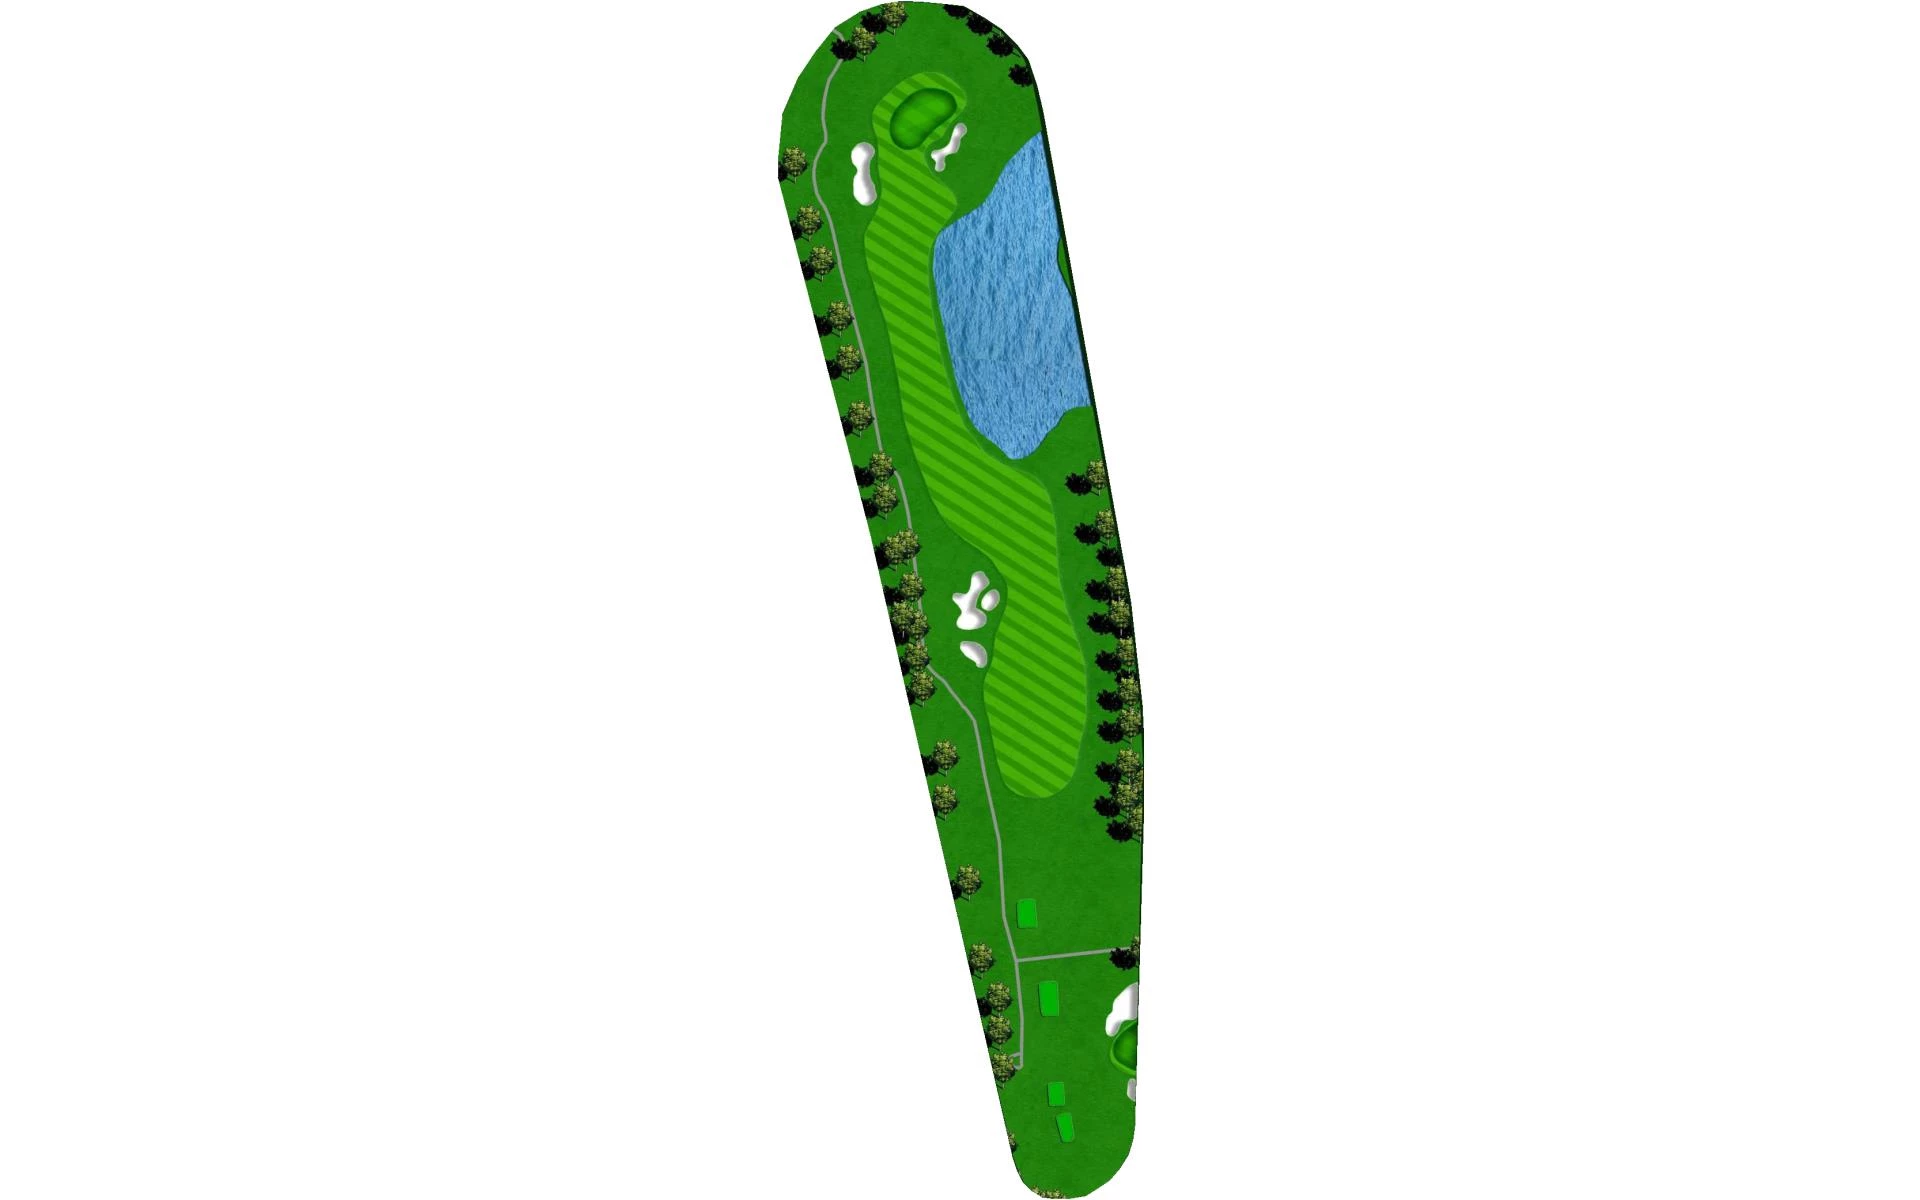
# 5 /
Par: 4
Yardage by Tee:
BLACK 444
BLUE 422
ORANGE 393
GOLD 351
WHITE 351
GREEN 260
Pro Tips
Both an accurate and long tee shot is imperative on this par 4. If the first shot can get past the fairway bunker on the left and end up at the bottom of the hill, a little wedge can be played into this green guarded by a lake on the left and bunker on the right. If the tee shot ends up at the top of the hill, a mid to long iron will be required on this approach. It is best to play for the front of this green.
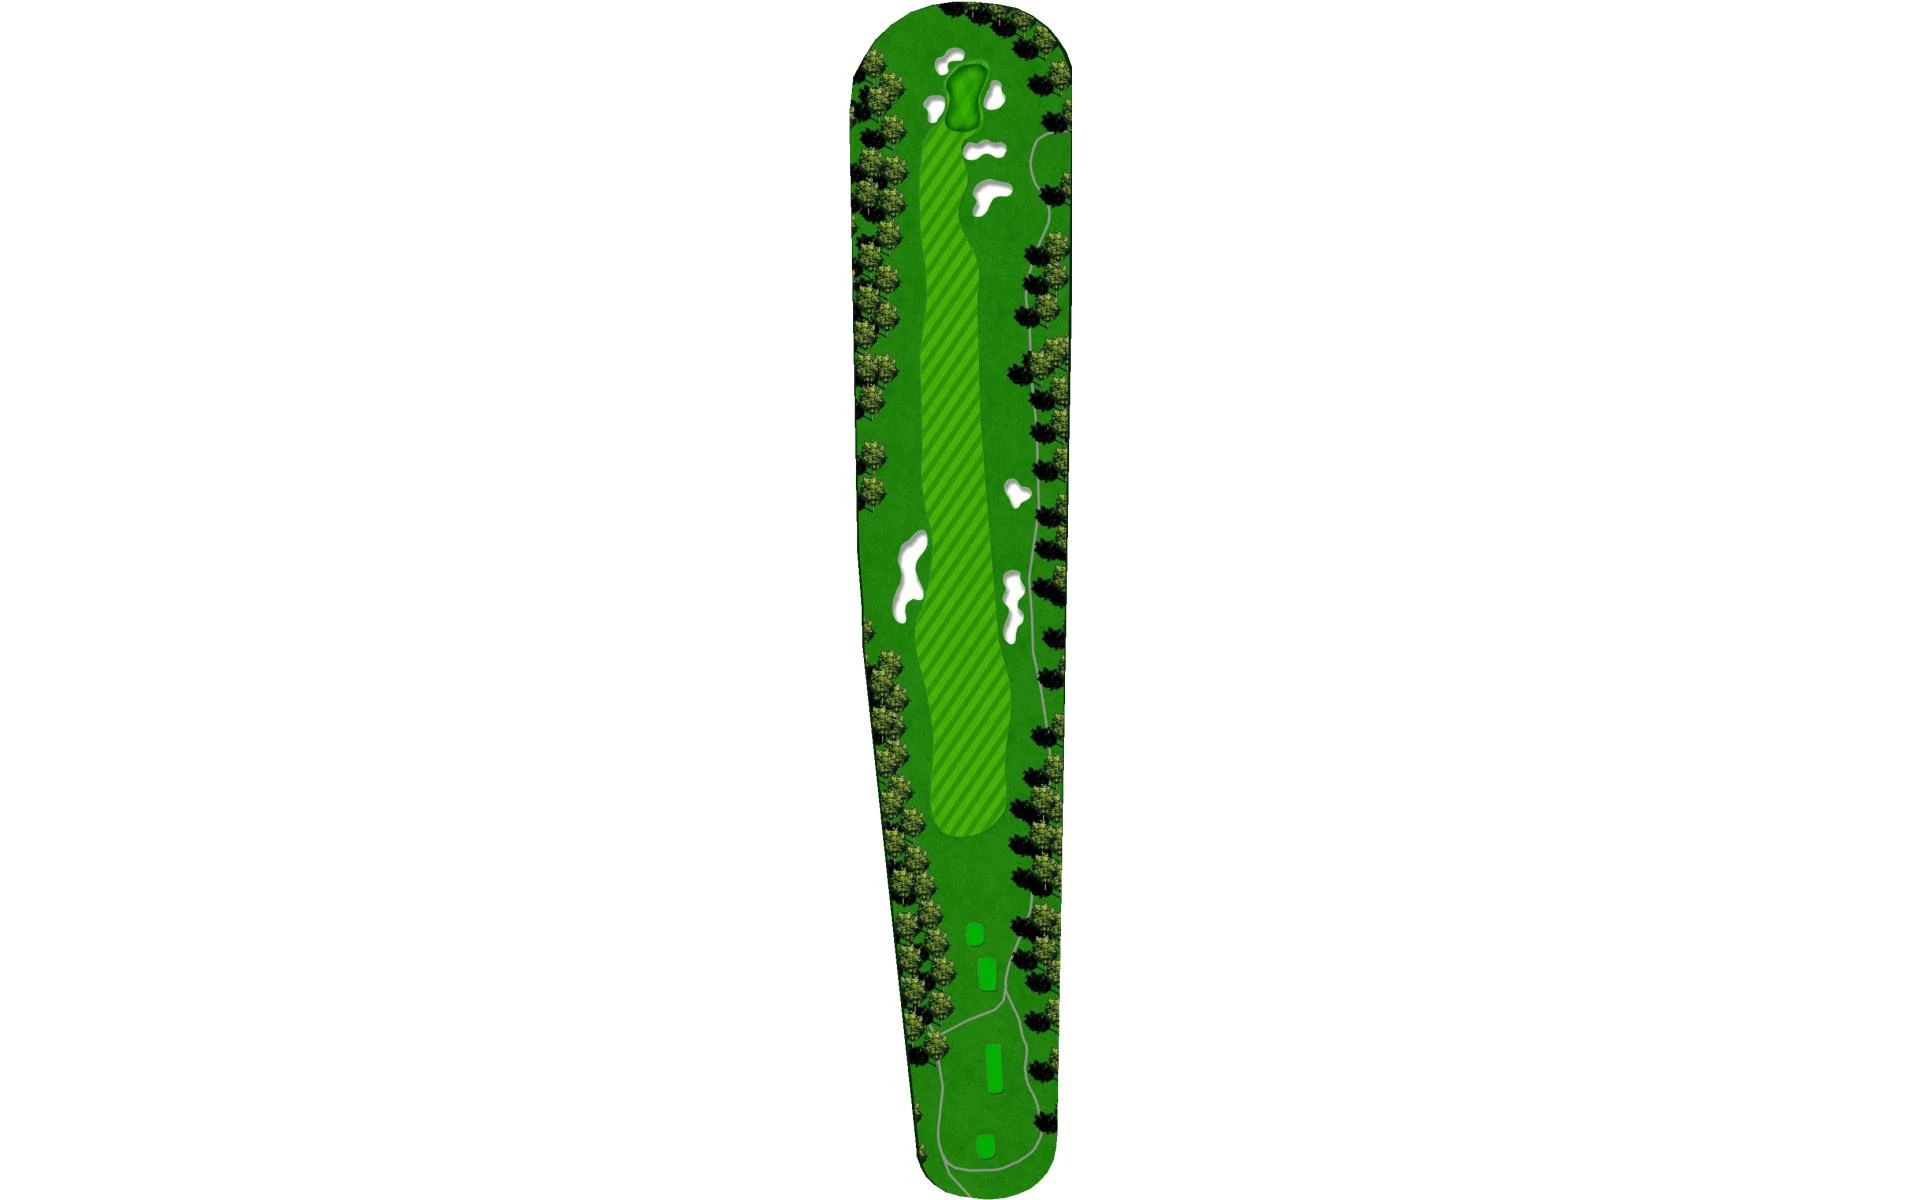
# 6 /
Par: 5
Yardage by Tee:
BLACK 588
BLUE 565
ORANGE 538
GOLD 487
WHITE 487
GREEN 338
Pro Tips
The second par 5 of the day requires an accurate second shot to have a good chance at birdie on this hole. An elevated putting surface guarded by bunkers that are front, left and behind the green will demand the approach shot be below the pin location. A delicate shot awaits should your approach be deep on this hole as it slopes from back to front.
# 7 /
Par: 4
Yardage by Tee:
BLACK 395
BLUE 321
ORANGE 298
GOLD 298
WHITE 266
GREEN 196
Pro Tips
The fairway bunker up the left side of this par 4 is a great aiming point as the landing area slopes and funnels left to right. Depending on the tees being played a driver may not be required with an elevated green awaiting the approach. Be mindful of a false front on the putting surface as an approach to the middle of the green would be most ideal.

# 8 /
Par: 3
Yardage by Tee:
BLACK 210
BLUE 190
ORANGE 153
GOLD 139
WHITE 139
GREEN 89
Pro Tips
This par 3 has the biggest green on the golf course and can require anything from a short to a long iron on this approach depending on the tees being played. A quality opening shot is imperative to this green that slopes from back to font and guarded by 3 bunkers on the right side of the putting surface. Once again, anything past the pin location will be a delicate shot going back towards the front of the green.
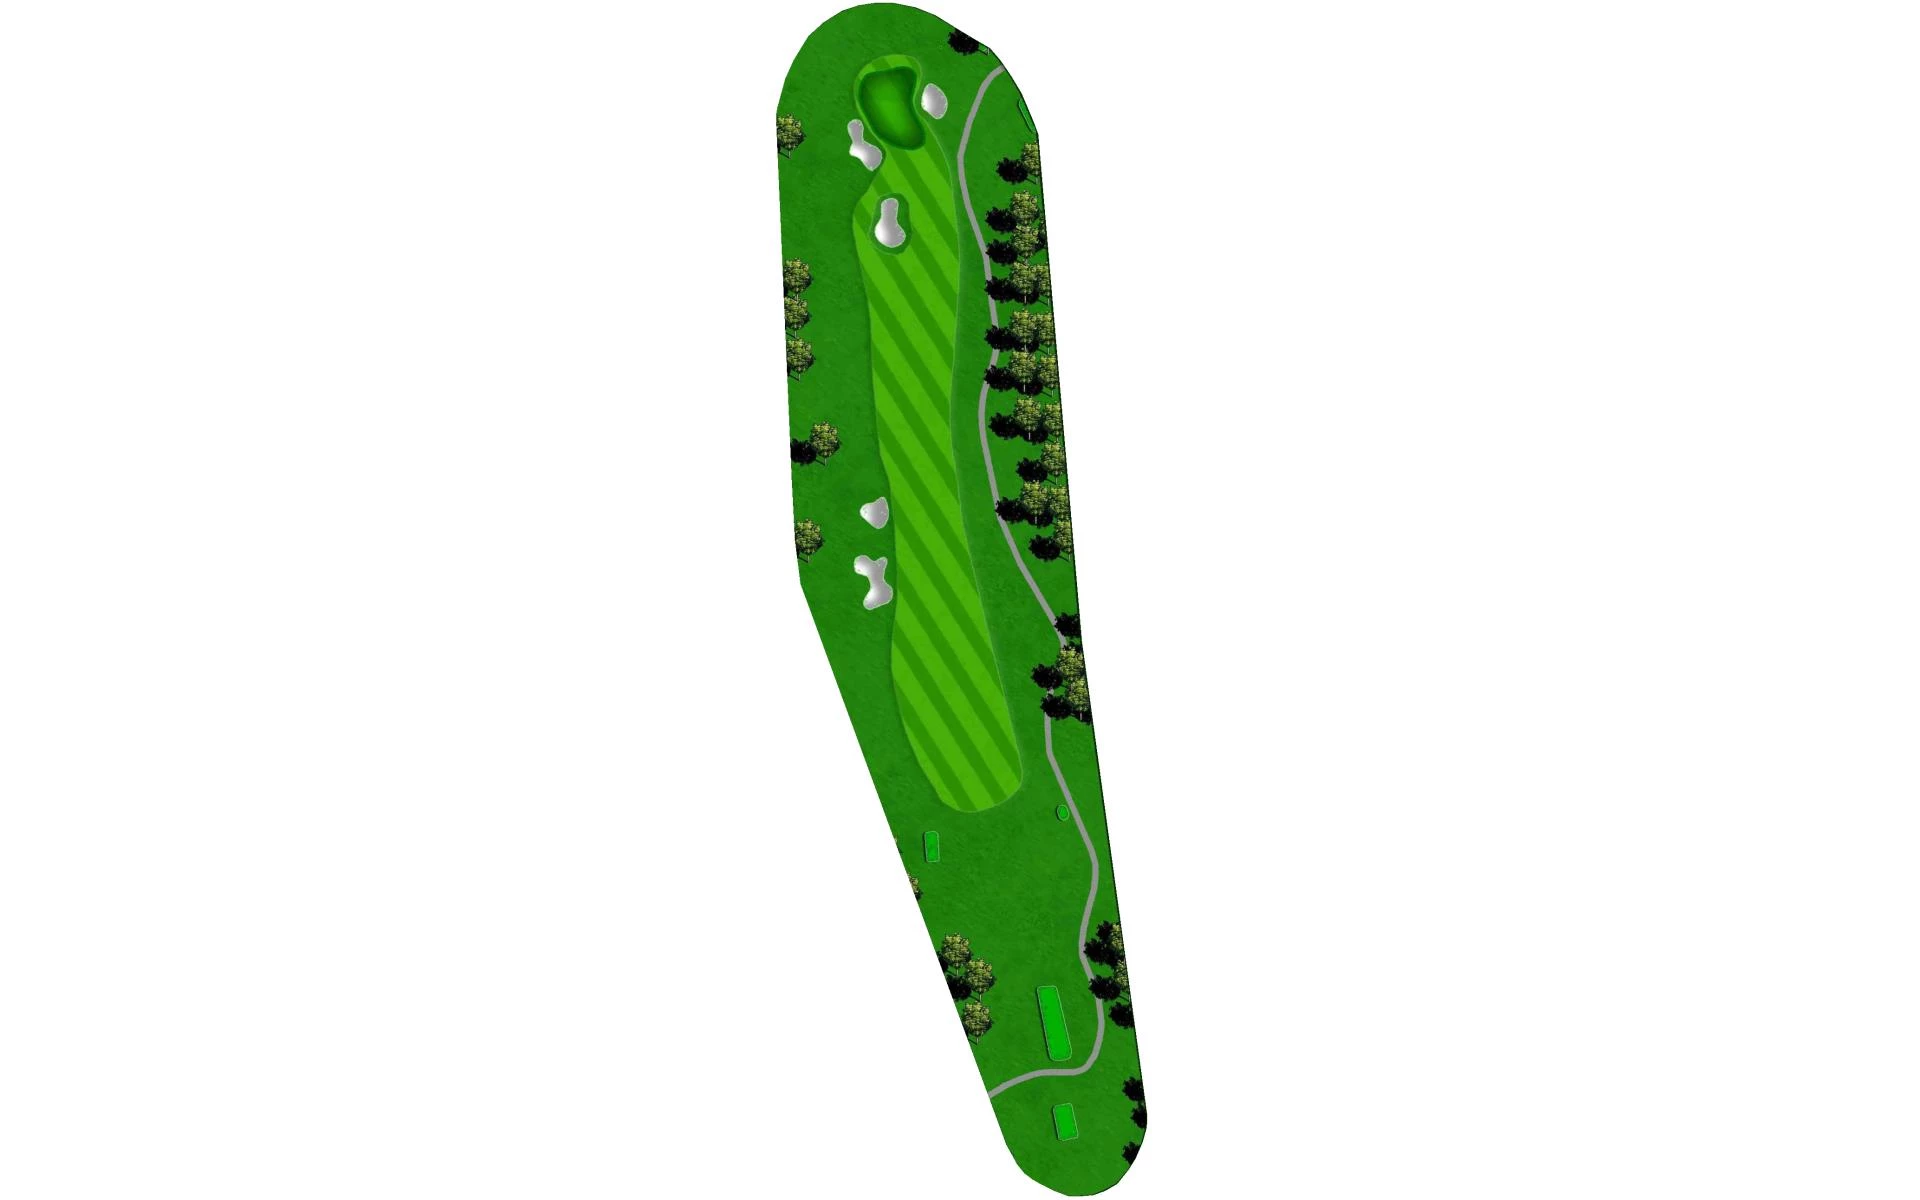
# 9 /
Par: 4
Yardage by Tee:
BLACK 389
BLUE 359
ORANGE 331
GOLD 300
WHITE 300
GREEN 228
Pro Tips
A fairway guarded by bunkers on both the left and right side of this uphill dogleg left par 4 require careful navigation on both the tee shot and approach. A tee shot up the left center of the fairway is most ideal while being cognizant of a ridge in the middle of the green. Use that ridge as a backboard for front hole locations but ultimately make sure the approach is on the correct level as well.
# 10 /
Par: 5
Yardage by Tee:
BLACK 523
BLUE 491
ORANGE 479
GOLD 439
WHITE 439
GREEN 334
Pro Tips
The first hole on the back 9 is a par 5 that is relatively straight from tee to green and demands accuracy to narrow fairway with fairway sloping left to right. Although driver would be a prudent play off the tee one can still hit 3 wood and have a flip wedge in after a good second
shot from the bottom of the hill. One of the bigger green complexes on the course, 4 bunkers surround the putting surface itself.
# 11 /
Par: 4
Yardage by Tee:
BLACK 378
BLUE 362
ORANGE 331
GOLD 331
WHITE 295
GREEN 263
Pro Tips
A sharp dogleg right par 4 with a multitude of options off the tee. Most shots with a driver off the tee will run through the fairway and end up OB. If driver is pulled the corner can be cut leaving a short wedge in to a green guarded by bunkers at the front and back of the putting surface. The safe play off the tee might just be a 3 wood to the left of the fairway bunker at the bottom of the hill.

# 12 /
Par: 3
Yardage by Tee:
BLACK 188
BLUE 169
ORANGE 144
GOLD 115
WHITE 115
GREEN 107
Pro Tips
This uphill par 3 requires an accurate approach to one of the smaller putting surfaces on the golf course. Bunkers located at the right, left, and back of the green demand players to calibrate their yardage correctly depending on where that pin is located. Be prepared to take an extra club or two into this green especially if a head wind is present given its higher elevation compared to the tee box.
# 13 /
Par: 4
Yardage by Tee:
BLACK 371
BLUE 342
ORANGE 330
GOLD 272
WHITE 272
GREEN 221
Pro Tips
A slight dog leg left on this short par 4 demands an accurate tee shot to the left center of the fairway due to the big tree guarding the green on the right. With a fairway that slopes from right to left, a short iron to wedge is all but guaranteed with a tee shot to this area past the fairway bunkers on each side of the landing area. Be sure the approach shot is far enough onto the green so both bunkers located short right and left of the putting surface are avoided.
# 14 /
Par: 4
Yardage by Tee:
BLACK 455
BLUE 426
ORANGE 404
GOLD 348
WHITE 348
GREEN 284
Pro Tips
The second most difficult hole on the course is a long dog leg right par 4 with a downhill tee shot that must favor the right side of the fairway for the most ideal approach. Careful not to go too far right off the tee as the lake will swallow most shots heading that way. The putting surface is guarded by marsh land on the left side along with bunkers surrounding the green itself. A good tee shot will leave the player with a long to mid iron into this green.

# 15 /
Par: 4
Yardage by Tee:
BLACK 432
BLUE 393
ORANGE 363
GOLD 303
WHITE 303
GREEN 270
Pro Tips
A classic risk-reward dog leg left par 4 where the longer hitters can take their tee shot over the lake leaving a small wedge into a green guarded by bunkers left, right and over the back right behind the putting surface. Should one choose not to take on the lake, a tee shot up the right side of the fairway will leave the player with the most ideal shot into this green. Pampas grass helps show the right edge of the lake. Beware as the fairway slopes to the left toward the lake.
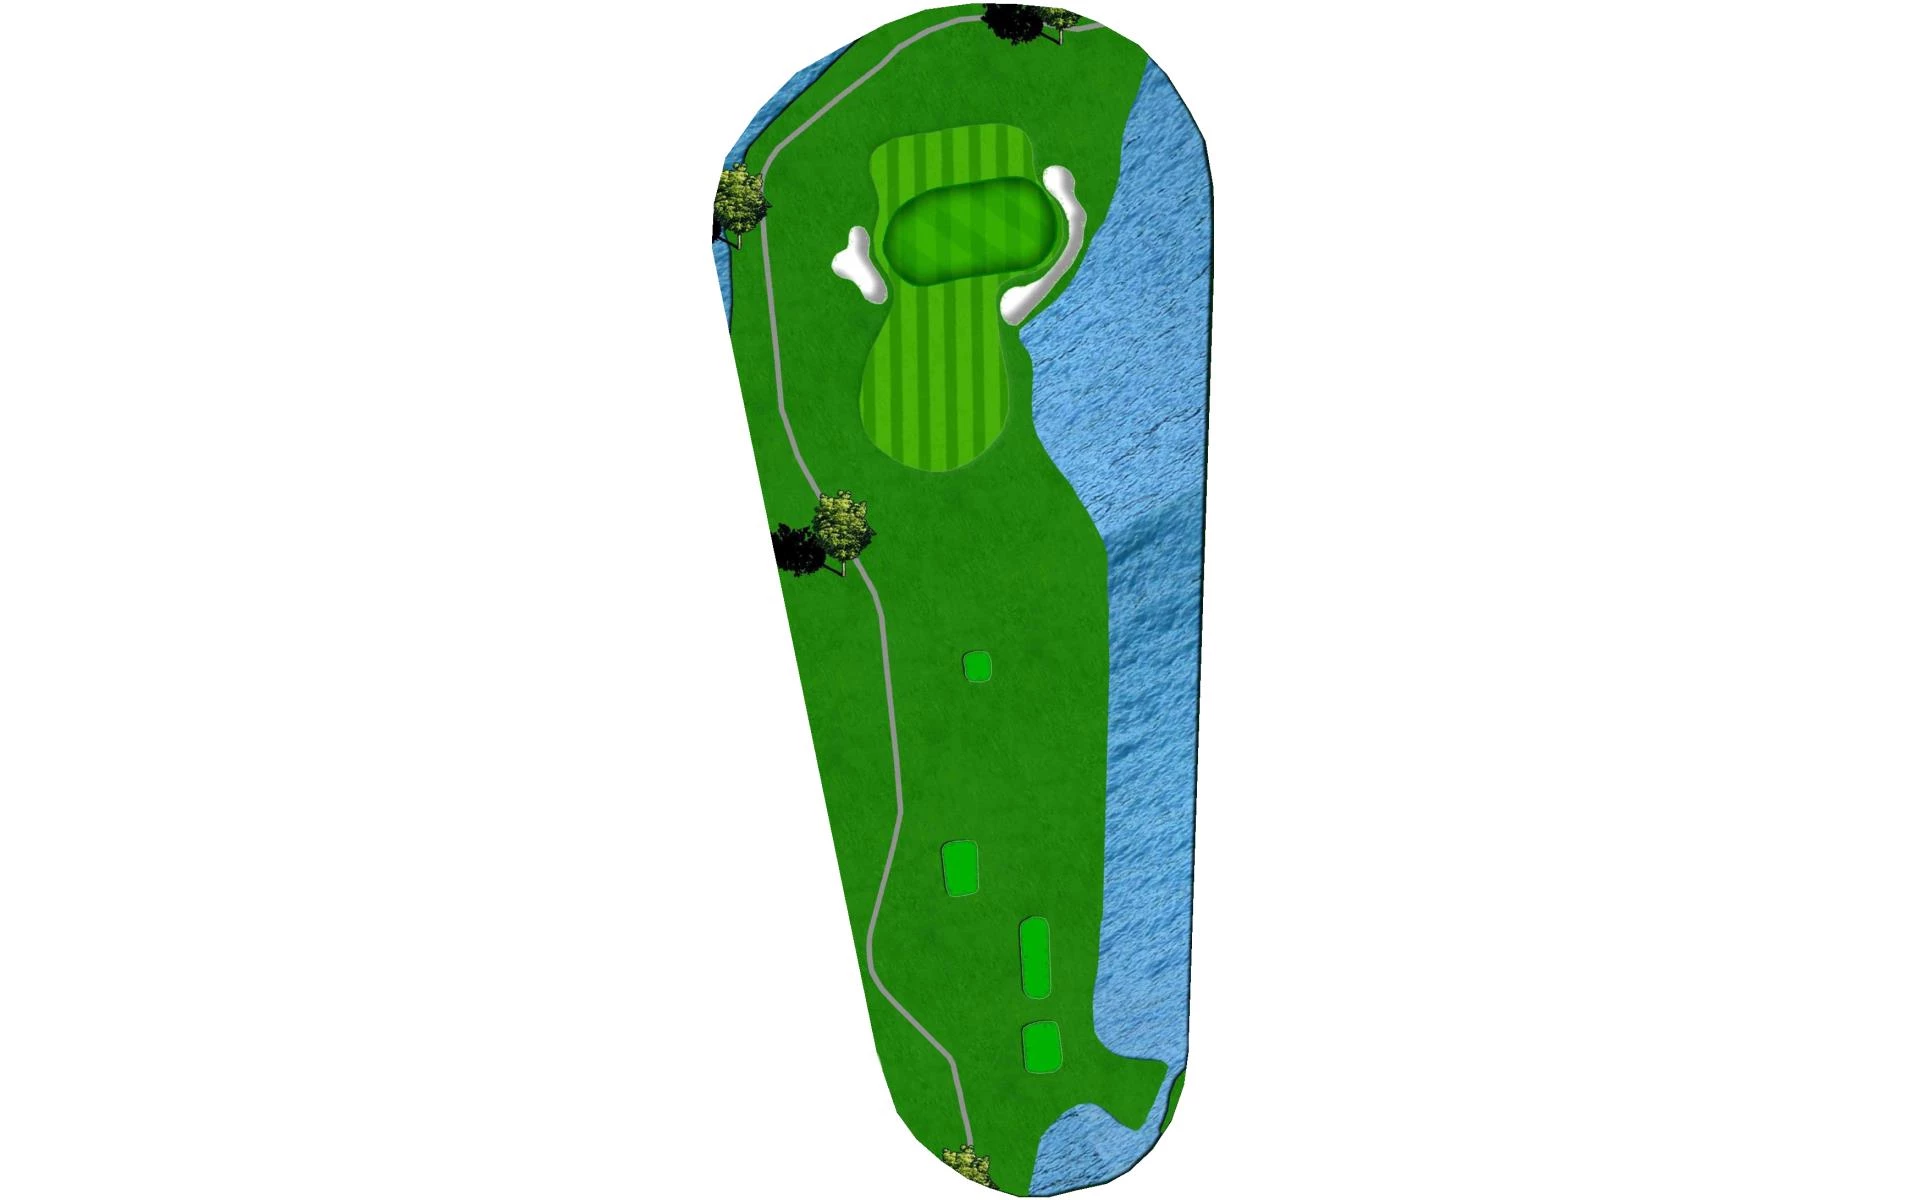
# 16 /
Par: 3
Yardage by Tee:
BLACK 203
BLUE 176
ORANGE 157
GOLD 157
WHITE 137
GREEN 95
Pro Tips
With water up the right side of this par 3 and bunkers both left and right of one of the smaller greens on the course, a birdie chance awaits the player who successfully navigates his/her shot the correct distance. A bit of a false front exists at the front of the green but once over the putting surface is relatively flat. Pay close attention to the wind direction on this hole as anything into a breeze will result in the shot falling short of the desired result.
# 17 /
Par: 5
Yardage by Tee:
BLACK 560
BLUE 543
ORANGE 525
GOLD 488
WHITE 488
GREEN 401
Pro Tips
The last par 5 of the day is a dog leg right with OB left and a fairway bunker on the right that must be negotiated correctly. Some players may be able to take it over this bunker, but the ideal shot is a left to right ball flight off the tee. From there the longer hitter can have a go at this slightly elevated green while others have a straightforward layup resulting in a short iron or wedge for the third shot. With most of the green sloping from right to left, leave yourself with an uphill putt for the best chance at birdie.
# 18 /
Par: 4
Yardage by Tee:
BLACK 385
BLUE 374
ORANGE 342
GOLD 289
WHITE 289
GREEN 214
Pro Tips
This finishing par 4 requires a right to left ball flight off the tee that ends up on the left center of the fairway. With fairway bunkers on both the left and right side of the fairway landing area, an approach to a two-tiered green awaits the player hoping for a birdie chance to end their day on a positive note. Be mindful of which tier the pin is located on as the spine in the middle of the green can both reward and deter good approach shots.