Devils Ridge Golf Course
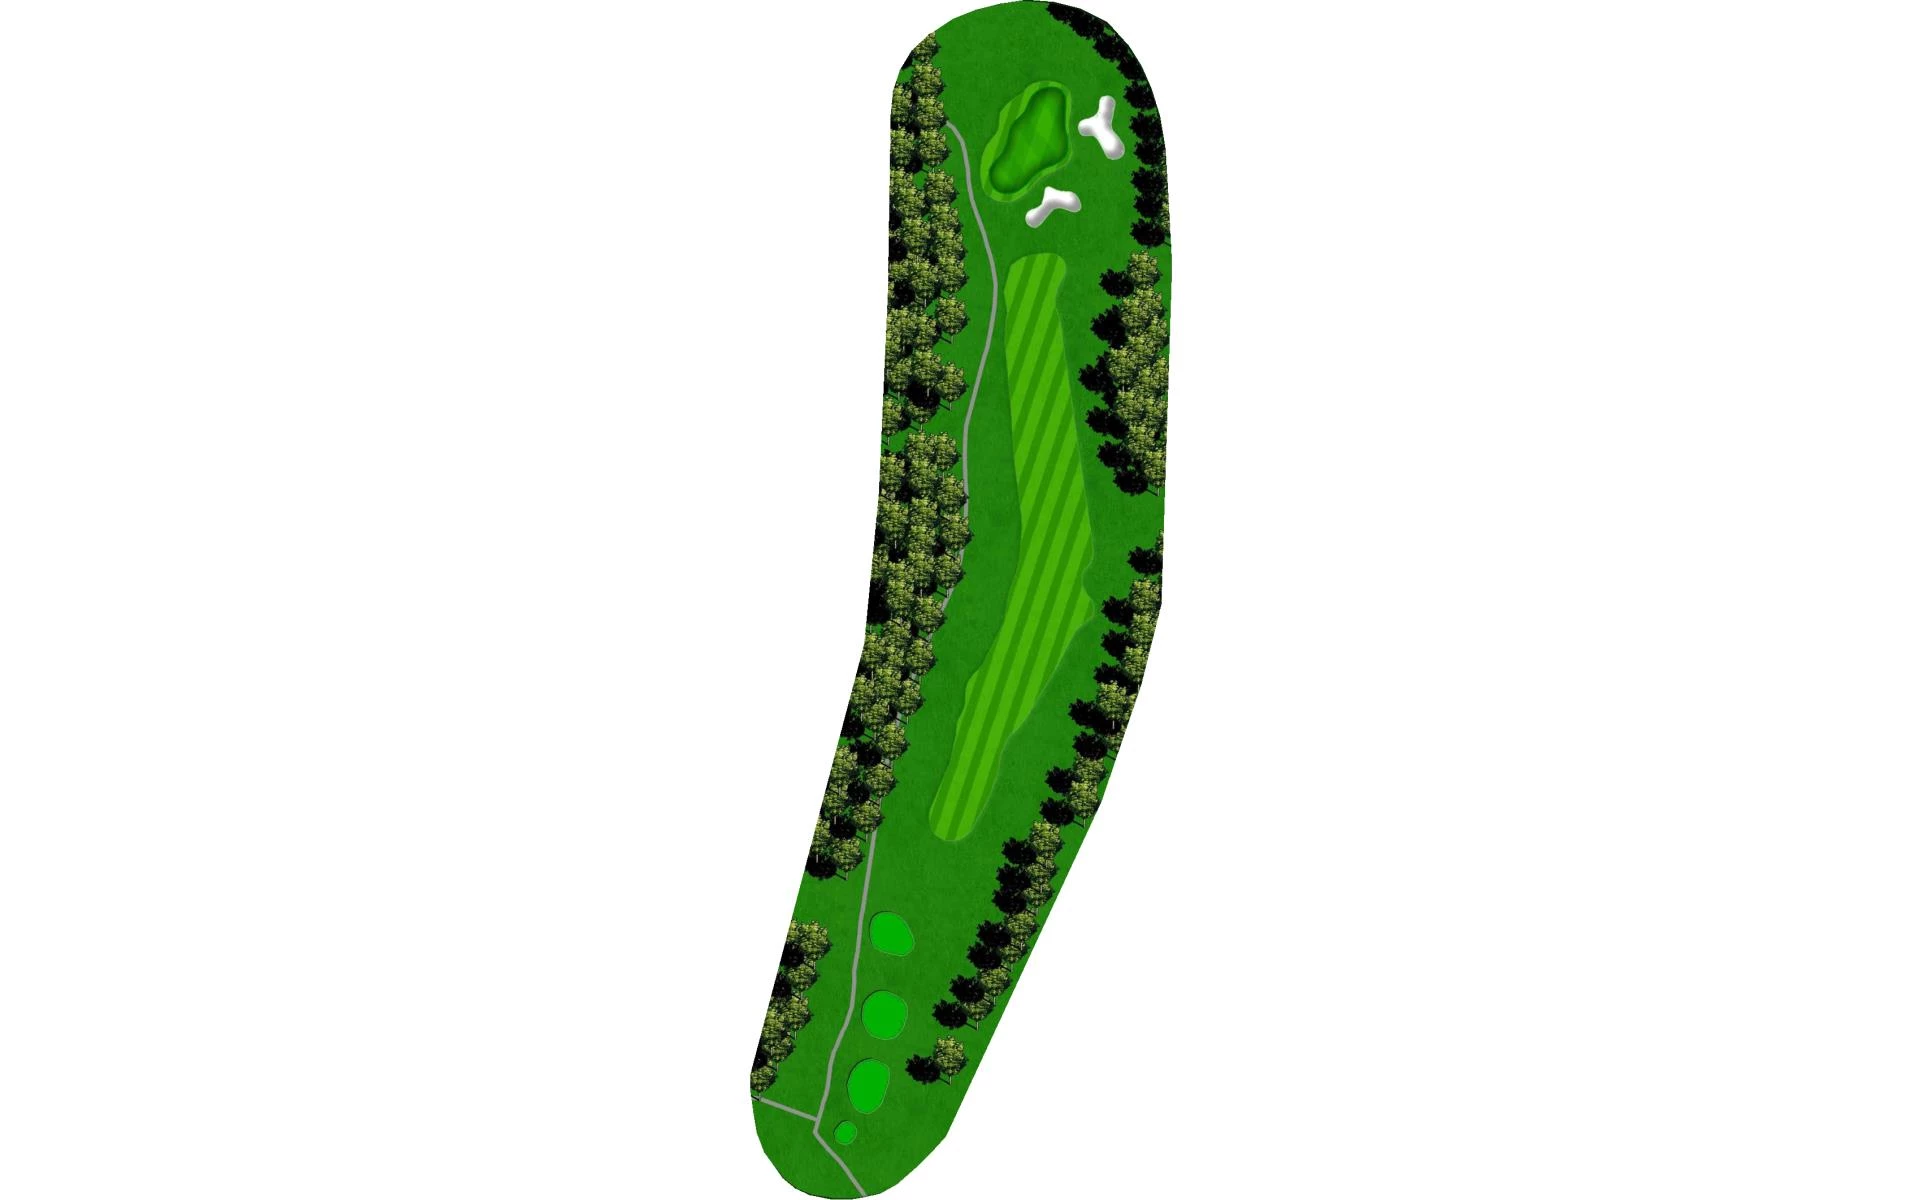
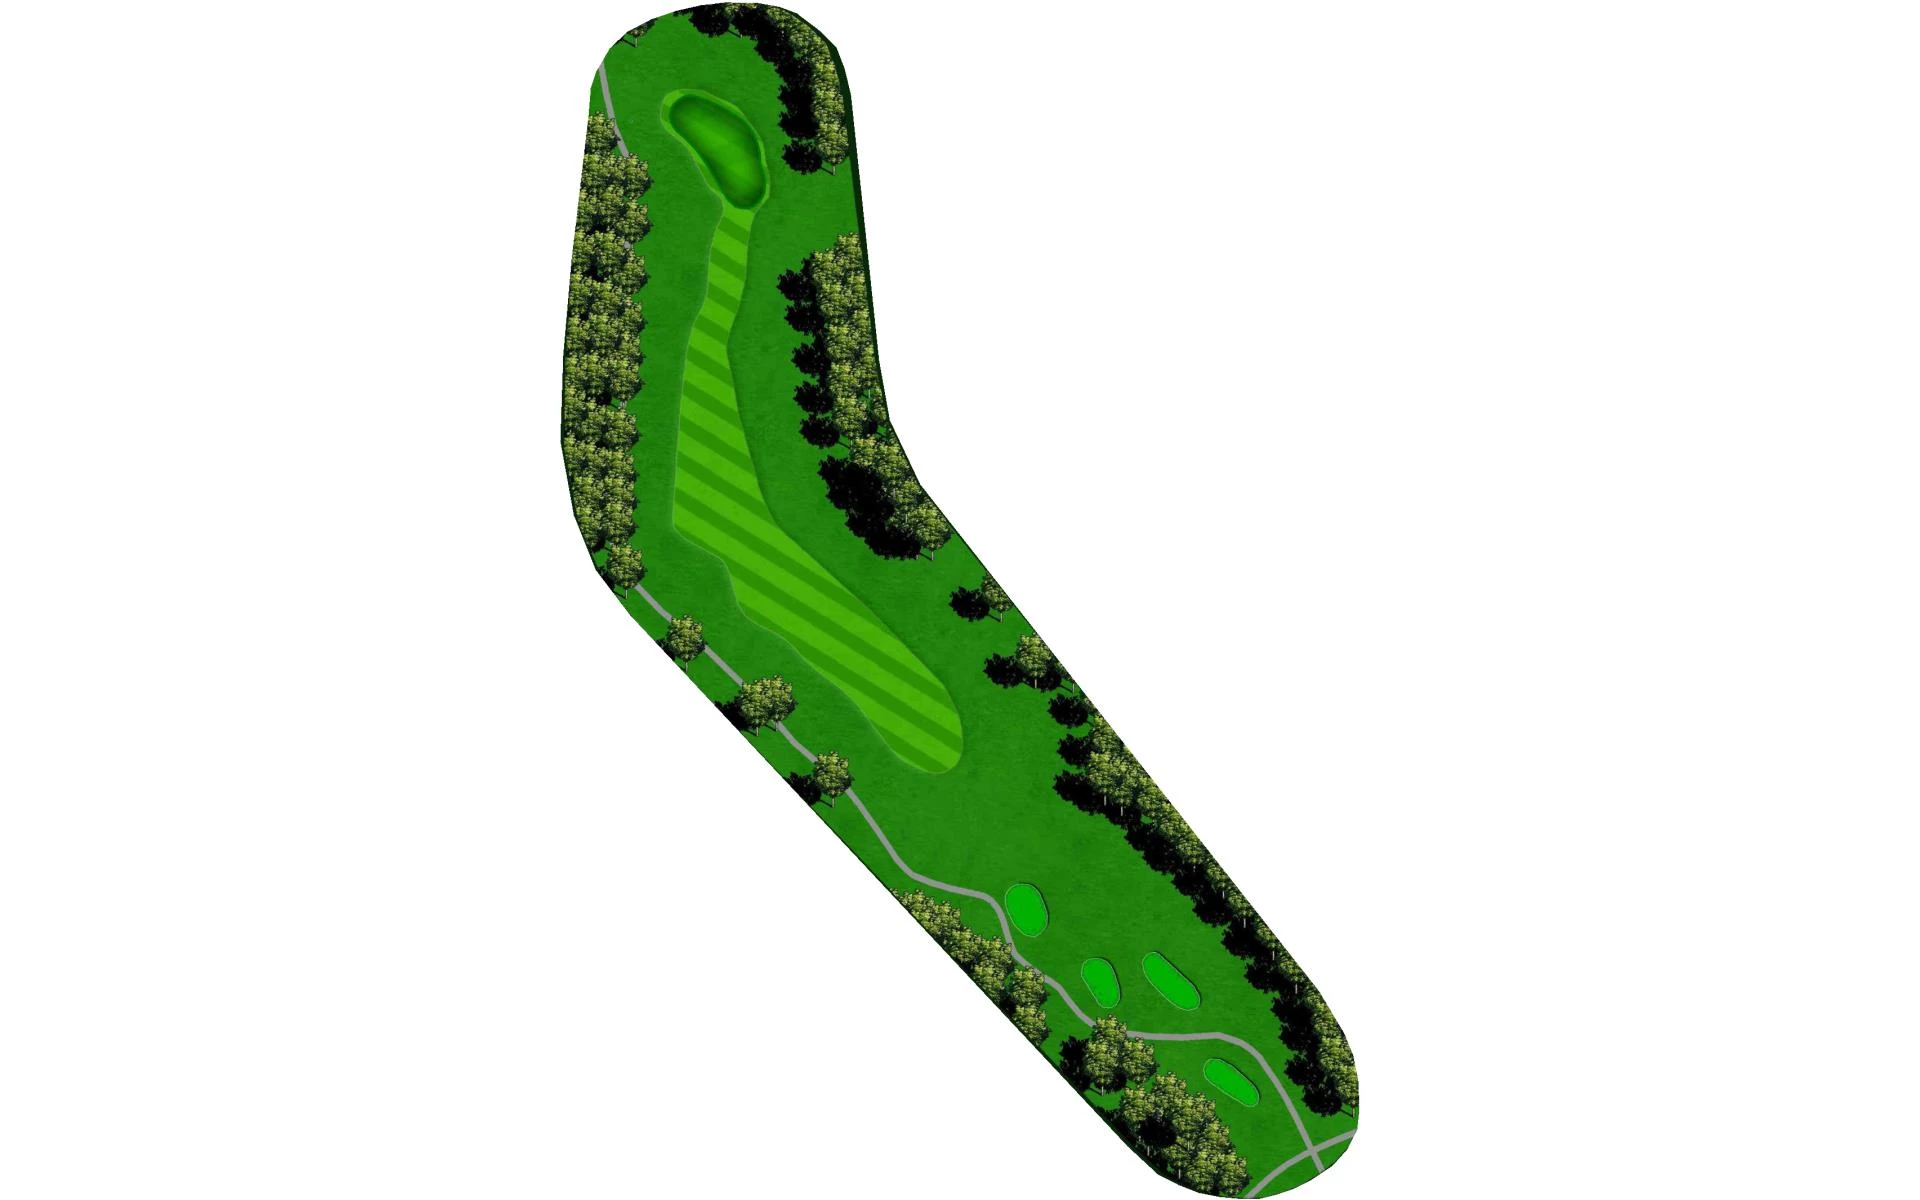
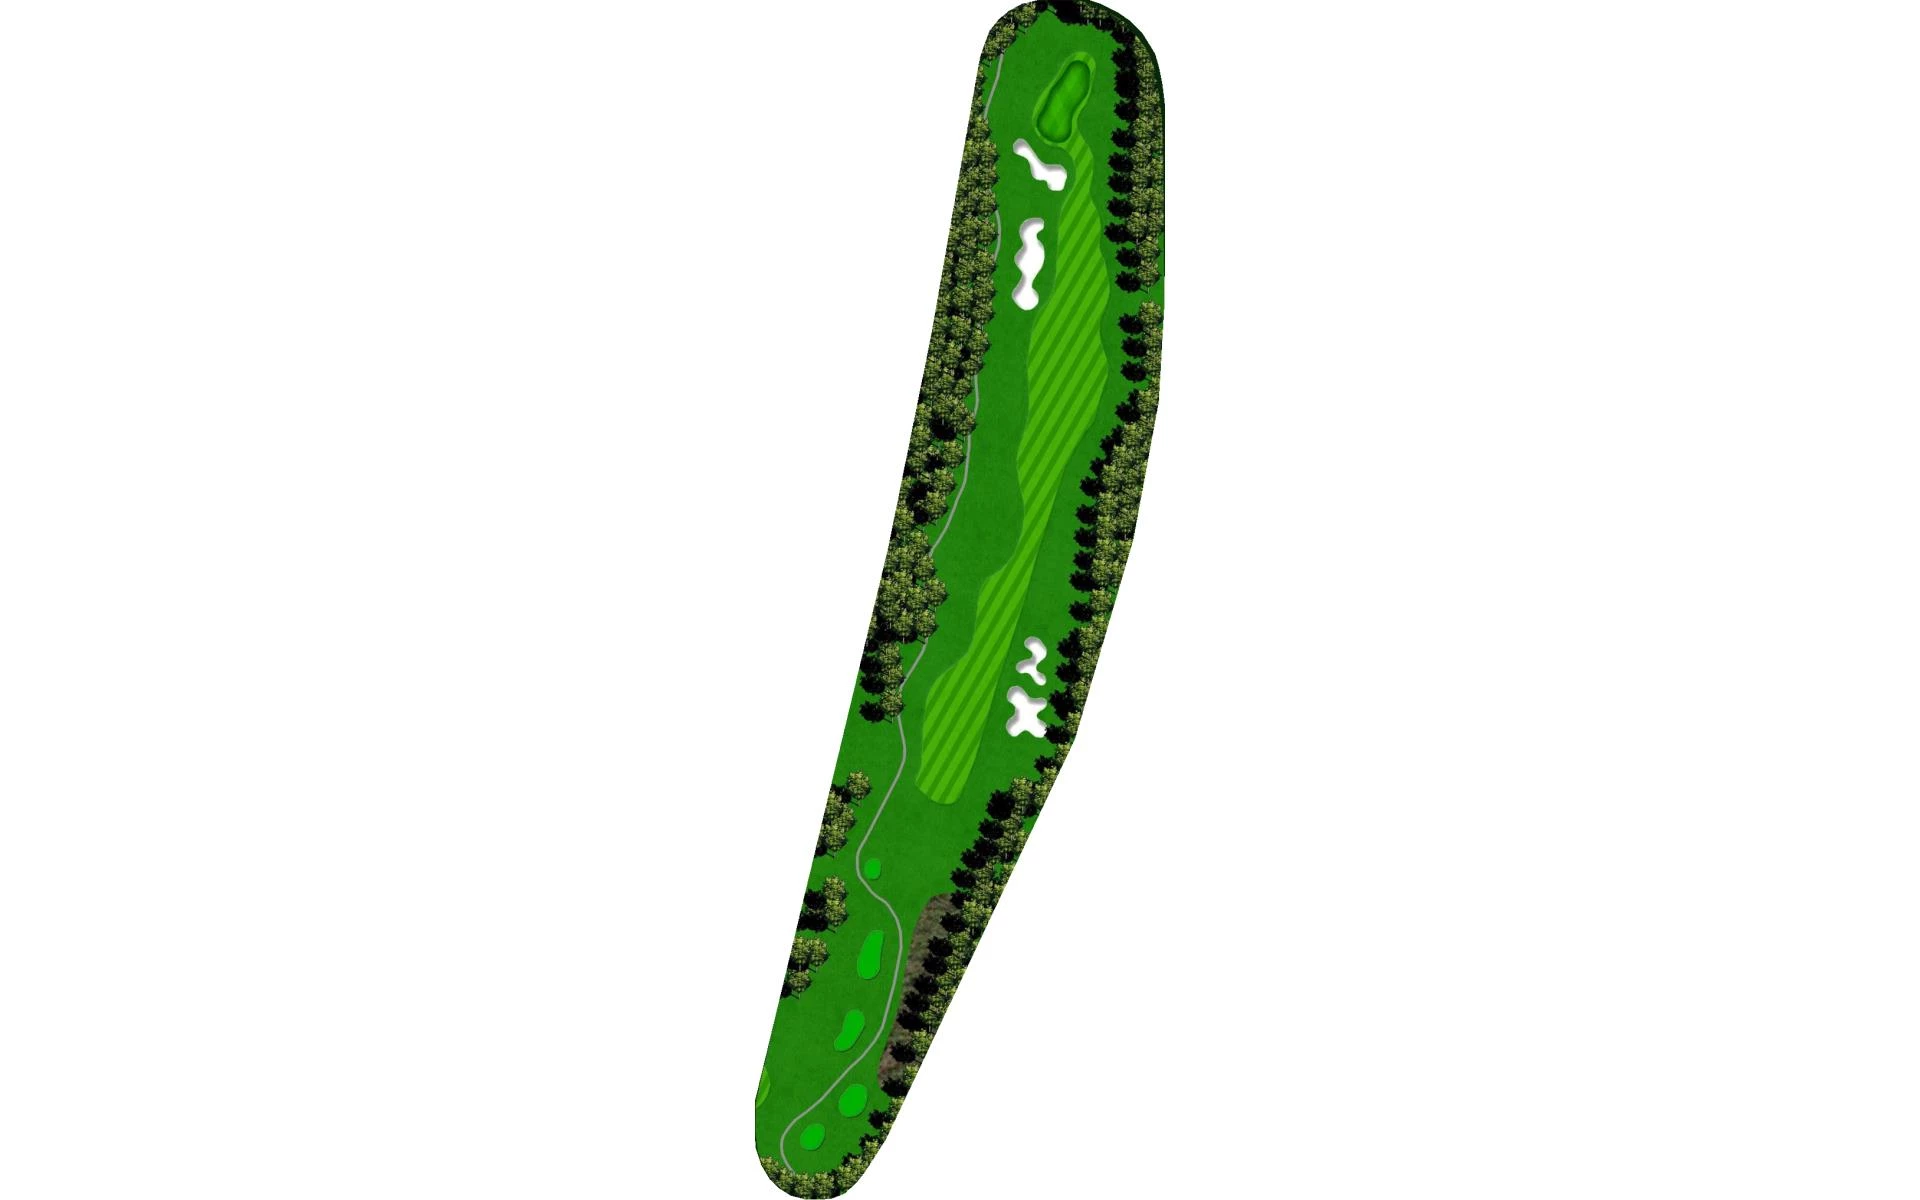
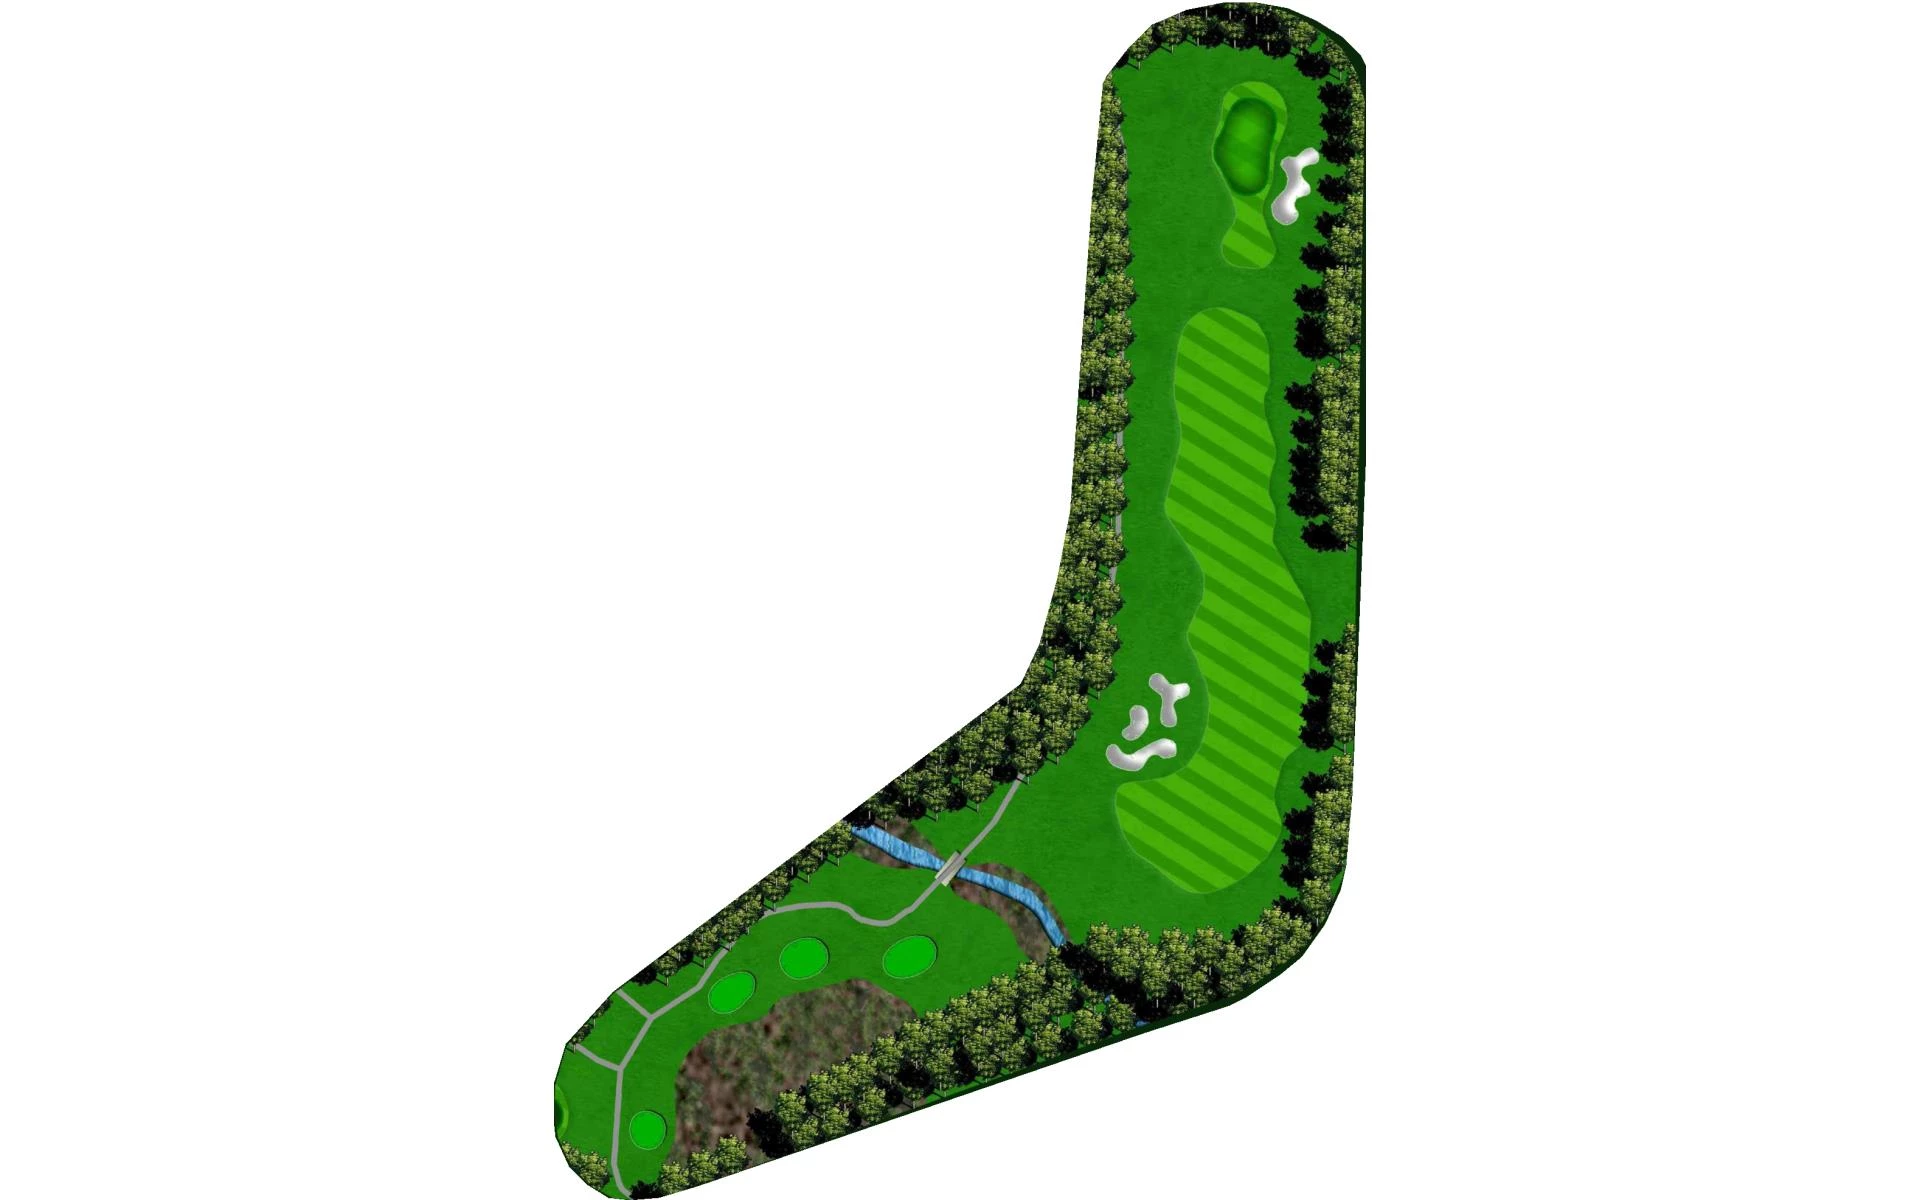
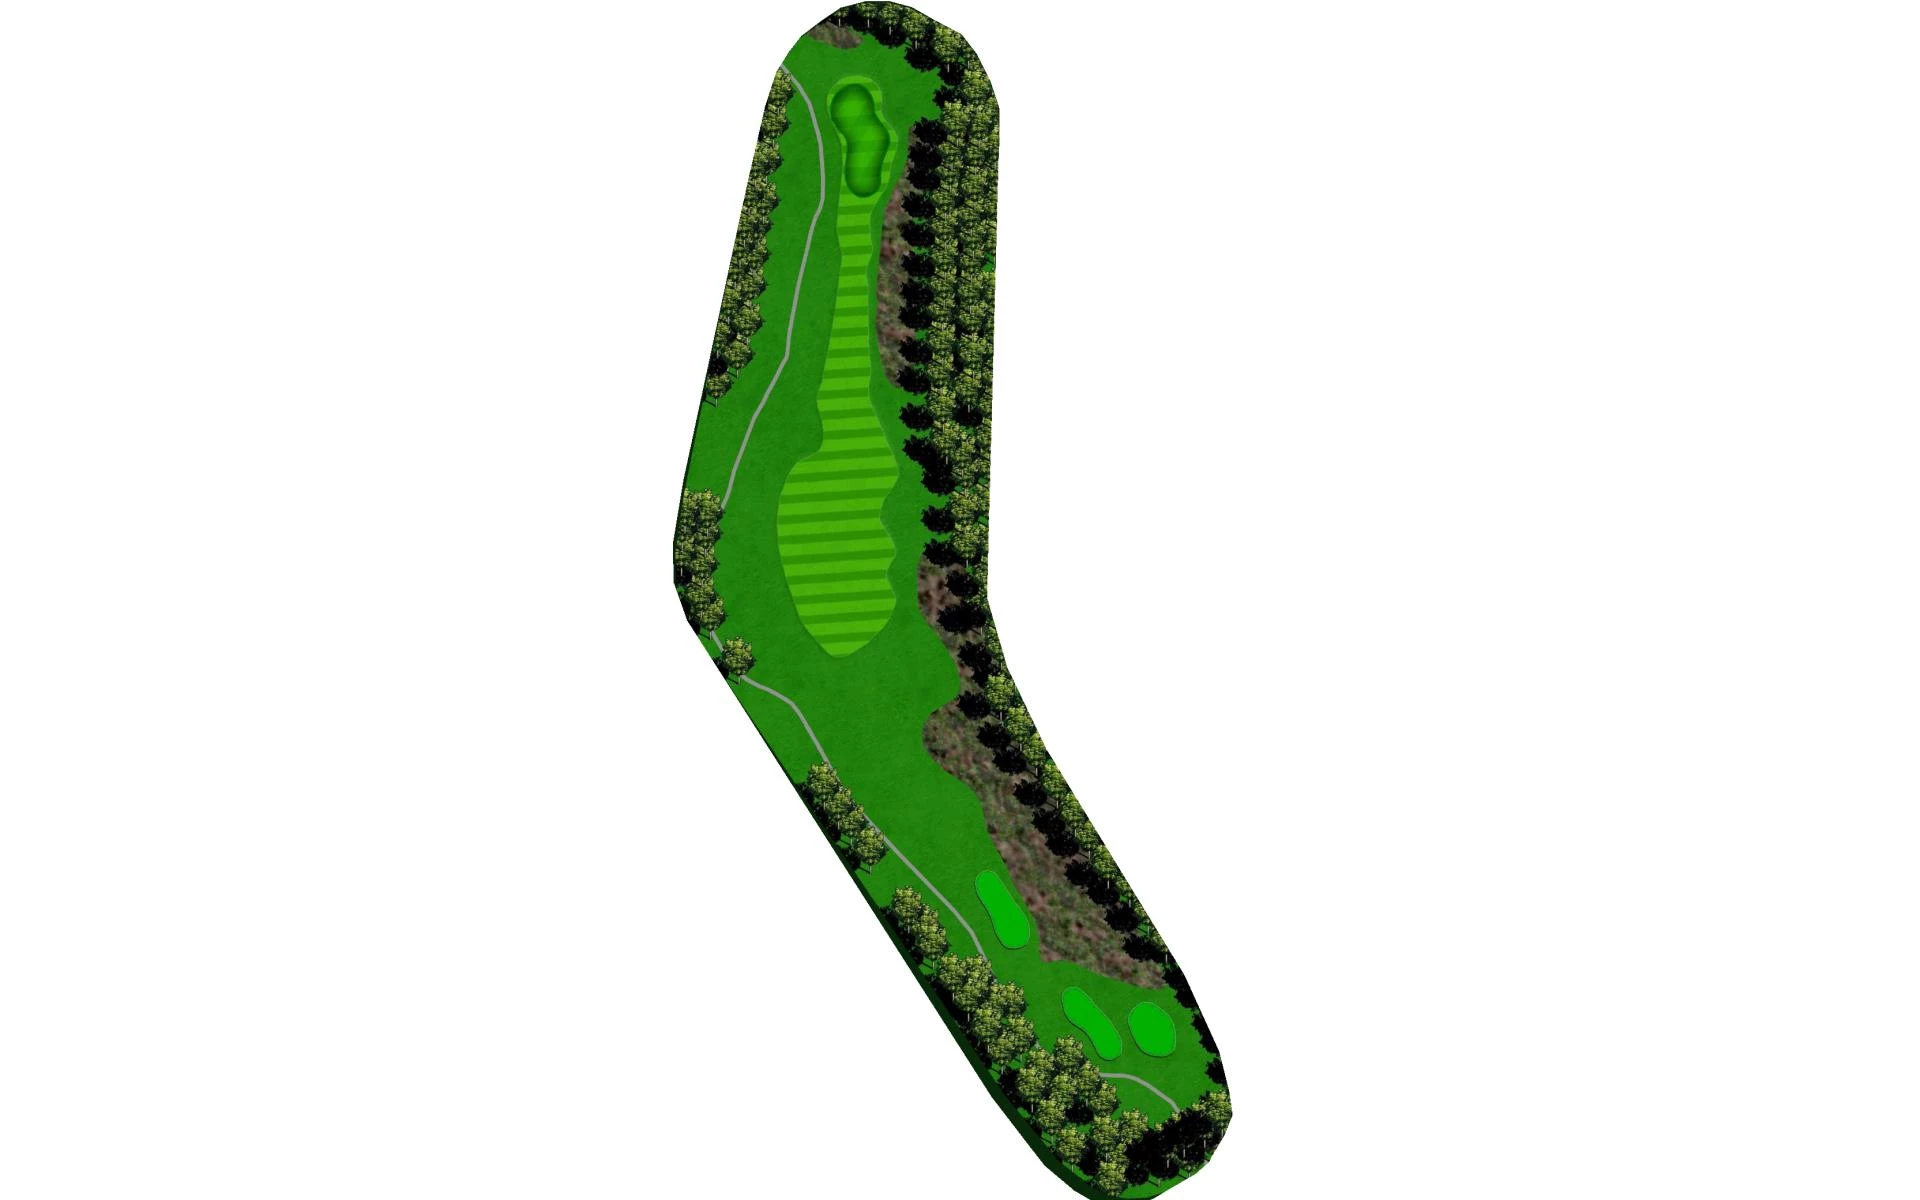
# 1 /
Par: 4
Handicaps:
Men's 5
Women's 3
Yardage by Tee:
BLACK 411
BLUE 377
WHITE 347
YELLOW 314
RED 311
Slope:
Black- 142 | Blue- Men 132 | Blue-Women 141 | White- Men 125 | White-Women 135 | Yellow- Men 114 | Yellow-Women 125 | Red-Men 104 | Red-Women 113 |
Pro Tips
Finding the right side of the fairway is critical on this opening tee shot to have a good angle to the green. The approach plays uphill so make sure you have enough club to carry the deep, difficult bunkers that guard the front of the green.
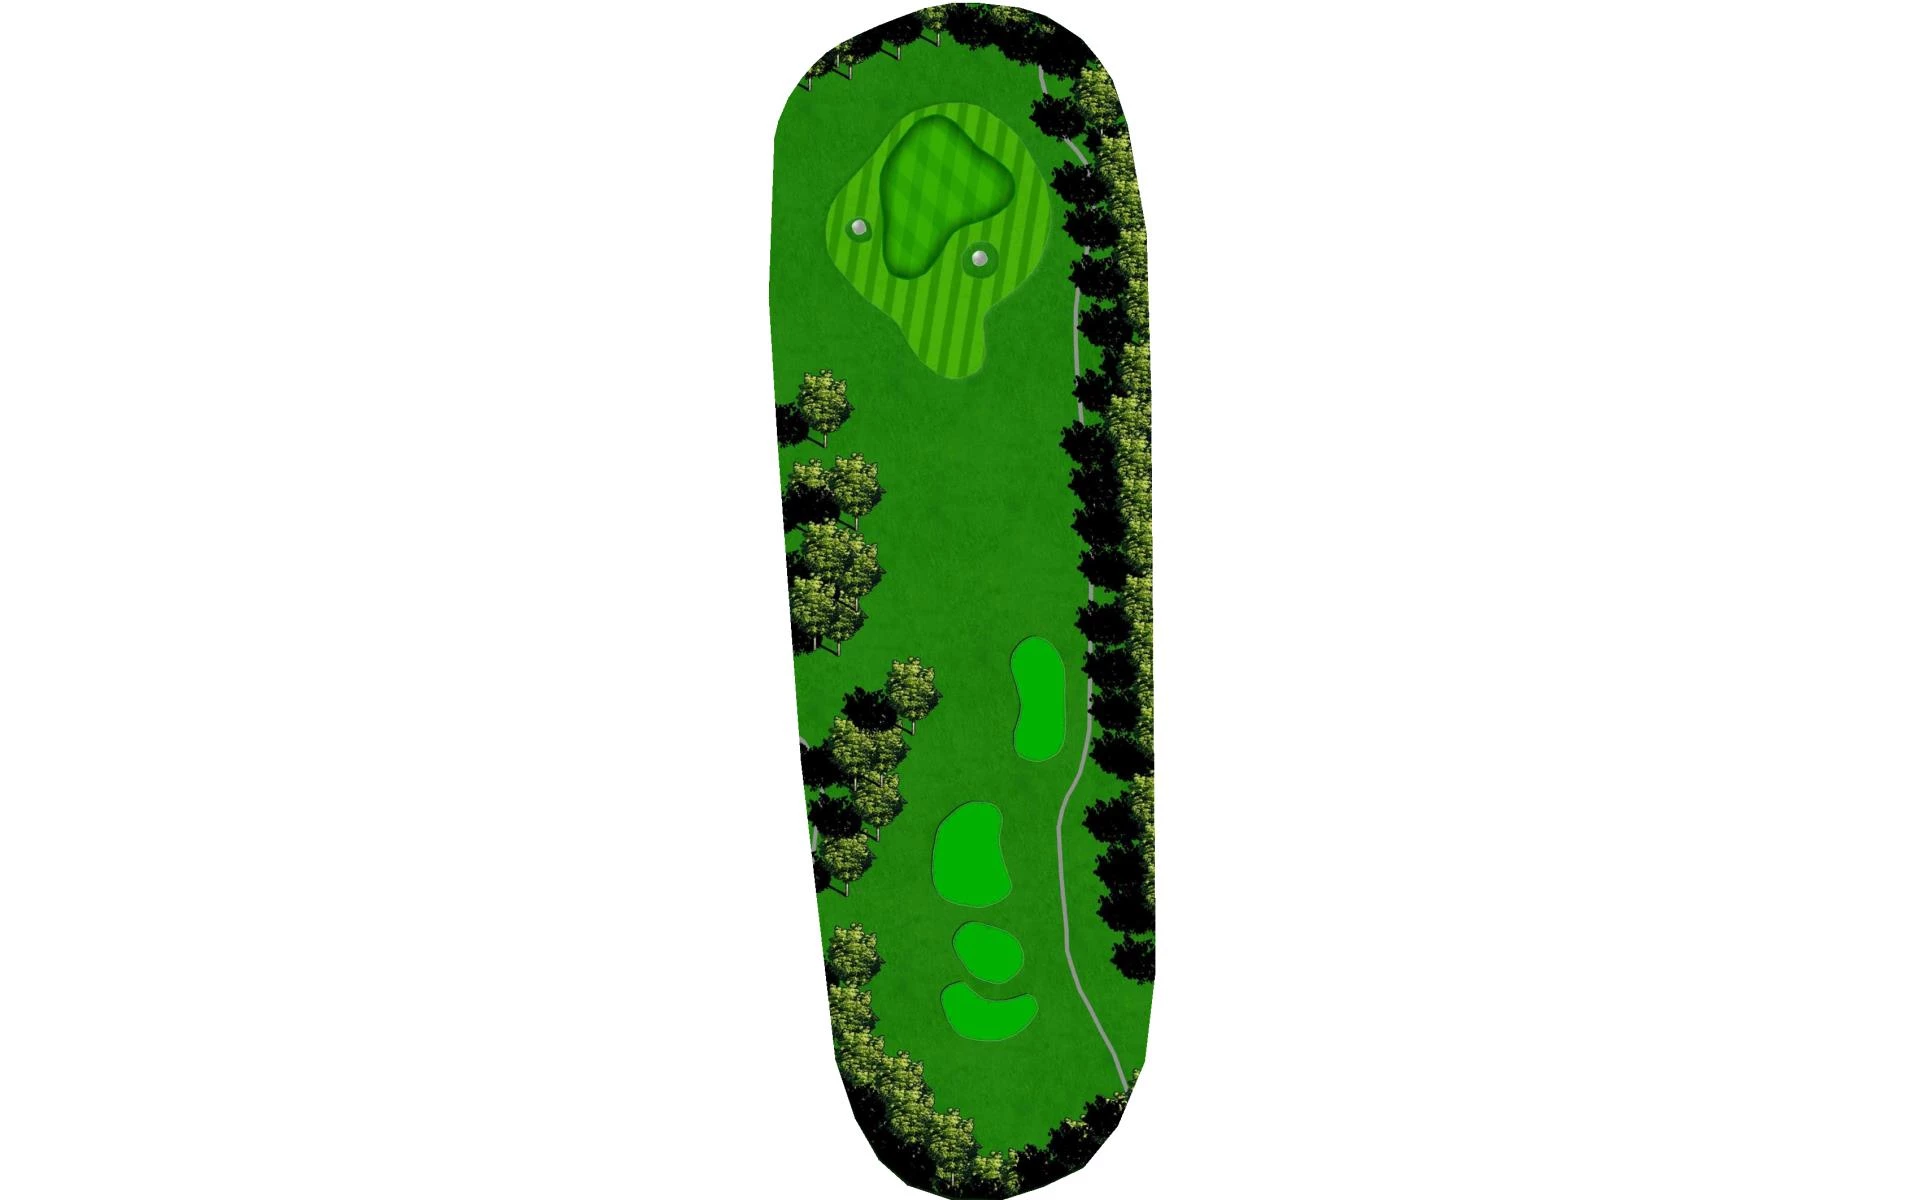
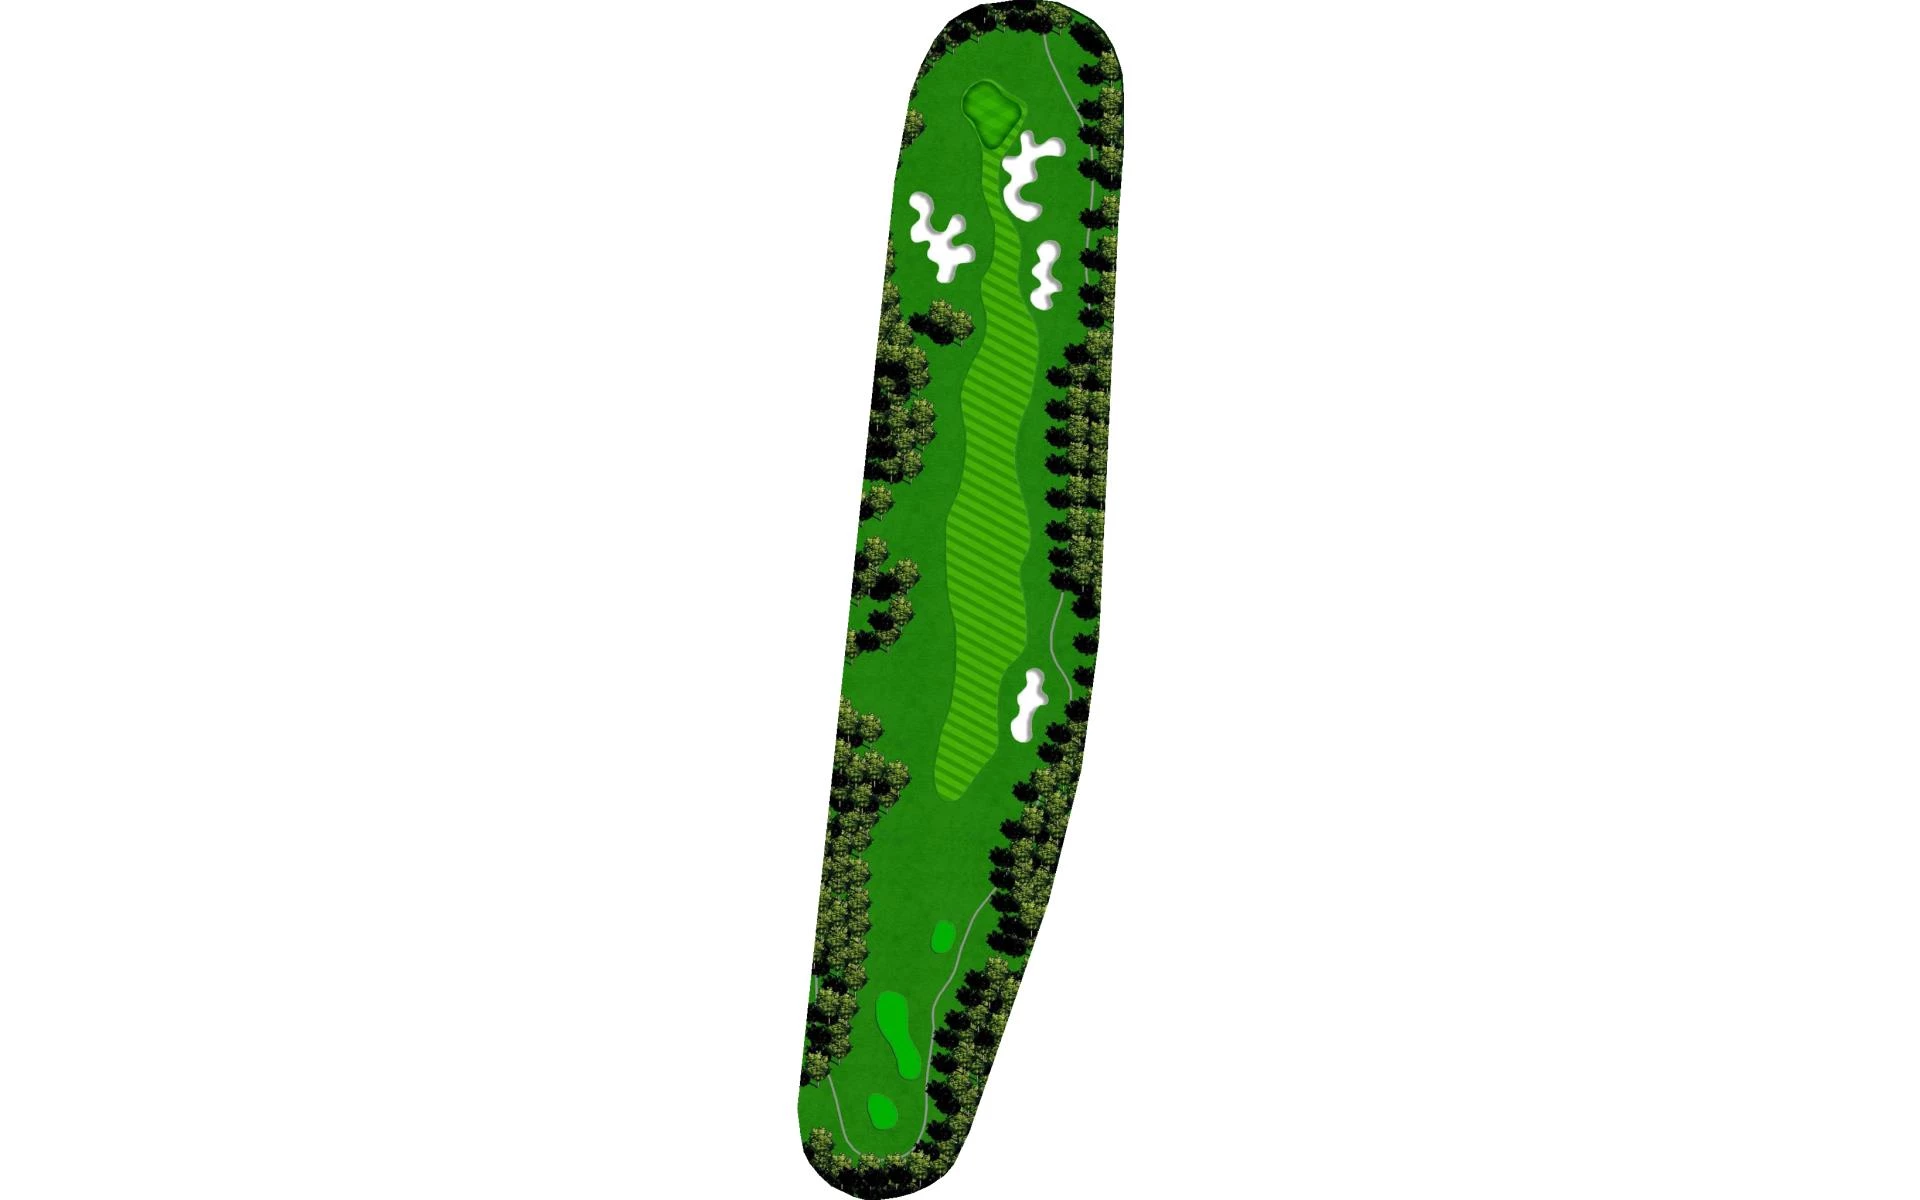
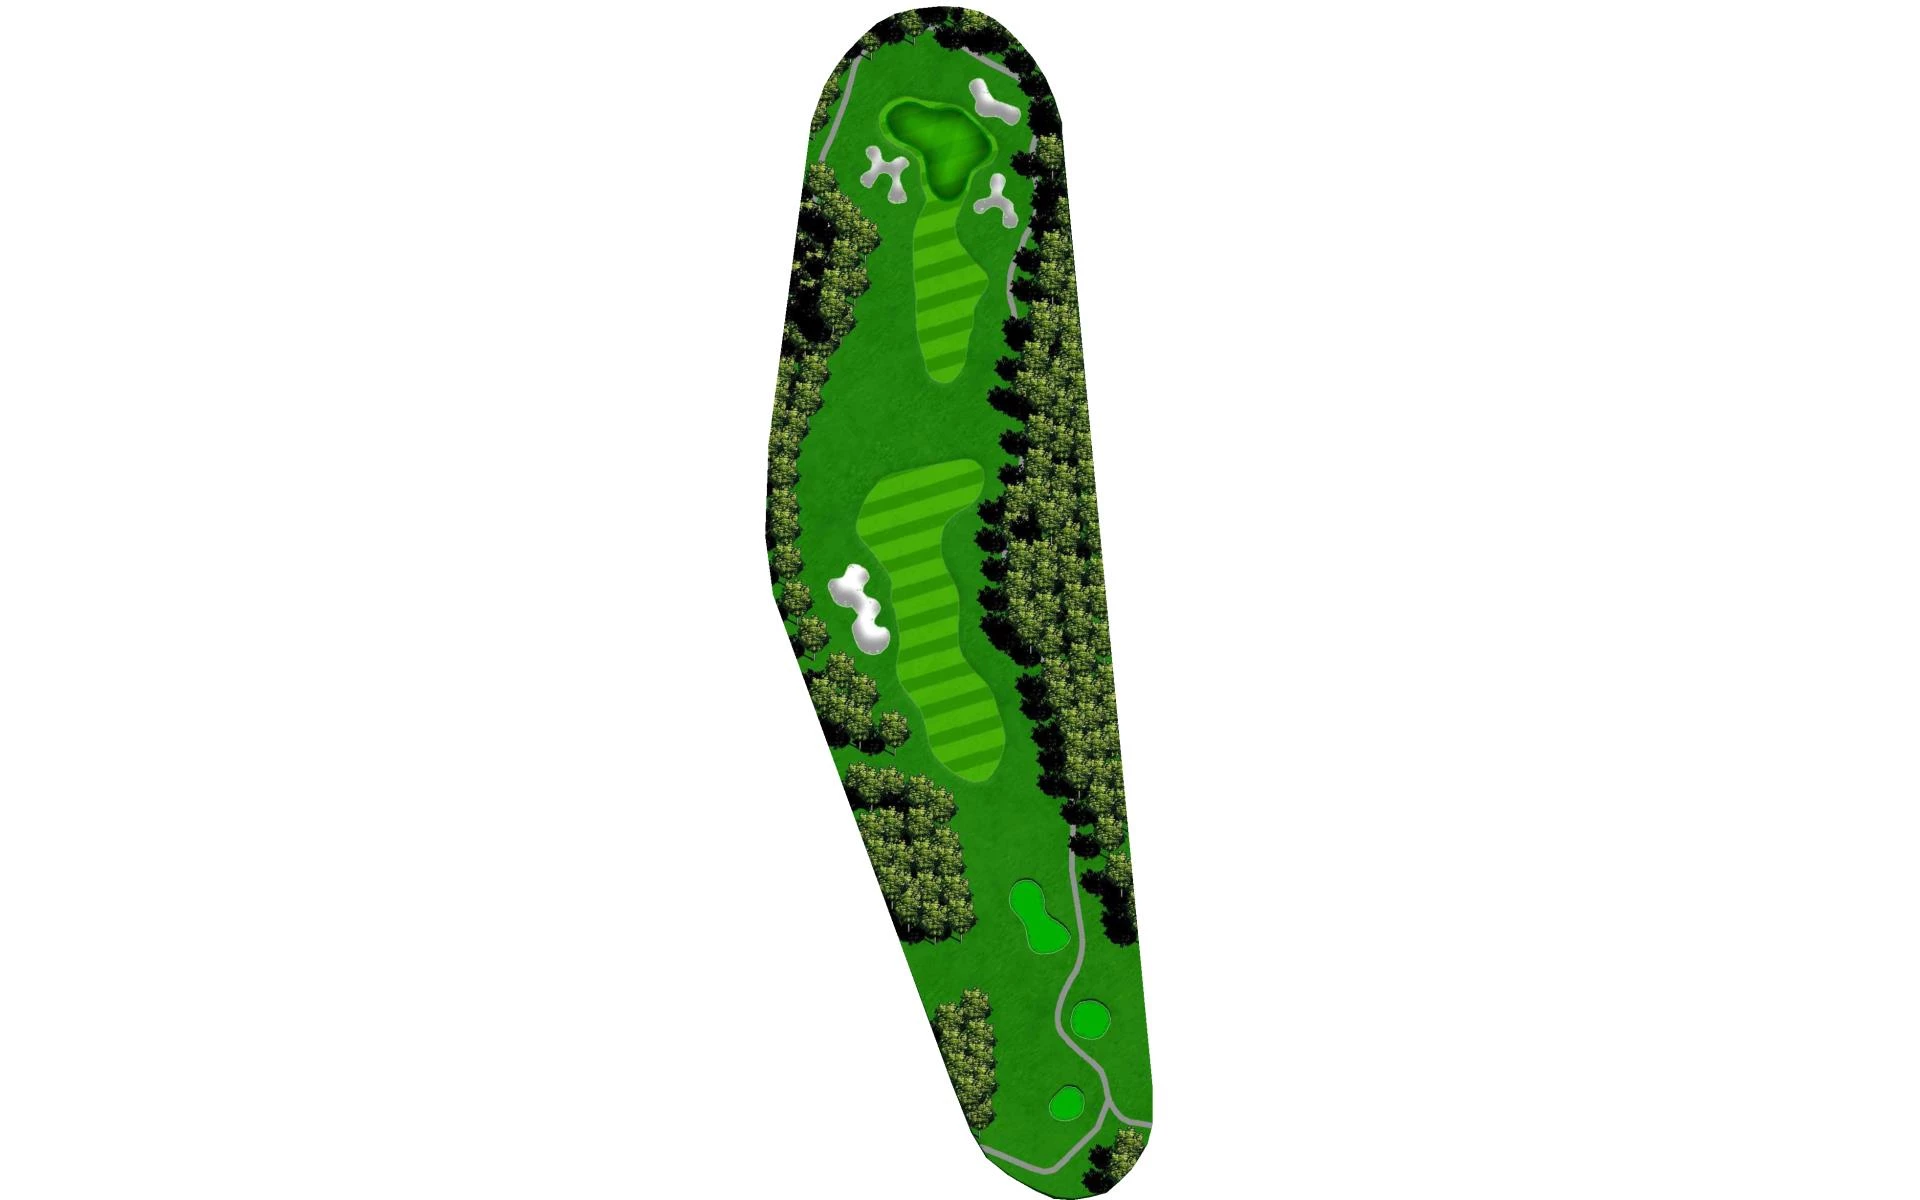
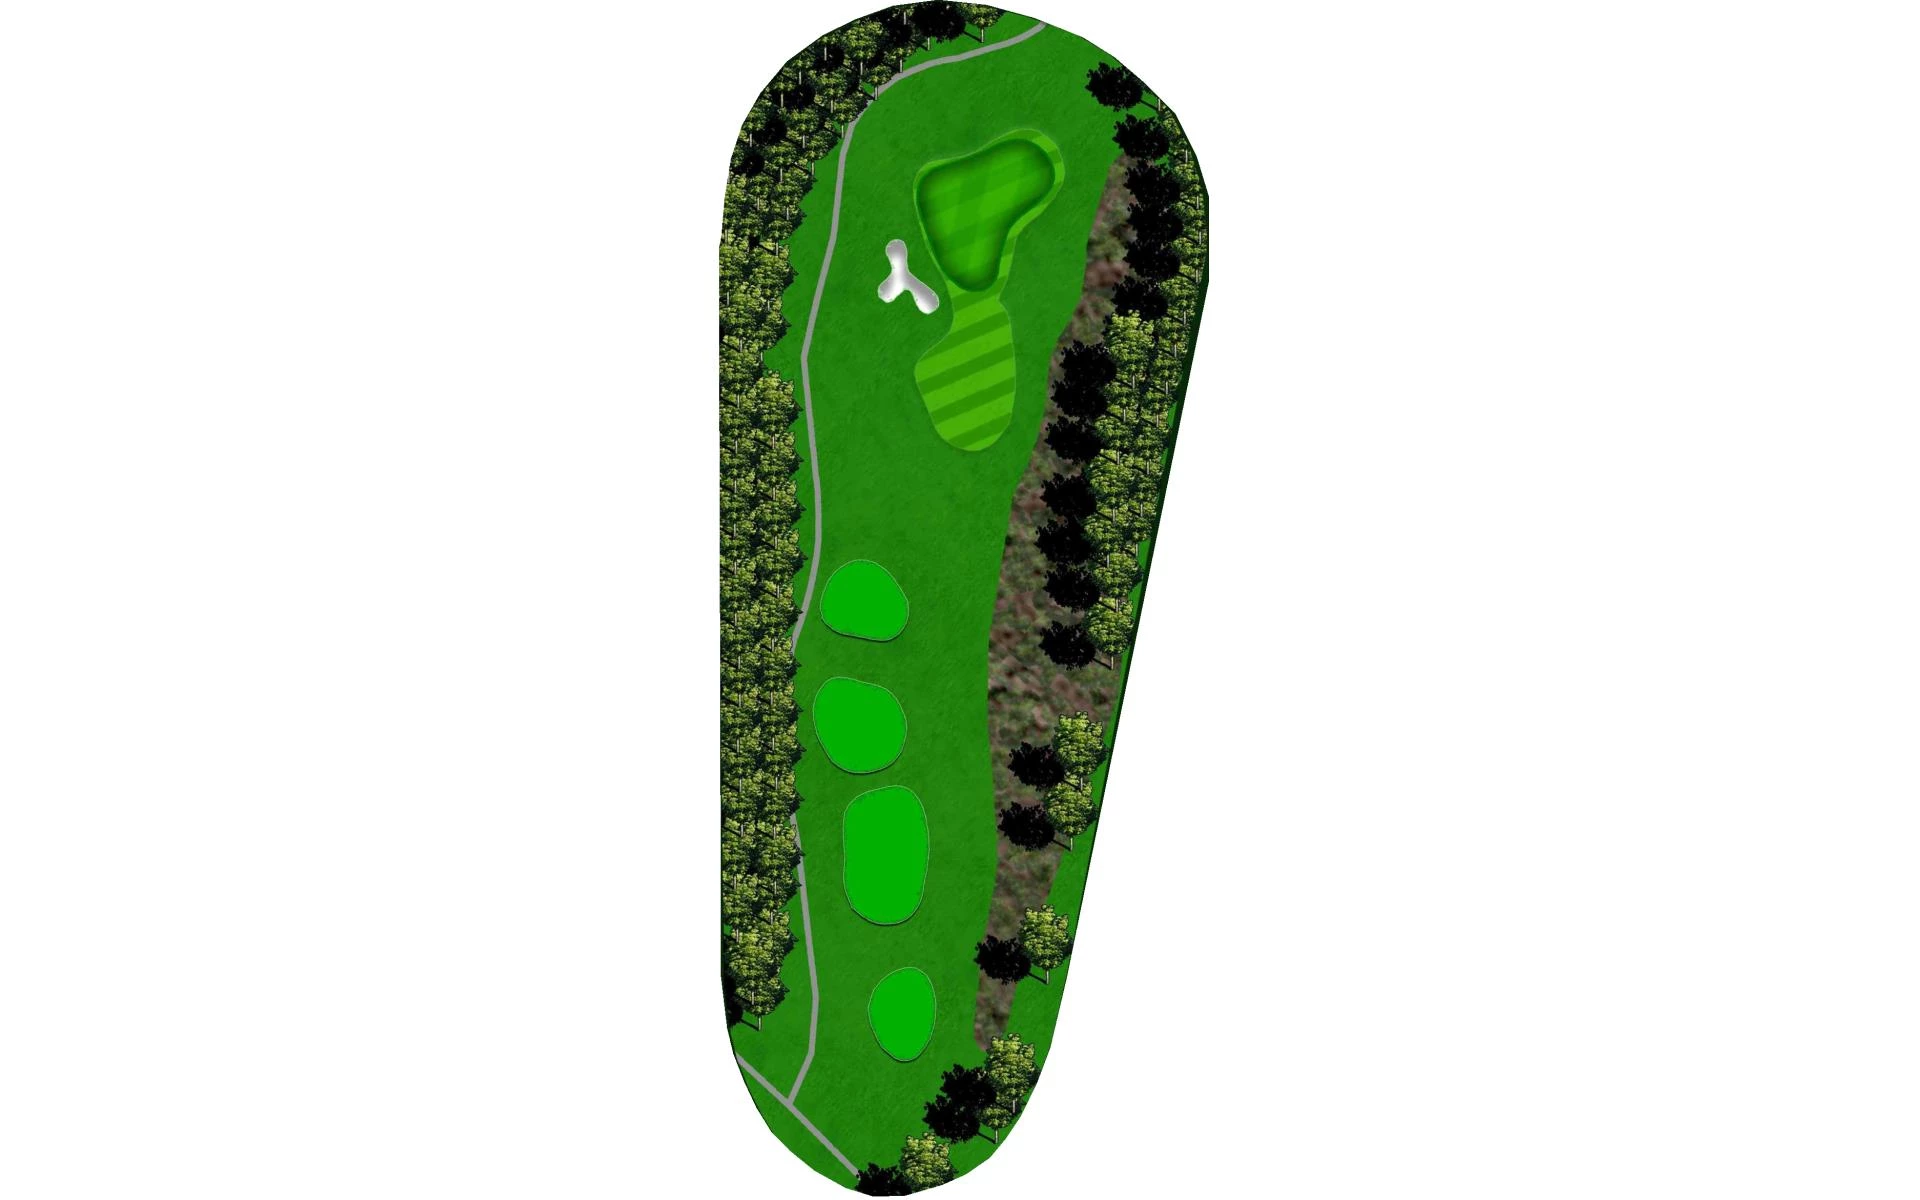
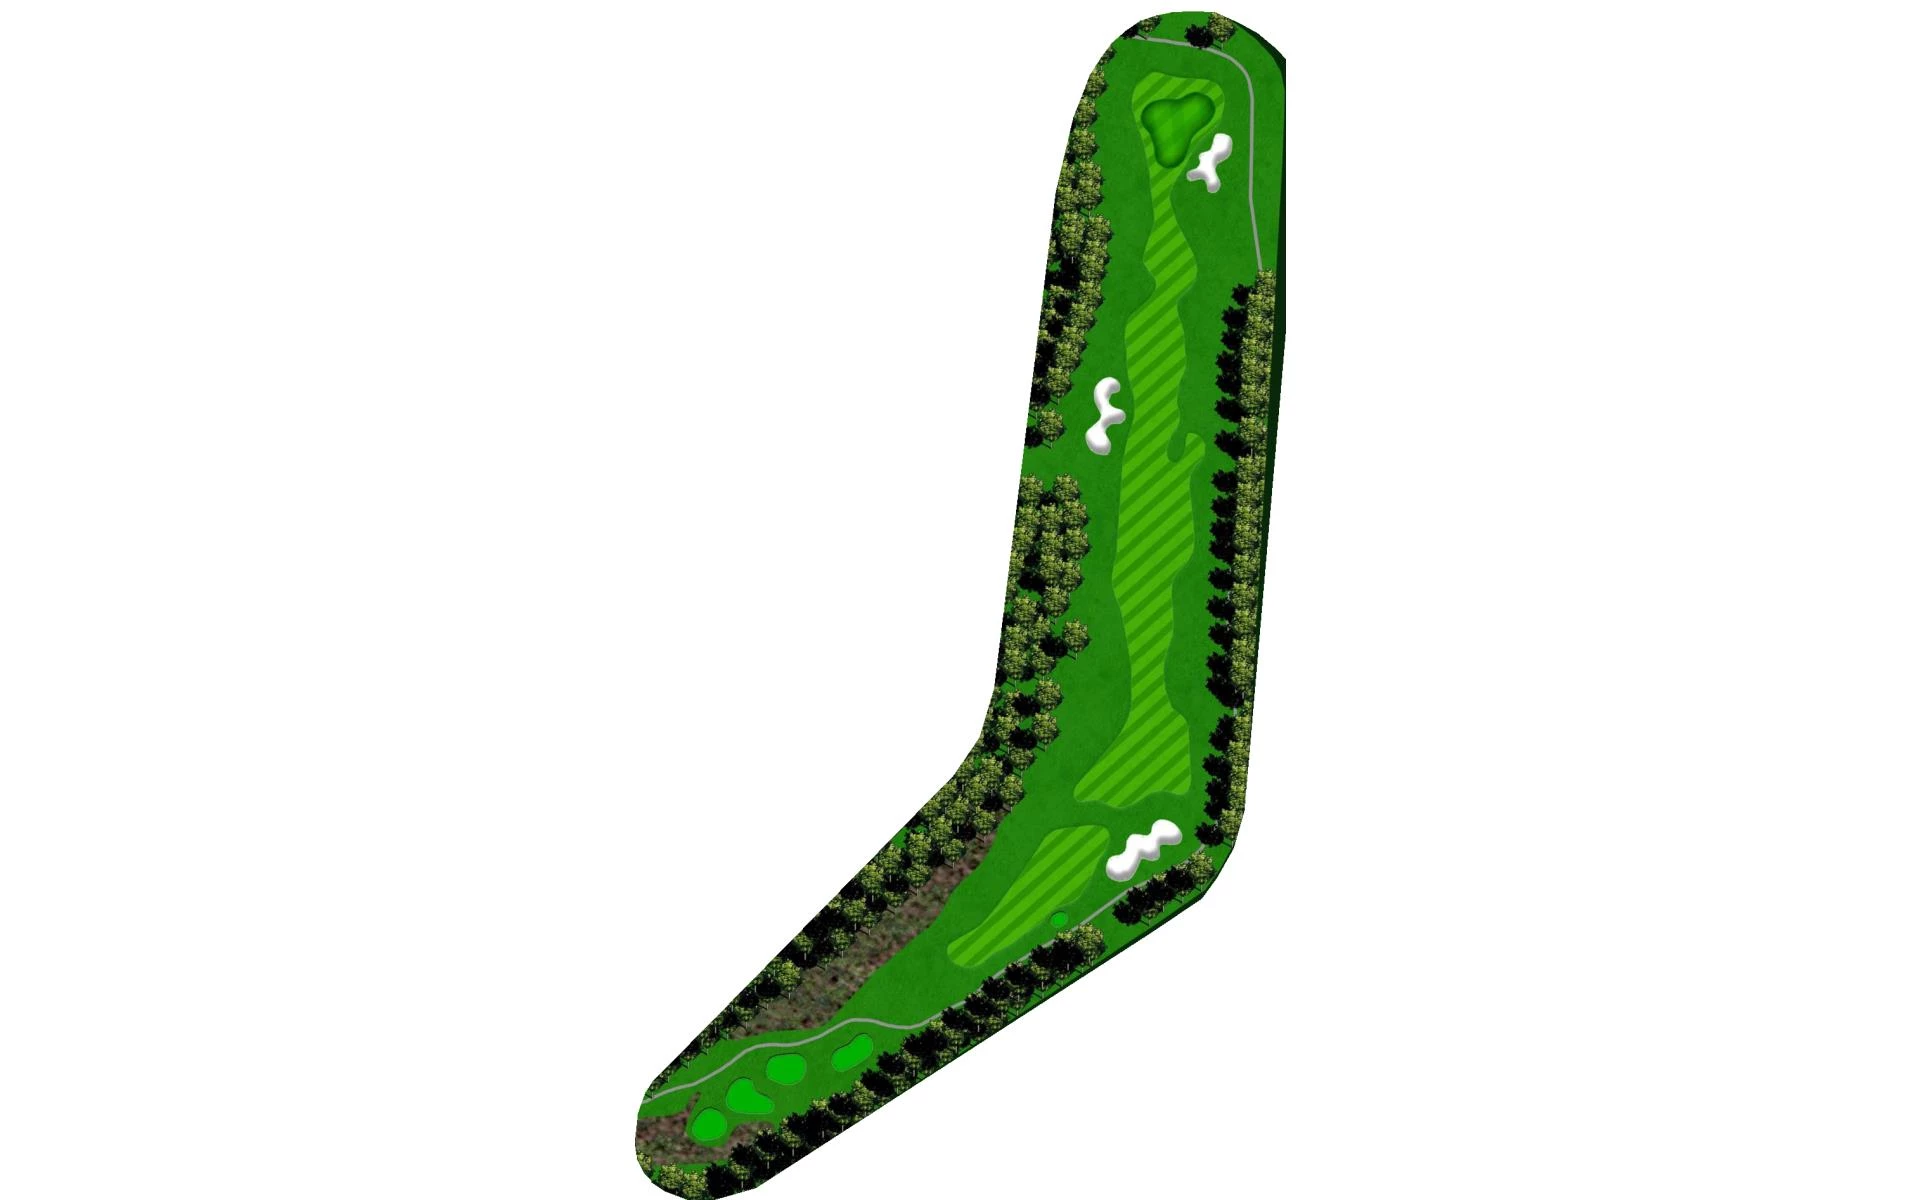
# 2 /
Par: 4
Handicaps:
Men's 17
Women's 17
Yardage by Tee:
BLACK 202
BLUE 185
WHITE 159
YELLOW 122
RED 112
Slope:
Black- 142 | Blue- Men 132 | Blue-Women 141 | White- Men 125 | White-Women 135 | Yellow- Men 114 | Yellow-Women 125 | Red-Men 104 | Red-Women 113 |
Pro Tips
Another tough bunker guards the front of the green. Hitting the green is key but hitting the wrong section of the green can lead to a tough two putt.
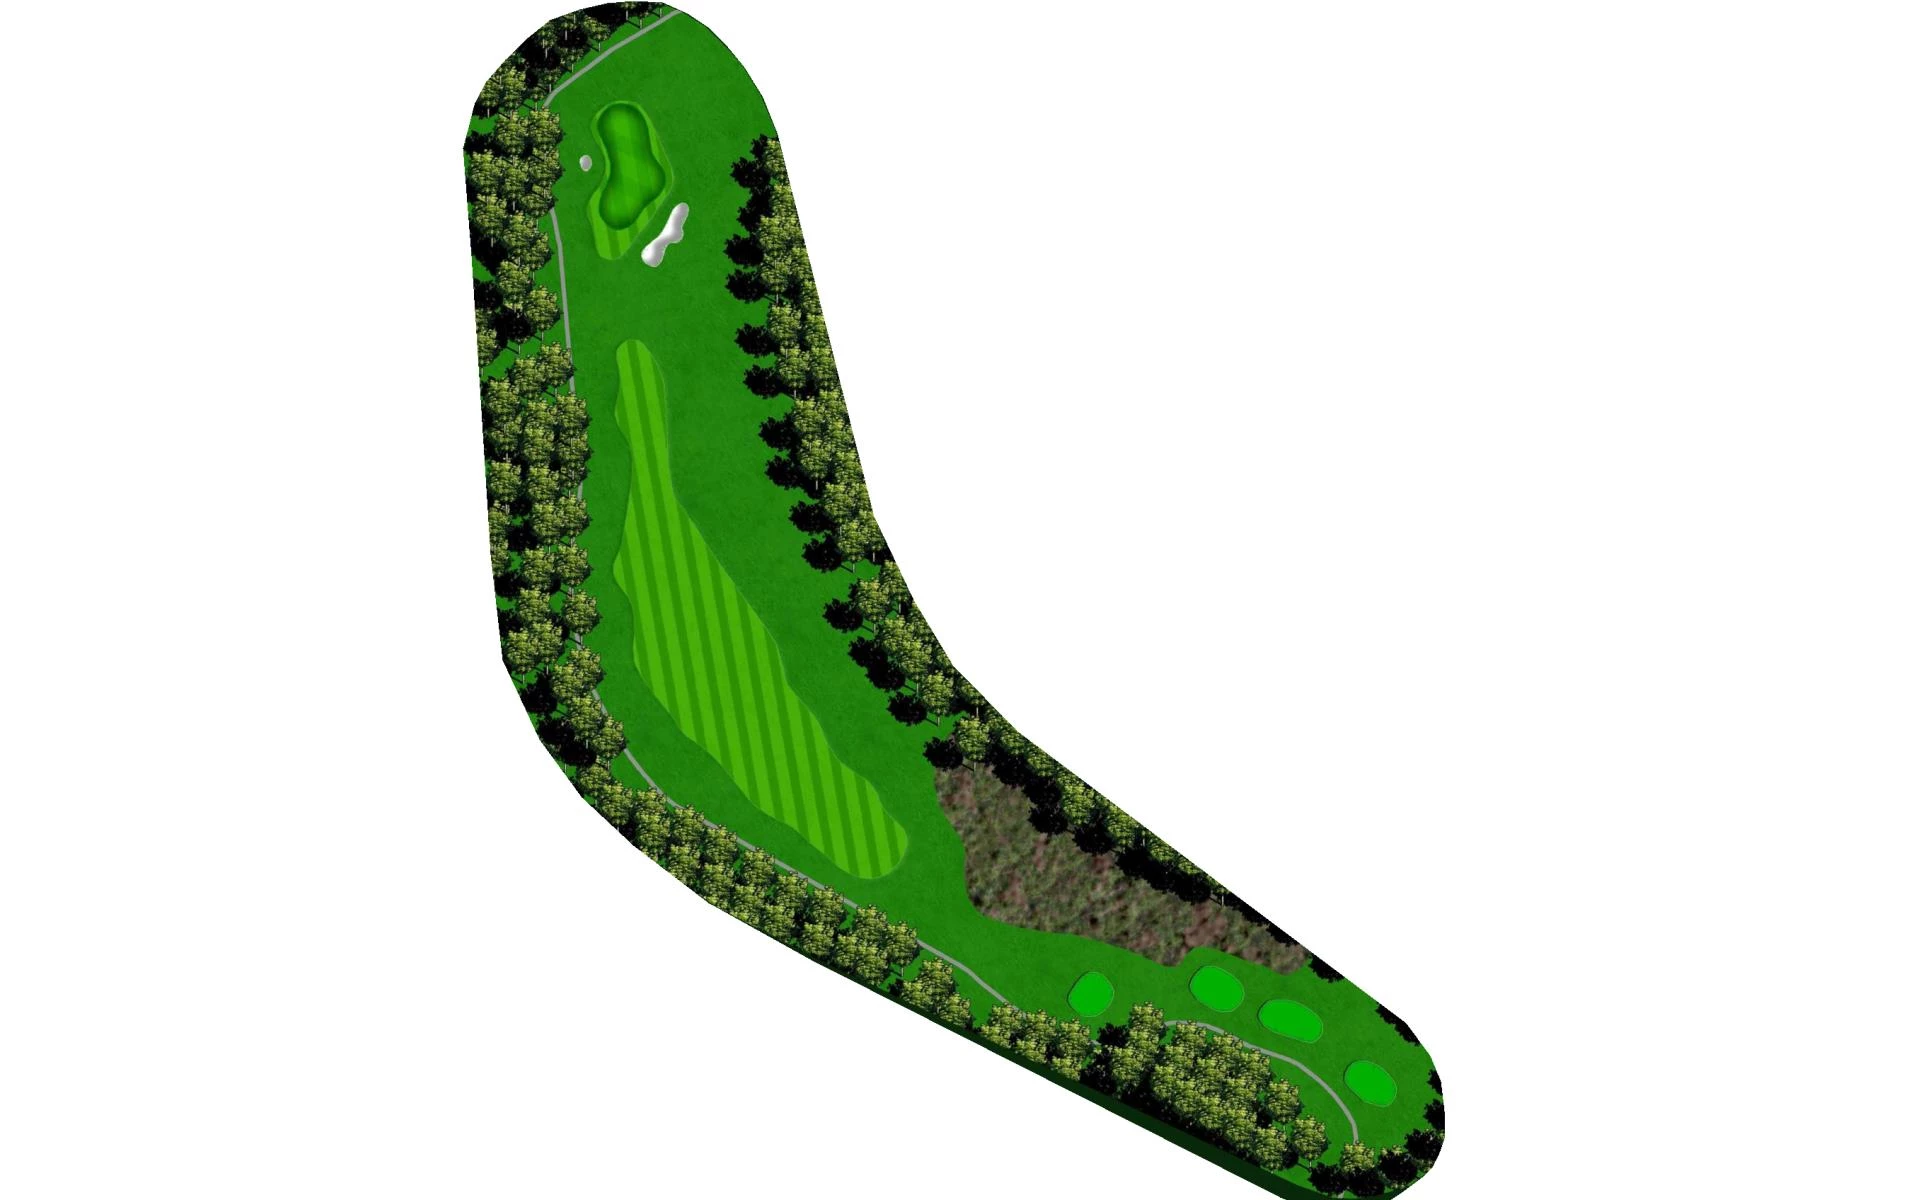
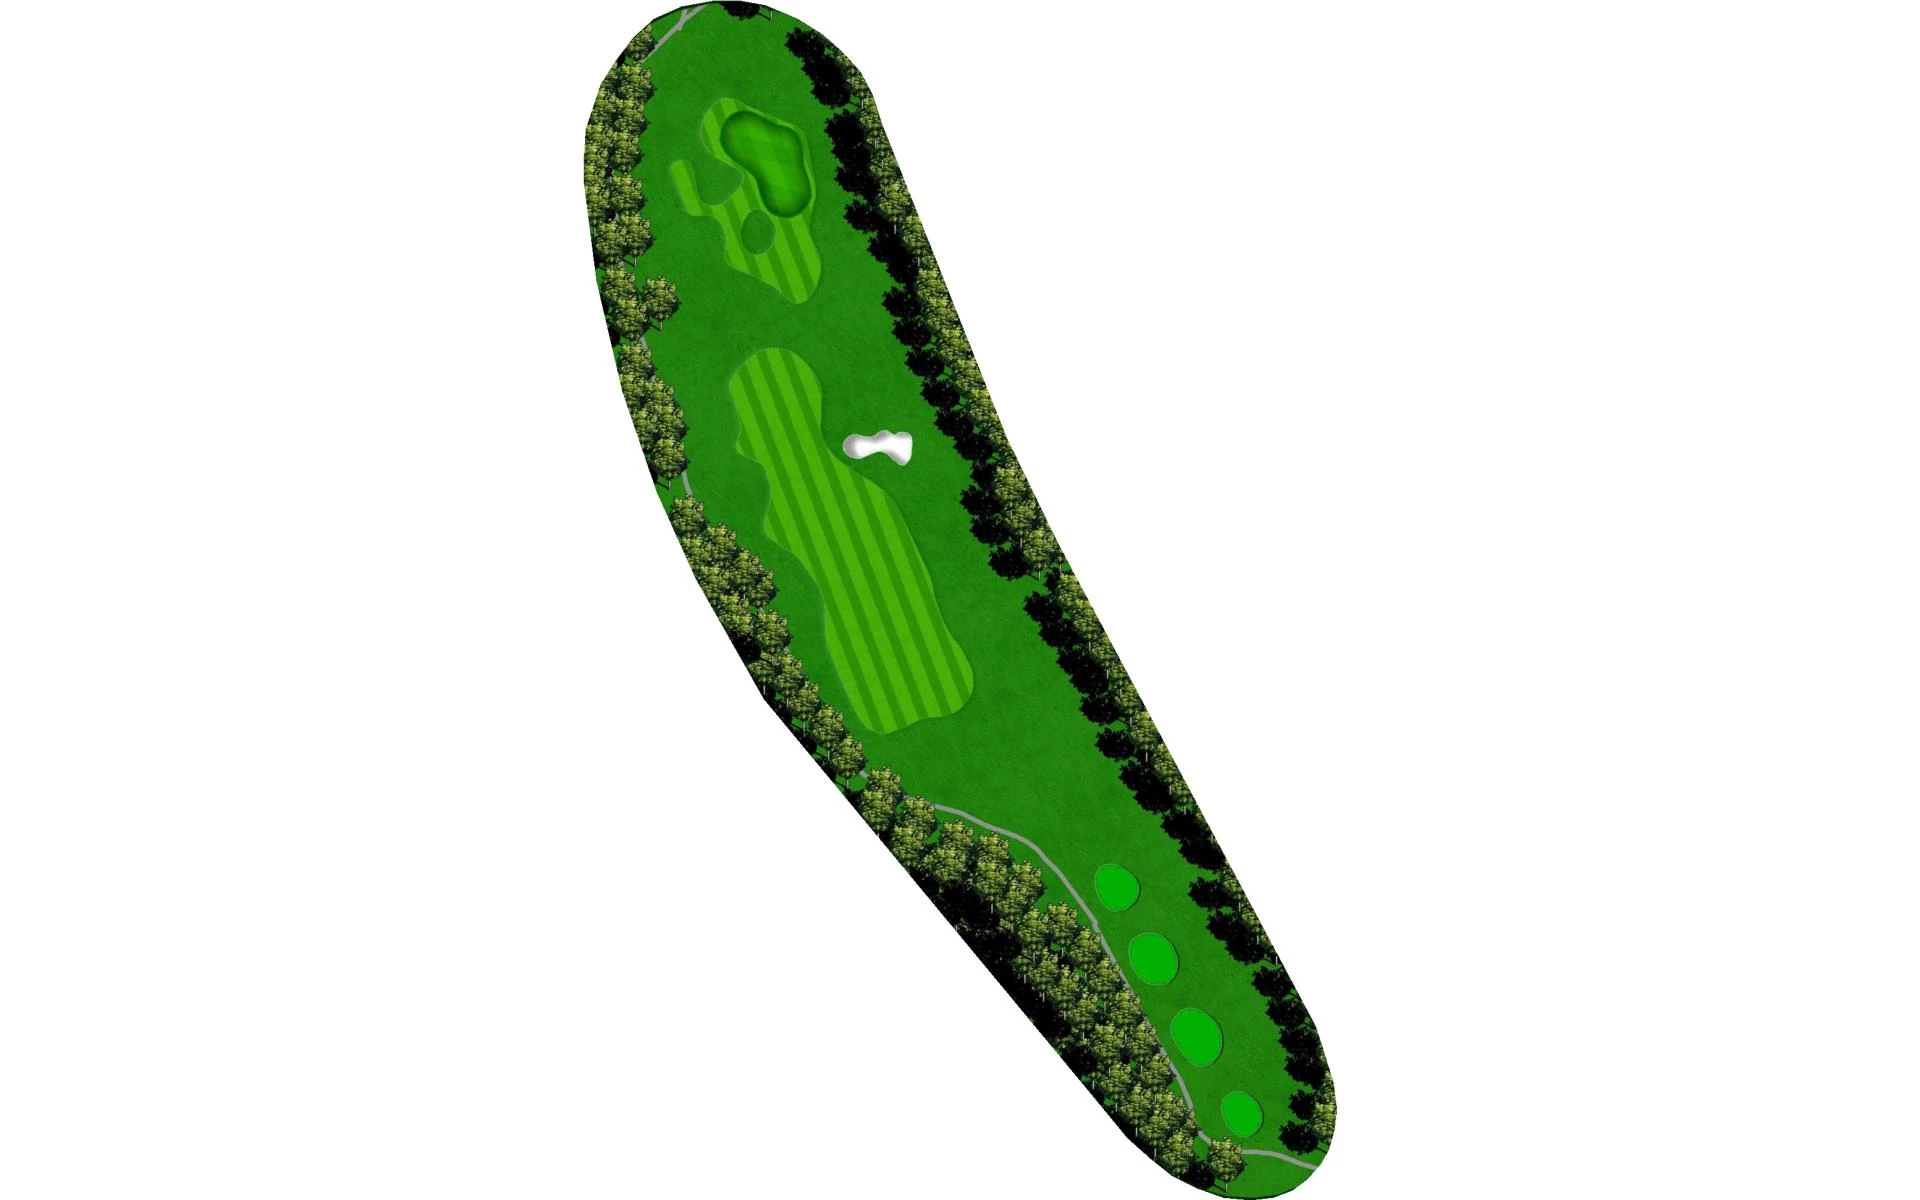
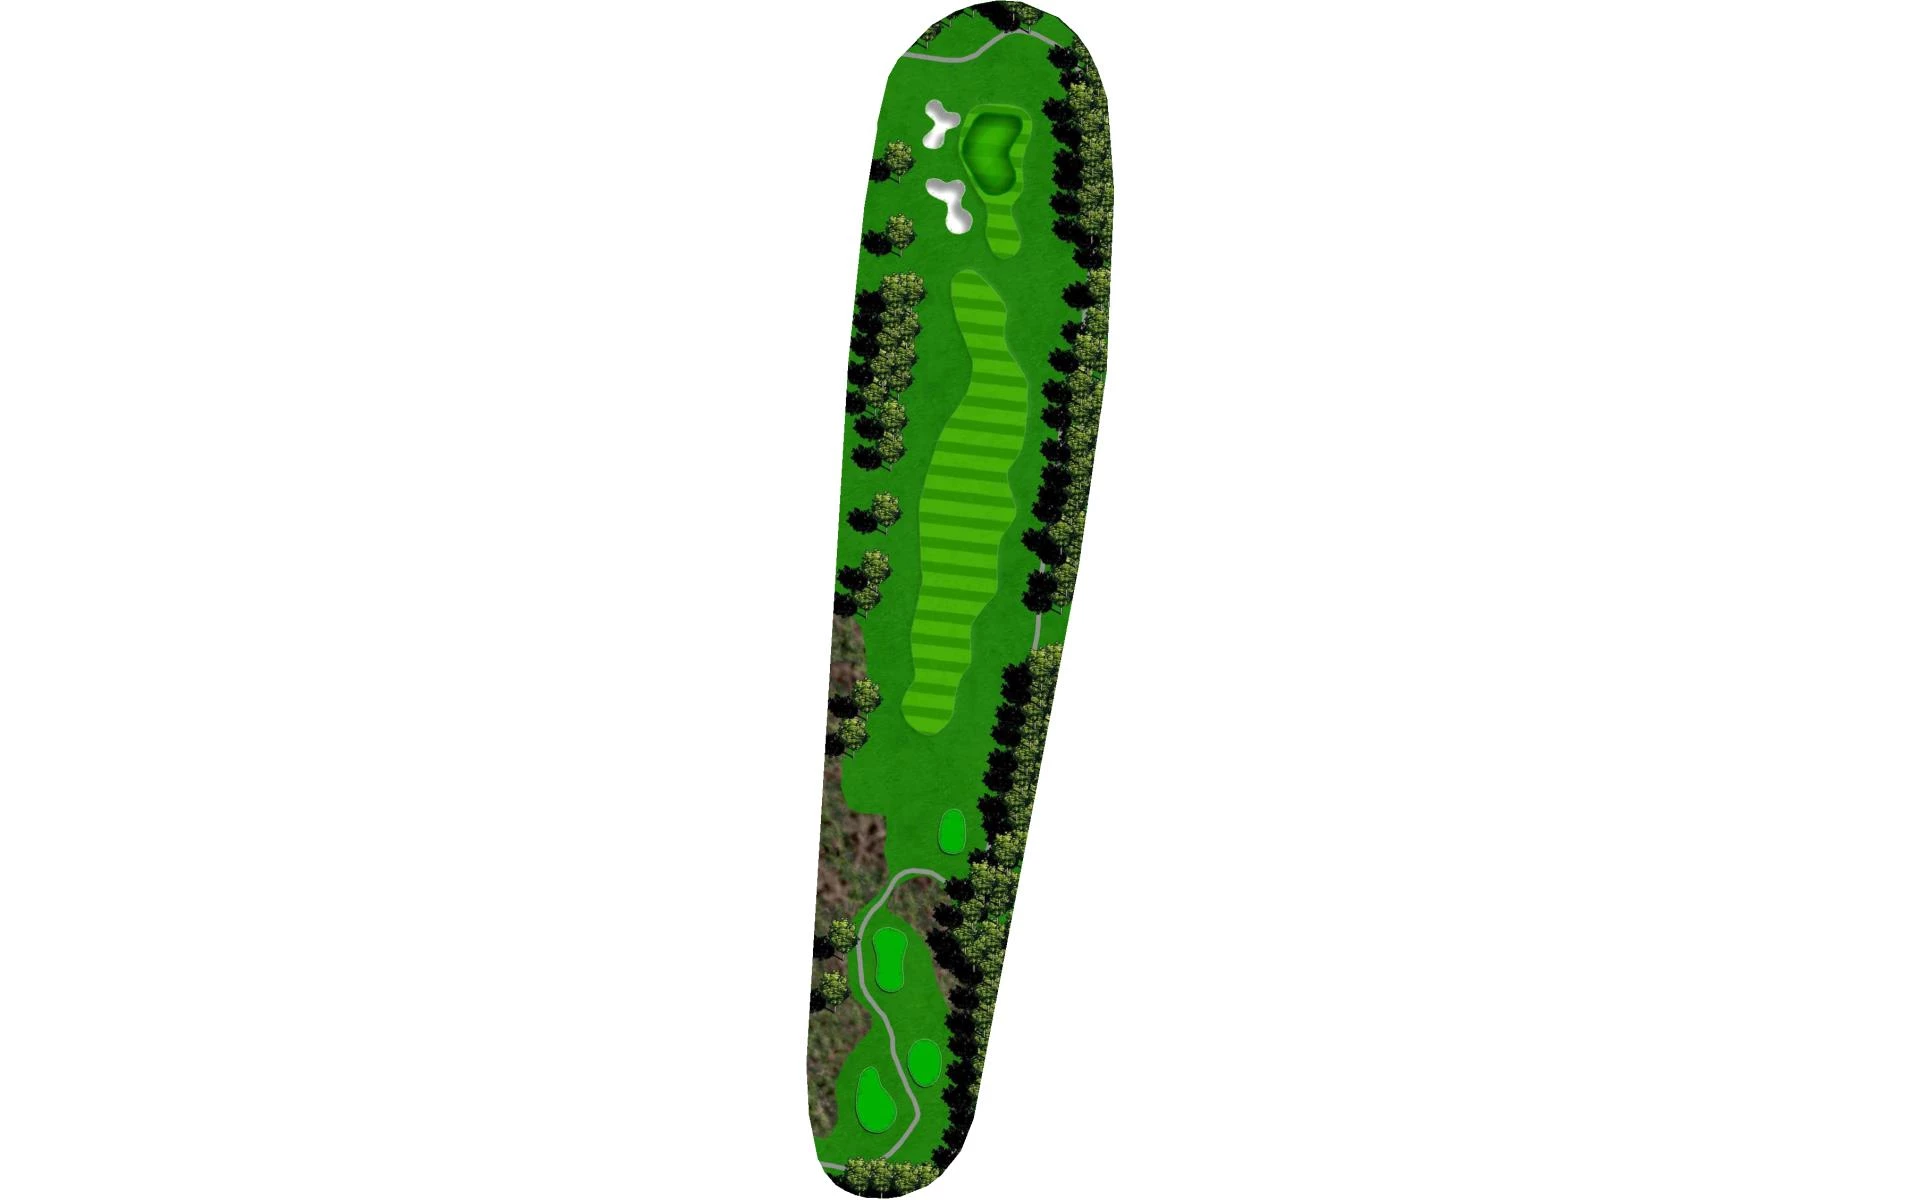
# 3 /
Par: 4
Handicaps:
Men's 7
Women's 7
Yardage by Tee:
BLACK 431
BLUE 386
WHITE 358
YELLOW 324
RED 249
Slope:
Black- 142 | Blue- Men 132 | Blue-Women 141 | White- Men 125 | White-Women 135 | Yellow- Men 114 | Yellow-Women 125 | Red-Men 104 | Red-Women 113 |
Pro Tips
A good drive down the right side with a little draw will find the fairway. The green is deep but narrow, so an accurate approach is key to a good look for birdie.
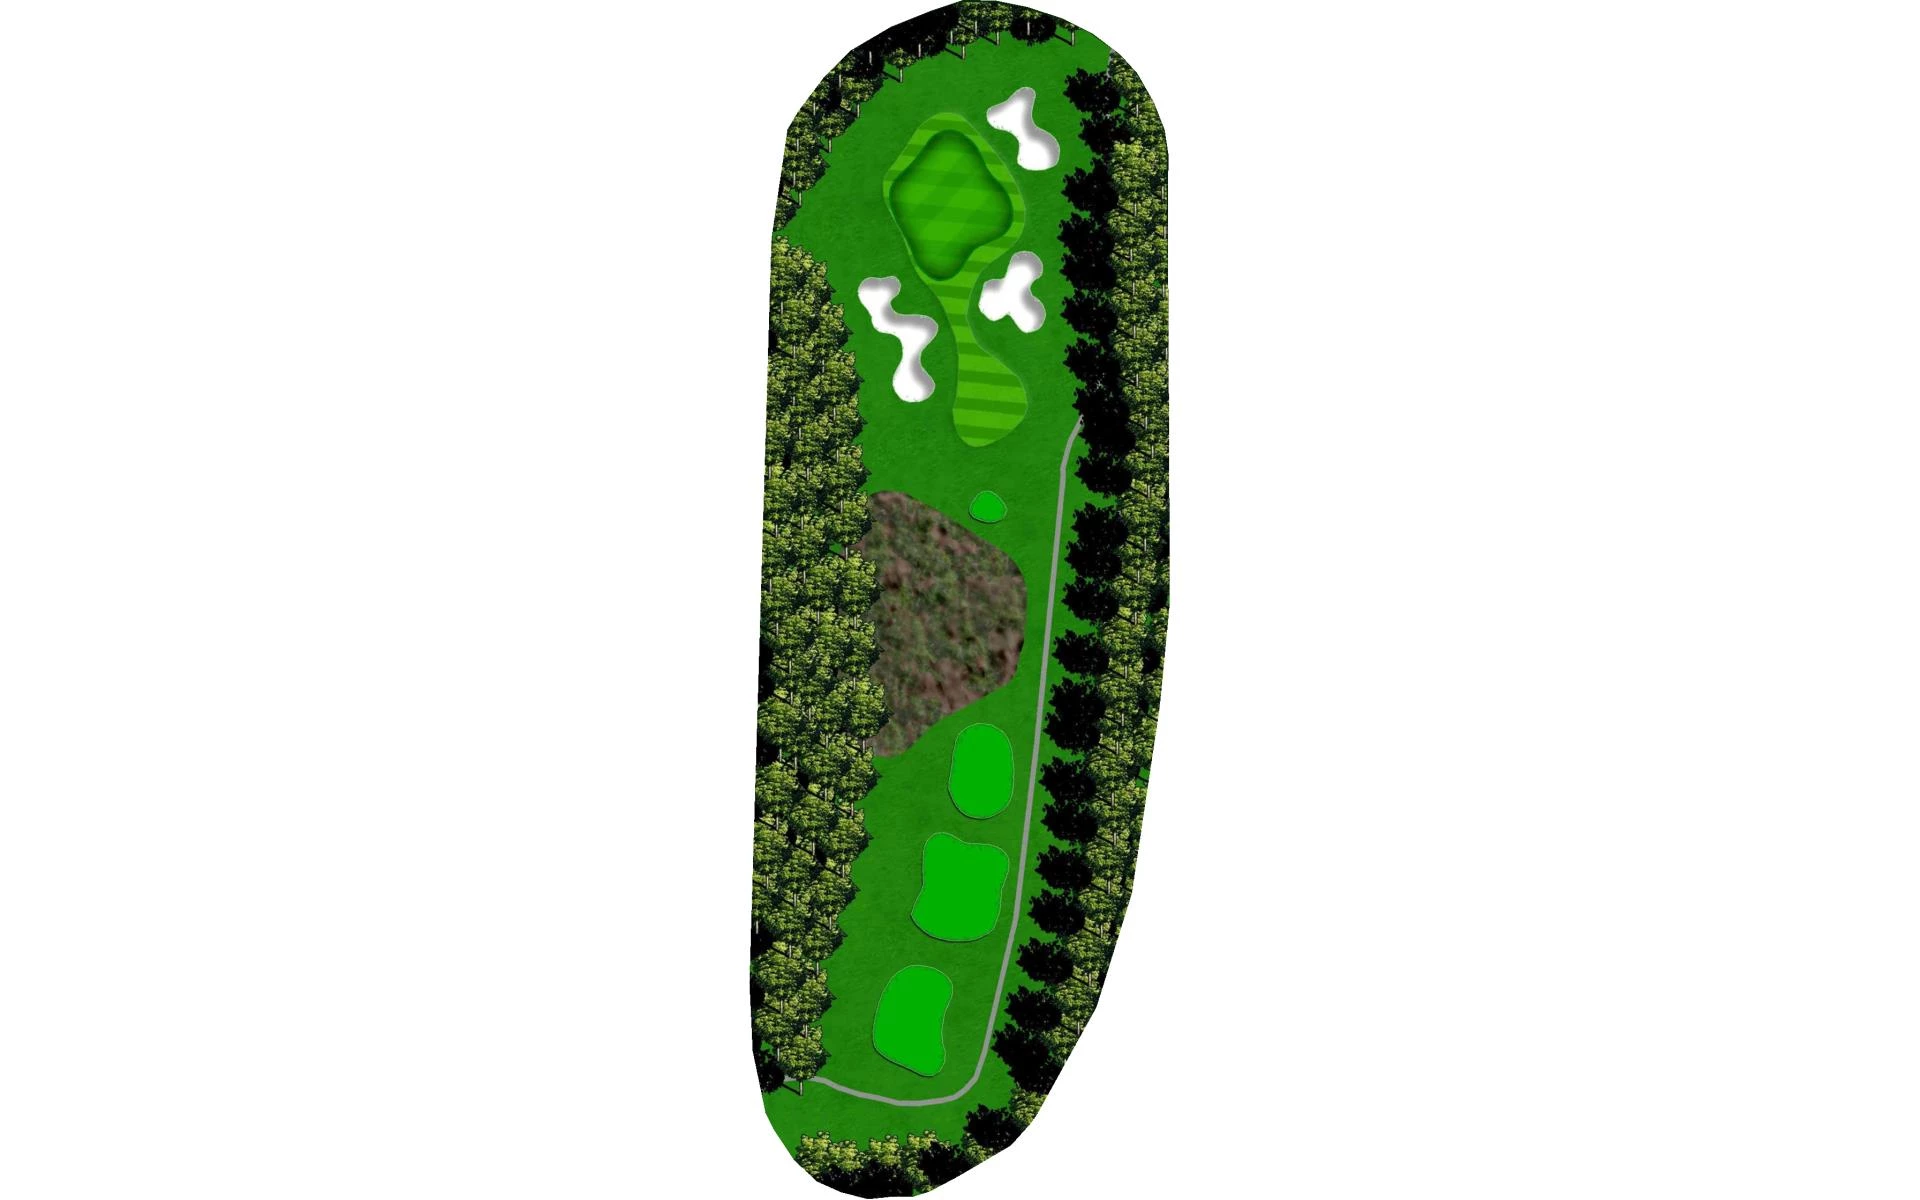
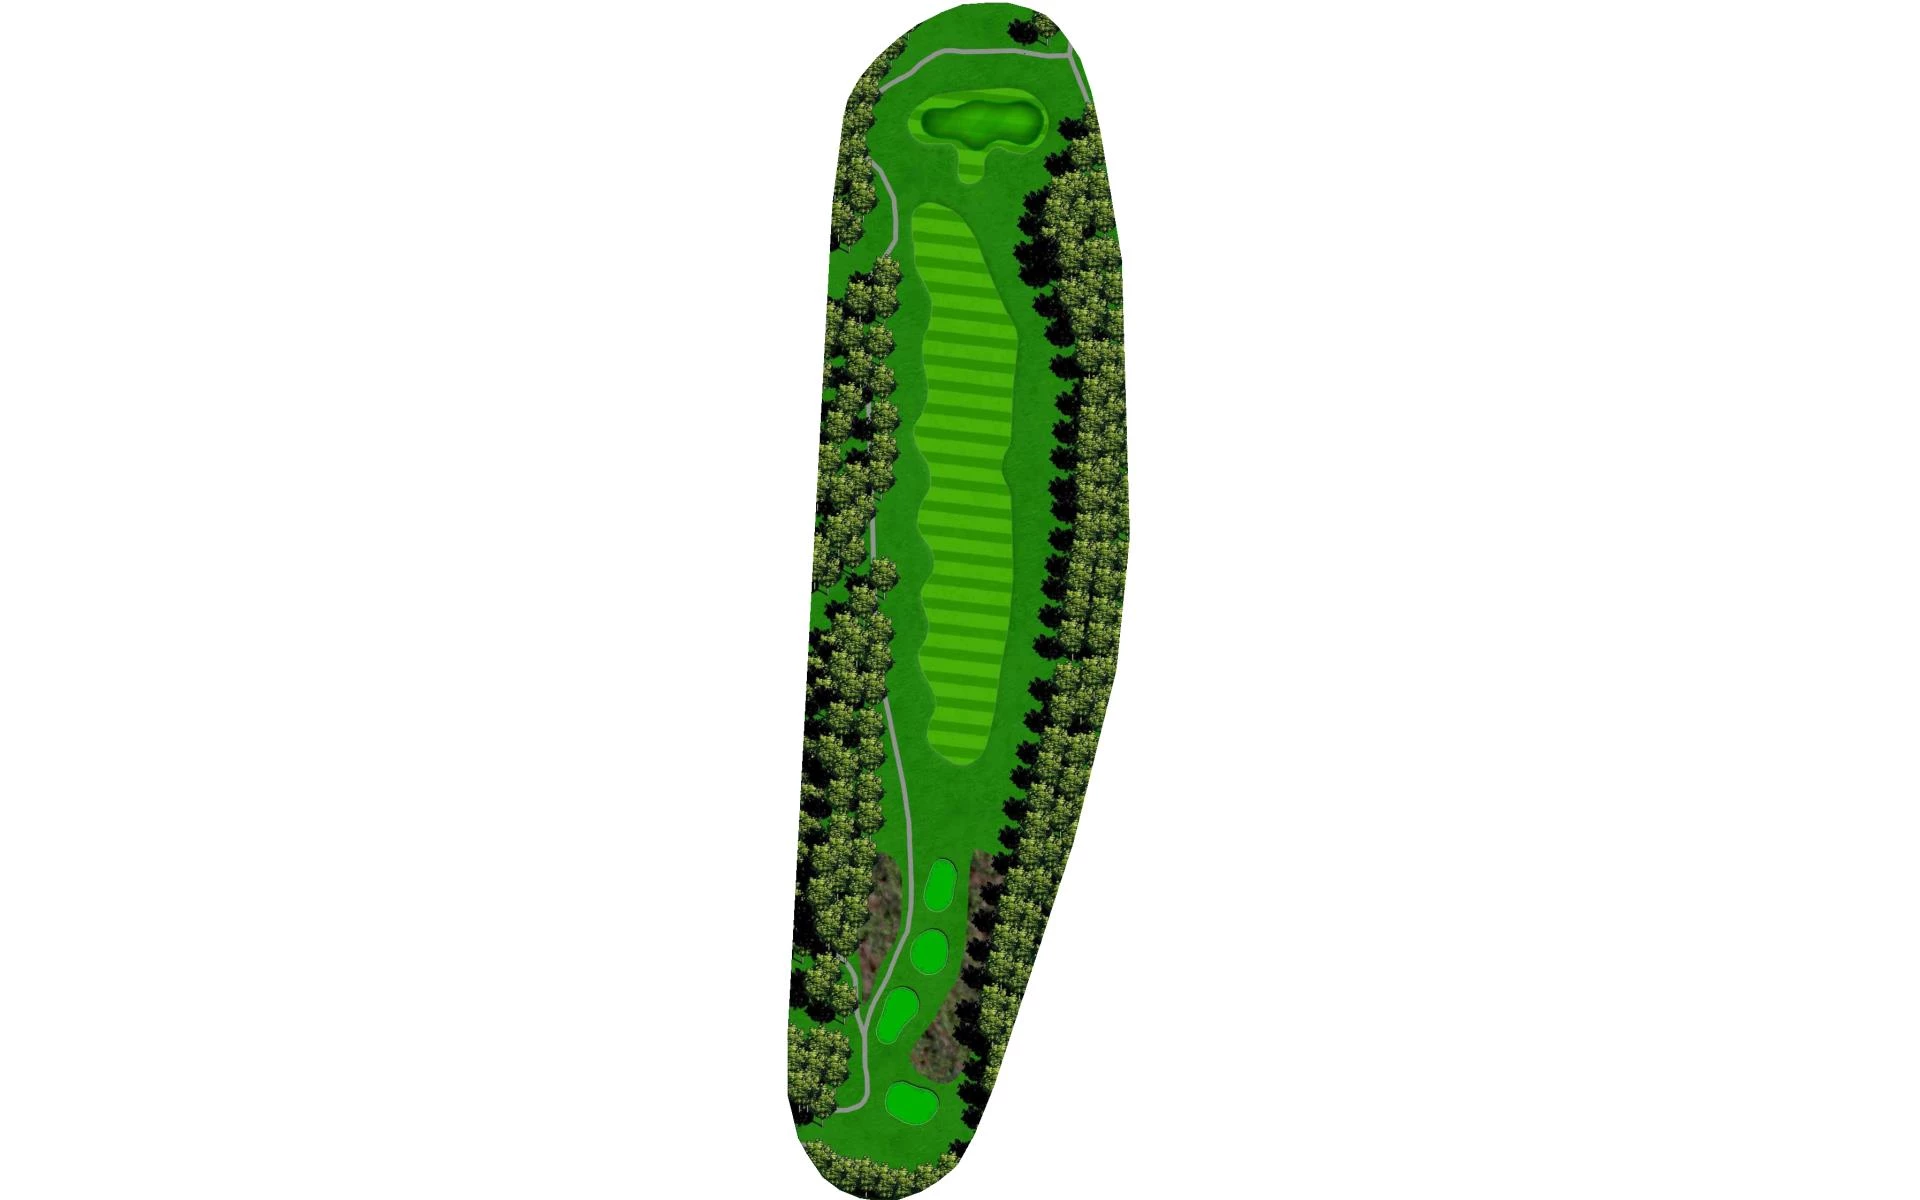
# 4 /
Par: 4
Handicaps:
Men's 11
Women's 11
Yardage by Tee:
BLACK 407
BLUE 384
WHITE 311
YELLOW 274
RED 269
Slope:
Black- 142 | Blue- Men 132 | Blue-Women 141 | White- Men 125 | White-Women 135 | Yellow- Men 114 | Yellow-Women 125 | Red-Men 104 | Red-Women 113 |
Pro Tips
Avoid the left fairway bunker to give yourself an easier approach into the green.
# 5 /
Par: 4
Handicaps:
Men's 15
Women's 15
Yardage by Tee:
BLACK 376
BLUE 336
WHITE 318
YELLOW 282
RED 280
Slope:
Black- 142 | Blue- Men 132 | Blue-Women 141 | White- Men 125 | White-Women 135 | Yellow- Men 114 | Yellow-Women 125 | Red-Men 104 | Red-Women 113 |
Pro Tips
Long hitters can wait for the green to clear and try to cut the right corner over the trees. Most golfers, be sure to hit your tee shot long enough down the left to get past the corner to give yourself a good look at the flag and take advantage of a good look at birdie.
# 6 /
Par: 5
Handicaps:
Men's 9
Women's 9
Yardage by Tee:
BLACK 514
BLUE 481
WHITE 459
YELLOW 414
RED 248
Slope:
Black- 142 | Blue- Men 132 | Blue-Women 141 | White- Men 125 | White-Women 135 | Yellow- Men 114 | Yellow-Women 125 | Red-Men 104 | Red-Women 113 |
Pro Tips
The first Par 5 with a well-guarded green. To avoid the risk, lay up short of the fairway bunkers to give yourself a good distance to hit your third shot close to score a birdie.
# 7 /
Par: 4
Handicaps:
Men's 1
Women's 5
Yardage by Tee:
BLACK 439
BLUE 403
WHITE 375
YELLOW 338
RED 334
Slope:
Black- 142 | Blue- Men 132 | Blue-Women 141 | White- Men 125 | White-Women 135 | Yellow- Men 114 | Yellow-Women 125 | Red-Men 104 | Red-Women 113 |
Pro Tips
Place your tee shot down the left for a good look at the green. An approach long or to the left can cause trouble so be sure to measure your approach correctly. Par is a good score on this difficult hole.
# 8 /
Par: 3
Handicaps:
Men's 13
Women's 13
Yardage by Tee:
BLACK 197
BLUE 166
WHITE 142
YELLOW 128
RED 68
Slope:
Black- 142 | Blue- Men 132 | Blue-Women 141 | White- Men 125 | White-Women 135 | Yellow- Men 114 | Yellow-Women 125 | Red-Men 104 | Red-Women 113 |
Pro Tips
The second Par 3 on the front side. The ridge going through the middle right of the green can make getting it close to a tucked right flag behind the bunker difficult. Hit your approach to the middle of the green to ensure a par on this difficult Par 3.
# 9 /
Par: 5
Handicaps:
Men's 3
Women's 1
Yardage by Tee:
BLACK 567
BLUE 539
WHITE 507
YELLOW 463
RED 359
Slope:
Black- 142 | Blue- Men 132 | Blue-Women 141 | White- Men 125 | White-Women 135 | Yellow- Men 114 | Yellow-Women 125 | Red-Men 104 | Red-Women 113 |
Pro Tips
Another Par 5 that is well guarded. Avoid the left side near the green and the bunkers. The longer hitters be sure to miss right if you go for this green in two, but well struck shots can lead to a strong finish to the front nine.
# 10 /
Par: 4
Handicaps:
Men's 12
Women's 8
Yardage by Tee:
BLACK 402
BLUE 368
WHITE 328
YELLOW 310
RED 307
Slope:
Black- 142 | Blue- Men 132 | Blue-Women 141 | White- Men 125 | White-Women 135 | Yellow- Men 114 | Yellow-Women 125 | Red-Men 104 | Red-Women 113 |
Pro Tips
Left side of the fairway is key to this opening hole on the back 9. The approach will play slightly downhill.
# 11 /
Par: 4
Handicaps:
Men's 16
Women's 16
Yardage by Tee:
BLACK 371
BLUE 339
WHITE 307
YELLOW 277
RED 274
Slope:
Black- 142 | Blue- Men 132 | Blue-Women 141 | White- Men 125 | White-Women 135 | Yellow- Men 114 | Yellow-Women 125 | Red-Men 104 | Red-Women 113 |
Pro Tips
Longer hitters can get it close on this par 4 by hugging the right side of the hole but be sure you have enough to carry the bunker on this downhill tee shot. For us mortal golfers, a tee shot down the left side of the fairway will give a good look at the flag
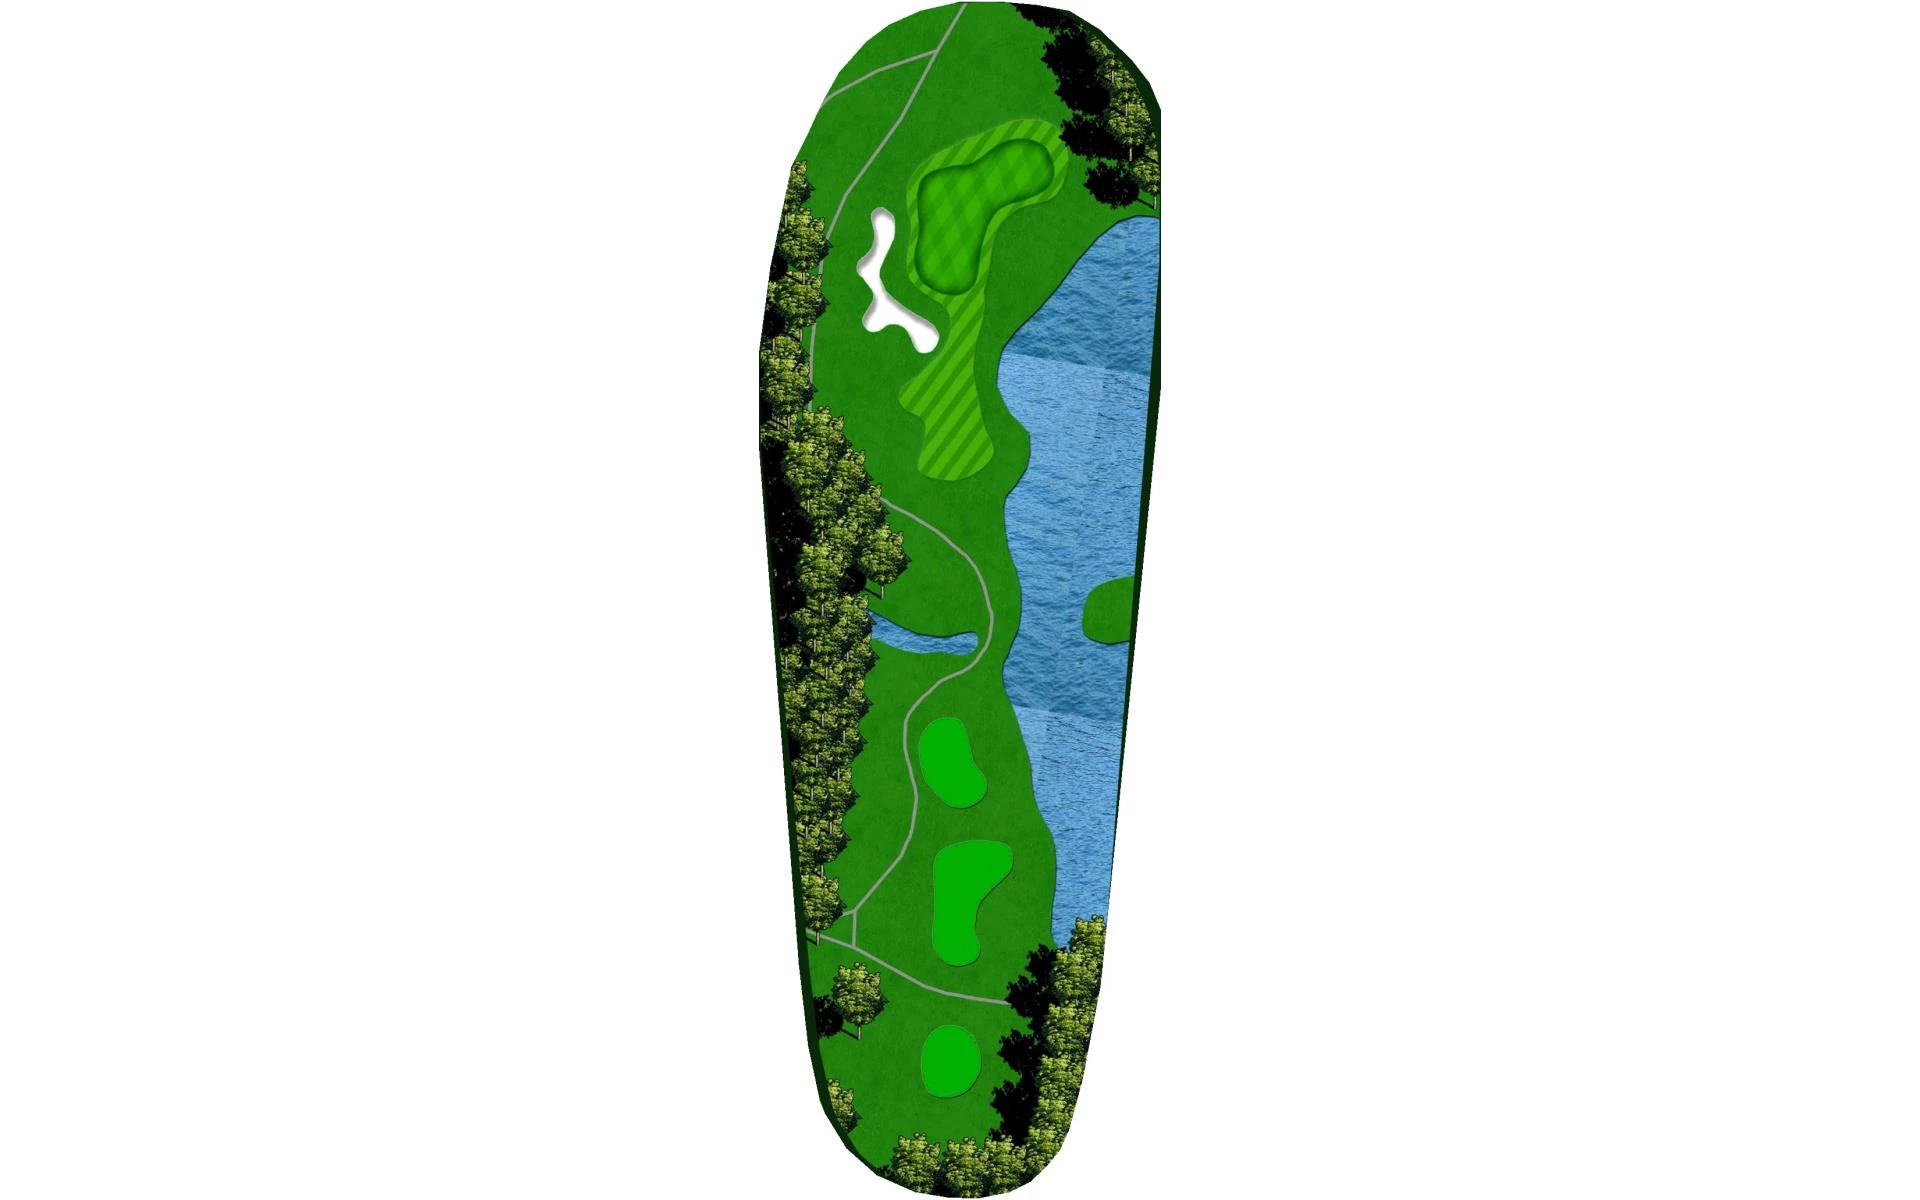
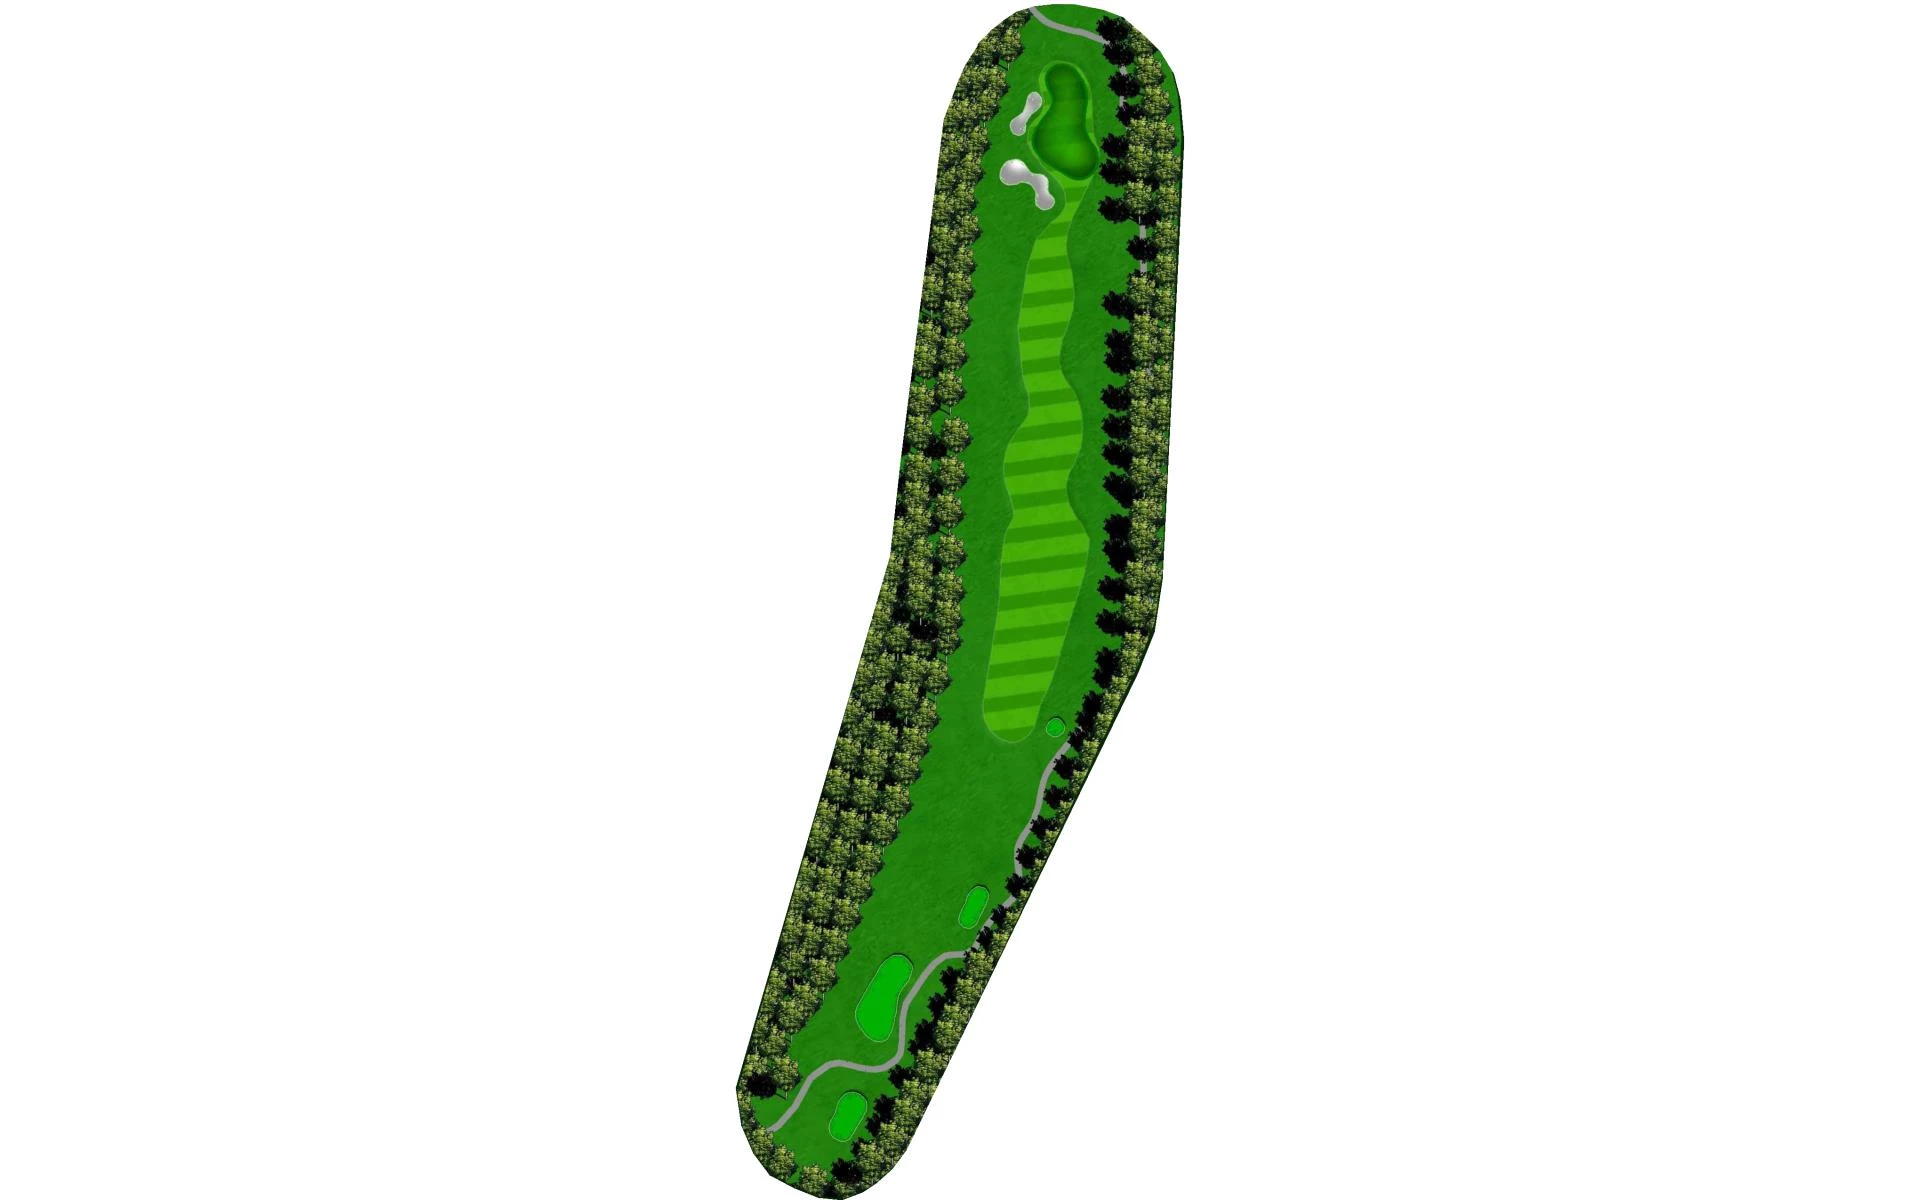
# 12 /
Par: 3
Handicaps:
Men's 10
Women's 10
Yardage by Tee:
BLACK 210
BLUE 178
WHITE 162
YELLOW 132
RED 96
Slope:
Black- 142 | Blue- Men 132 | Blue-Women 141 | White- Men 125 | White-Women 135 | Yellow- Men 114 | Yellow-Women 125 | Red-Men 104 | Red-Women 113 |
Pro Tips
The only hole on the course with water this Par 3 requires an accurate tee shot to get it close. With an undulated green hitting the right area is key to avoiding a difficult first putt. Be sure to avoid the bunker left and grass bunker on the right.
# 13 /
Par: 5
Handicaps:
Men's 14
Women's 14
Yardage by Tee:
BLACK 535
BLUE 505
WHITE 421
YELLOW 382
RED 378
Slope:
Black- 142 | Blue- Men 132 | Blue-Women 141 | White- Men 125 | White-Women 135 | Yellow- Men 114 | Yellow-Women 125 | Red-Men 104 | Red-Women 113 |
Pro Tips
The first Par 5 on the back 9. Keep your tee shot down the right to avoid the fairway bunkers. This Par 5 can lead to more birdies than the first two with an easier green surround so be sure you take advantage of #13.
# 14 /
Par: 3
Handicaps:
Men's 18
Women's 18
Yardage by Tee:
BLACK 194
BLUE 156
WHITE 125
YELLOW 93
RED 89
Slope:
Black- 142 | Blue- Men 132 | Blue-Women 141 | White- Men 125 | White-Women 135 | Yellow- Men 114 | Yellow-Women 125 | Red-Men 104 | Red-Women 113 |
Pro Tips
The easiest Par 3 on the course still requires an accurate tee shot to score a birdie. Avoid left of the green to stay clear of the bunker and slope.
# 15 /
Par: 4
Handicaps:
Men's 6
Women's 12
Yardage by Tee:
BLACK 415
BLUE 396
WHITE 352
YELLOW 290
RED 206
Slope:
Black- 142 | Blue- Men 132 | Blue-Women 141 | White- Men 125 | White-Women 135 | Yellow- Men 114 | Yellow-Women 125 | Red-Men 104 | Red-Women 113 |
Pro Tips
Longer hitters will find a shorter iron into this green so be sure to walk away with no more than a par to go into the finishing holes with confidence. Be sure to check your yardage as this uphill, deep green can have a three-club difference from front to back.
# 16 /
Par: 4
Handicaps:
Men's 2
Women's 6
Yardage by Tee:
BLACK 422
BLUE 383
WHITE 351
YELLOW 322
RED 263
Slope:
Black- 142 | Blue- Men 132 | Blue-Women 141 | White- Men 125 | White-Women 135 | Yellow- Men 114 | Yellow-Women 125 | Red-Men 104 | Red-Women 113 |
Pro Tips
A wide fairway will make this tee shot easy but hitting the green will prove difficult with an uphill approach to a shallow green. Be sure to avoid the two grass bunkers guarding the green as they’ll prove difficult to get up and down.
# 17 /
Par: 4
Handicaps:
Men's 4
Women's 4
Yardage by Tee:
BLACK 388
BLUE 372
WHITE 325
YELLOW 305
RED 244
Slope:
Black- 142 | Blue- Men 132 | Blue-Women 141 | White- Men 125 | White-Women 135 | Yellow- Men 114 | Yellow-Women 125 | Red-Men 104 | Red-Women 113 |
Pro Tips
The start of a tough two-hole stretch. Be sure the tee shot is down the left side of the fairway and an accurate approach into the narrow, deep green is key to avoid trouble left and right.
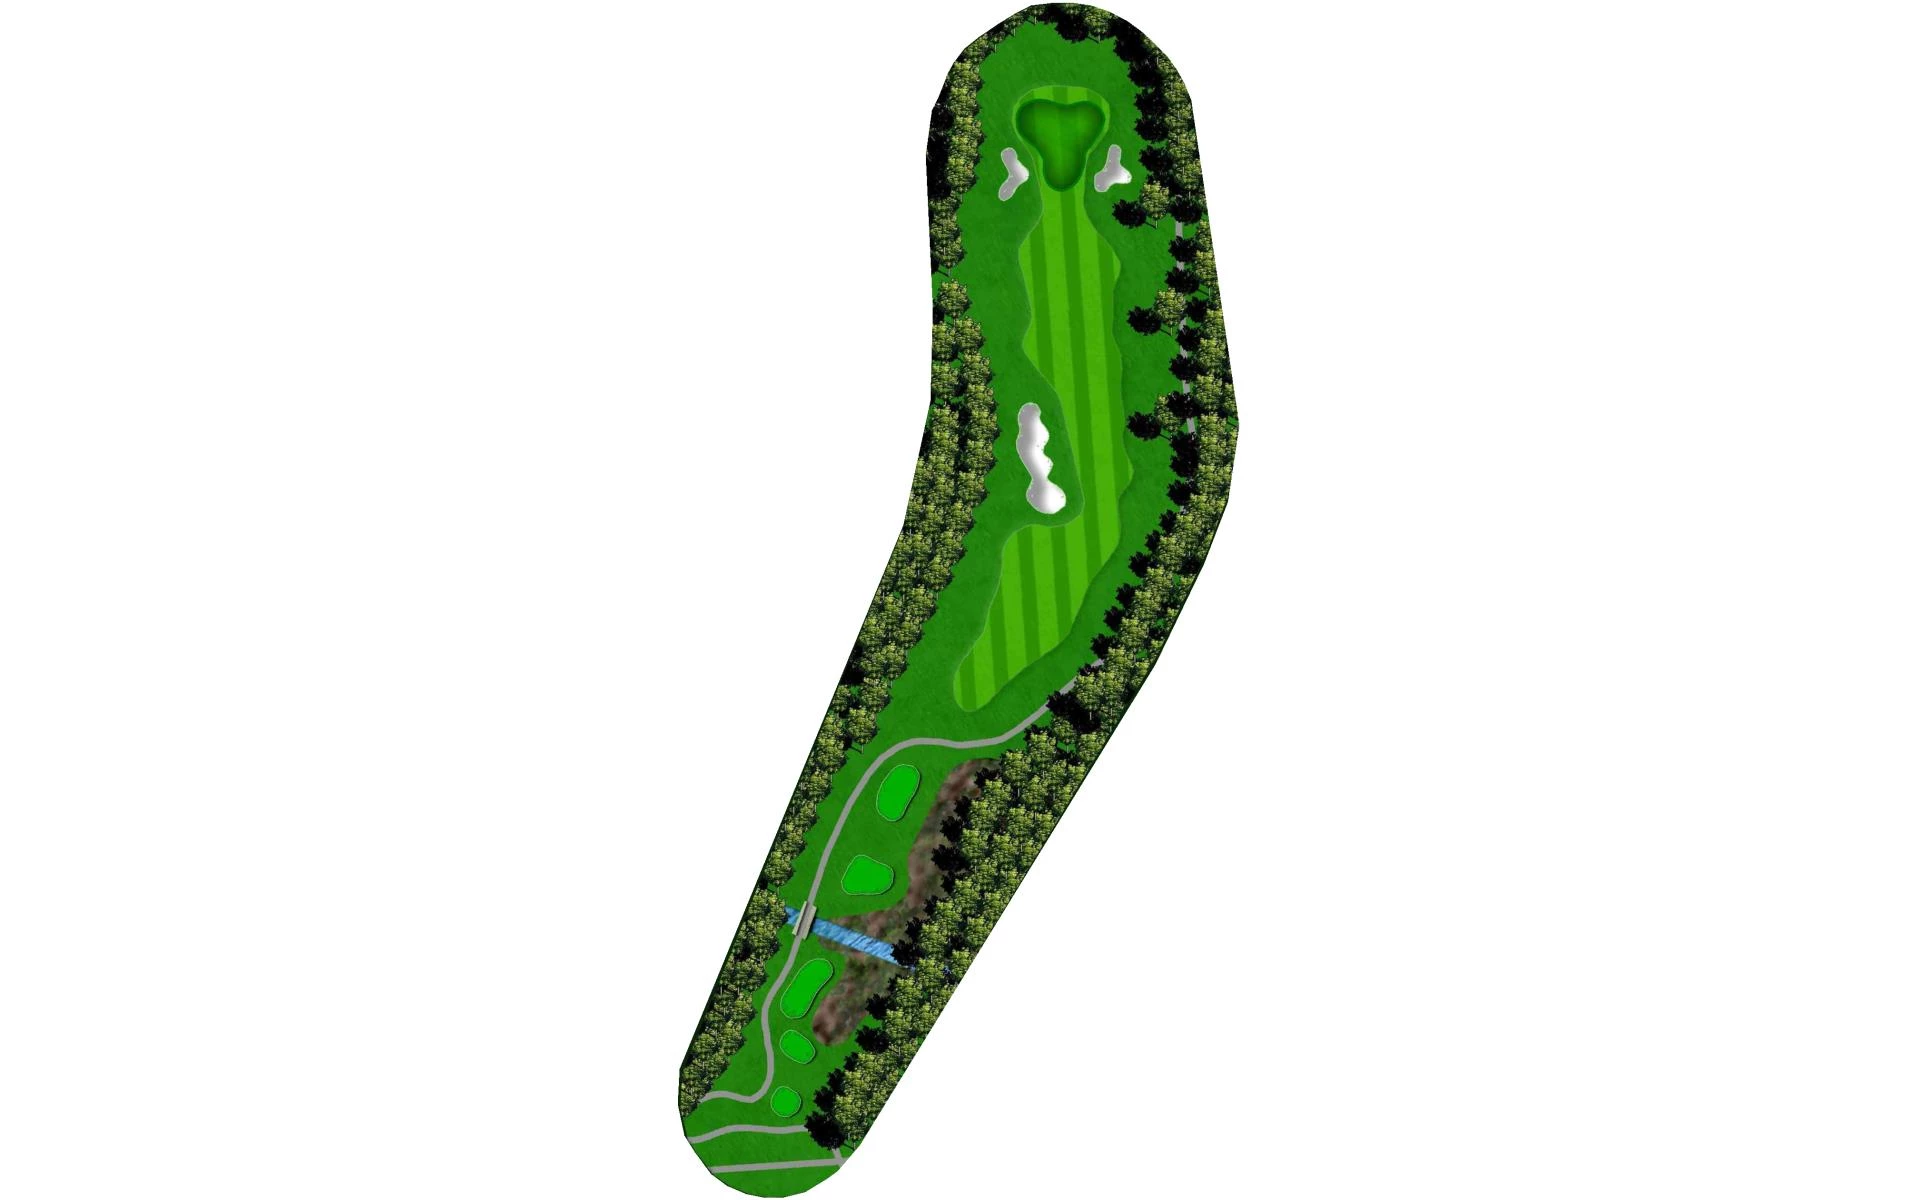
# 18 /
Par: 5
Handicaps:
Men's 8
Women's 2
Yardage by Tee:
BLACK 551
BLUE 528
WHITE 505
YELLOW 474
RED 351
Slope:
Black- 142 | Blue- Men 132 | Blue-Women 141 | White- Men 125 | White-Women 135 | Yellow- Men 114 | Yellow-Women 125 | Red-Men 104 | Red-Women 113 |
Pro Tips
Another Par 5 to finish the side. Three solid shots is typically needed to find this green where anything can happen to finish the round. Be sure to avoid the greenside bunker and hope to find a level lie in the fairway with the mounding and two-tiered fairway.